
Getting Started Guide


PayPal for Nonprots: Get Started Guide
2 January 2012
Get more out of your fundraising efforts by giving donors a convenient and safe way to contribute. Encourage
supporters to act by placing a Donate button prominently on your home page.
• Discounted rates for 501(c)(3) status
• Your donors don’t even need a PayPal account
• Accept all major credit cards
Receiving donations and selling fundraising merchandise online for your organization is easy with PayPal. In
this guide, we’ll review how you can:
• Sign up for a business account and verify your nonprofit status
• Create buttons and generate the related code for one-time and recurring donations and purchases
• Customize your payment pages to match the look and feel of your site (optional)
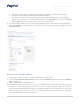
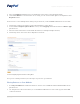
I. Set Up and Confirm a Business Account
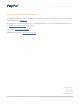
Go to www.paypal.com to set up a Business account, and click on the Business tab. Here’s what to expect:
Step What to Provide How Long it Takes
Sign up • Account/business owner’s
name, address and email
• Business name and address
• Customer service information
5–10 minutes
Confirm email address Email address used for sign-up 2 minutes
Add and confirm bank
account
• Bank name
• Account and routing numbers
• Name associated with account
3–5 days
If applicable, verify your
nonprofit status (only
for organizations with
501(c)(3)status)
• Evidence of tax-exempt status
• Bank statement or voided
check in your organization’s
name
• PayPal email account
• Contact information
• Description of your
organization and type of
payments it wants to accept
(such as donations and
merchandise payments)
3–5 business days
You can log in a day after signing up for
an account and submit items through
the Resolution Center.
Note: Once you’ve added a Donate
button to your nonprofit website, you
can begin accepting donations right
away. However, you won’t be able to
withdraw or transfer funds until your
nonprofit status has been verified.