
CPU Installation Guide

1
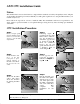
A929 CPU installation Guide
Notice:
This machine has been tested and found to comply with the standards set forth by the Quality Control. All parts
of the machine had undergone 24-hour reliability test. This guide explains how to setup the CPU and have your
machine ready for use.
Please follow the steps below on how to install the CPU. The manufacturer will not be responsible for any
direct, indirect, special, incidental or consequential damages arising from any defect and improper installation
of the CPU.
CPU Installation Procedure:
S
S
t
t
e
e
p
p
1
1
:
:
Before you begin, gently
place the machine upside
down. Loosen the three
screws to open the CPU
compartment:
S
S
t
t
e
e
p
p
3
3
:
:
Orient the CPU so that
pin 1 on the chip
corresponds to pin 1
(pinhole missing) on
the CPU socket. Insert
the processor into the
socket.
S
S
t
t
e
e
p
p
5
5
:
:
Then, lock the CPU
socket. The figure
shows the direction
for locking the CPU
socket.
S
S
t
t
e
e
p
p
4
4
:
:
For the opposite side,
repeat the procedures
indicated on
S
S
t
t
e
e
p
p
2
2
of
figure and
.
S
S
t
t
e
e
p
p
6
6
:
:
Put the heatsink over
the CPU and tighten
all four screws on each
side. Then place back
the CPU compartment
and secure with three
screws. This
completes the
installation for the
CPU.
S
S
t
t
e
e
p
p
2
2
:
:
Following figure
,
push the lock clip of the
CPU socket to release it.
Use the screwdriver to
unlock the opposite side
as shown in figure .
Insert the screwdriver
head to the gap and
gently shift the screw to
a 30-degree angle as
shown in figure .
*** The 4 screws are specially designed for the heatsink, do not use force or over- tighten the screws as
this may distress or damaged it.
-- Converted from Word to PDF for free at Fast PDF -- www.fastpdf.com --