
User`s guide


25
Chapter 3: BIOS Setup Utility
Using BIOS
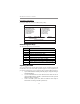
When you start the Setup Utility, the main menu appears. The main menu of the
Setup Utility displays a list of the options that are available. A highlight
indicates which option is currently selected. Use the cursor arrow keys to move
the highlight to other options. When an option is highlighted, execute the option
by pressing <Enter>.
Some options lead to pop-up dialog boxes that prompt you to verify that you
wish to execute that option. Other options lead to dialog boxes that prompt you
for information.
Some options (marked with a triangle
) lead to submenus that enable you to
change the values for the option. Use the cursor arrow keys to scroll through the
items in the submenu.
In this manual, default values are enclosed in parenthesis. Submenu items are
denoted by a triangle
.
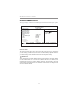
4 Download the Flash Utility and new BIOS file from the manufacturer’s
Web site. Copy these files to the system diskette you created in Step 3.
5 Turn off your computer and insert the system diskette in your
computer’s diskette drive. (You might need to run the Setup Utility and
change the boot priority items on the Advanced BIOS Features Setup
page, to force your computer to boot from the floppy diskette drive
first.)
6 At the A:\ prompt, type the Flash Utility program name and press
<Enter>.
7 Type the filename of the new BIOS in the “File Name to Program” text
box. Follow the onscreen directions to update the motherboard BIOS.
8 When the installation is complete, remove the floppy diskette from the
diskette drive and restart your computer. If your motherboard has a
Flash BIOS jumper, reset the jumper to protect the newly installed
BIOS from being overwritten.