User Guide CDM8975 090204_CDM8975_RAP_EN_REV02.indd 1 2009.2.
CHAPTER 2. BASIC OPERATION BASIC OPERATION ......................................................................... 16 TURNING THE PHONE ON/OFF ..................................................... 16 ACCESSING THE MENU ................................................................ 16 MENU SUMMARY ....................................................................... 17 MAKING A CALL ......................................................................... 19 ANSWERING CALLS ............................
Contents CHAPTER 6. MEDIA CENTER microSD ....................................................................................... 88 USING THE microSD CARD........................................................... 88 MEDIA CENTER.............................................................................. 89 MUSIC & TONES.......................................................................... 89 PICTURE & VIDEO ....................................................................... 93 GAMES ............
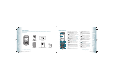
HANDSET DESCRIPTIONS 1 2 Standard Battery User Guide 3 15 4 14 5 6 7 13 12 11 8 10 9 Handset Battery Cover 6 Chapter 1 − Before Using 090204_CDM8975_RAP_EN_REV02.indd 6-7 QRG (Quick Reference Guide) Wall Charger 1. Earpiece: Allows you to hear the other caller. 2. Main Display Screen: Displays all the information needed to operate your phone. 3. [ ] Directional Key: Allows you to scroll through phone menu options and provides a shortcut to phone functions from idle mode. 4.
19 16 17 18 19 20 21 22 24 25 26 27 28 8 Chapter 1 − Before Using 090204_CDM8975_RAP_EN_REV02.indd 8-9 16. Front Display Screen: Displays incoming calls, messages, signal, battery strength, time and date. 17. [ ] Music Keys: Use for quick access to your music player to listen to your music. 18. External Speaker: Allows you to listen to music, sounds, ringtones or PTT conversations. 19. Wrist Strap Eyelet: Accessory eyelet (optional straps and lanyards - sold separately). 20.
Recent Call Icons Dialed Call All Sounds Off: Ringer volume is set to off. Received Call Alarm Only: Phone will alert you with an alarm tone. Vibrate Only: Phone will vibrate when call is received. Speakerphone: Speakerphone mode is active. Message Icons Missed Call New Contact Icons Multiple Message Pending Unread EMS Corrupt Message PTT Icons PTT Alert: The alert call is received. Mobile2 Picture Message Delivered Unread MMS PTT Call Ended: The PTT call is ended.
PTT Icons Before Using PTT Group Outgoing: Outgoing PTT group call. REMOVING THE BATTERY CHARGING YOUR BATTERY 1. To remove the battery, push down (1) on the top of the battery while inserting your finger into the slot and pulling up (2) from the back of the battery and slide it out. 1. To charge, open the Charging/Data Jack cover on the top left side of the phone, and connect the charger adapter. INSTALLING THE BATTERY PTT Group Offline: The PTT Group is Offline. 1.
Before Using CHAPTER 2 • Only use the battery and charger approved for use with this device. • Only use the battery for its original purpose. • Try to keep batteries in a temperature between 41 °F (5 °C) and 95 °F (35 °C). If the battery is stored in temperatures above or below the recommended range, give it time to warm up or cool down before using. • Store the discharged battery in a cool, dark and dry place. • Purchase a new battery when its operating time gradually decreases after fully charging.
Basic Operation ACCESSING THE MENU Your phone can be customized via the menu. Each function can be accessed by scrolling with the Directional Key or by pressing the number that corresponds with the menu item. 1. Press and hold the END Key until your display turns on. • If Enter Lock Code appears on the display, enter your 4-digit lock code to unlock your phone. • The default lock code is the last 4 digits of your Mobile Telephone Number. TURNING OFF 1.
Basic Operation 3RD DEPTH 5. All 6. Extras 6. View Timers 4. My Ringtones 1. Get New Ringtones 5. Media Center 1. Music & Tones 2. Picture & Video 3. Games 6. My Pictures 1. V CAST Music I Rhapsody 2. Get New Ringtones 3. My Ringtones 4. My Music 5. My Sounds 6. Sync Music 1. V CAST Videos 2. Get New Pictures 3. My Pictures 4. My Videos 5. Take Picture 6. Record Video 7. Online Album 1. Get New Applications 4. Mobile Web 5.
Basic Operation DISPLAY A MISSED CALL FROM IDLE MODE 1. Press the OK Key [MENU], select Recent Calls and press the OK Key. Depending on your phone’s settings, you may also answer incoming calls by opening the phone or by pressing any key. 2. To ignore incoming calls, press the Right Soft Key [Ignore]. With Auto w/ Handsfree, a call is automatically answered after a preset number of ring tones. For more details, see page 69. ENDING A CALL 1. Press the END Key.
Basic Operation 2. Scroll through the list by pressing or [PLAY] to listen to your selection. phone number is displayed. TURNING VIBRATE MODE ON OR OFF ADJUSTING THE VOLUME Vibrate Mode mutes the tones and activates an alert for an incoming call or message. ADJUSTING THE MASTER VOLUME 1. To activate, press and hold the Vibrate Mode Key 1. Press the Volume Keys up or down to select All Sounds Off, Alarm Only, Vibrate Only, Low, Medium Low, Medium, Medium High and High. 2.
PUSH TO TALK Note This chapter addresses and explains the basic features of your phone including: PUSH TO TALK CHAPTER 3 Push to Talk New contacts for PTT Contact list for PTT Groups for PTT Activating PTT PTT call types PTT calling basics Making a barge PTT call Making an alert PTT call Receiving a PTT call Returning a PTT call 24 Chapter 2 − Basic Operation 090204_CDM8975_RAP_EN_REV02.indd 24-25 2009.2.
26 Chapter 3 − Push to Talk 090204_CDM8975_RAP_EN_REV02.indd 26-27 speak at a time during Push to Talk calls. When using your phone keypad to make a Push to Talk call, you must enter the ten-digit phone number of the called party. Presence information may not be available for all Push to Talk contacts. The timeliness of presence information may be impacted by the network registration status of a Push to Talk contact.
3. Press the OK Key [ADD] and select the existing member. Press the OK Key [MARK] and then press the Left Soft Key [Done]. 3. Enter a new PTT group name and press the OK Key [SAVE]. ERASING GROUP ACTIVATING PTT ASSIGNING PHONE NUMBER TO GROUP 1. Press the OK Key [MENU], select Contacts and press the OK Key, scroll to PTT Groups and press the OK Key. PTT must be turned on in order for you to send and receive PTT calls and alerts. Follow the steps below to turn on PTT. 2.
Push to Talk 4. Press the END Key to end the call. 4. Press the END Key to end the call. 2. Press the Left Soft Key [Alert]. CALL TO GROUP MAKING AN ALERT PTT CALL 3. Press and release the PTT Key to alert the individual. The PTT Outgoing Alert will sound and Alerting appears on the display. 1. Press the PTT Key to access the PTT Contact List. PTT CALLING BASICS MAKING AN ALERT PTT CALL 2. Scroll to the group you want to call. 1. To talk, press and hold the PTT Key . 1.
Push to Talk RECEIVING ALERT CALL When you receive an Alert Call, the PTT Alert sounds and the Incoming Alert screen appears. The PTT Alert tone repeats every 5 seconds until it is answered or ignored. If you do not answer an incoming alert within 20 seconds, the PTT call will be automatically disconnected. 1. To answer the alert, press and hold the PTT Key to speak and release it to listen. 2. To ignore the alert, press the Right Soft Key [Ignore].
Memory Function 2. Press the Left Soft Key [Edit]. 1. Press the Right Soft Key [Contacts] and scroll to the contact to edit ringtone. ADDING A NEW CONTACT 3. Edit the information and press the OK Key [SAVE] to save. 2. Press the Left Soft Key [Edit]. STORING A PHONE NUMBER would like to edit. 1. Enter the phone number you want to save. ADDING OR CHANGING GROUPS 2. Press the Left Soft Key [Save]. To organize your Contacts into groups: 3. Scroll to Add New Contact and press the OK Key. 1.
Memory Function EDITING CONTACTS ENTRIES 3. Enter the phone number in the appropriate field. EDITING STORED PHONE NUMBERS DELETING A CONTACT ENTRY 4. Press the OK Key [SAVE]. 1. Press the Right Soft Key [Contacts]. Your Contacts display alphabetically. 1. Press the Right Soft Key [Contacts] and scroll to the contact to delete. 2. Select the Contact entry you want to edit and press the Left Soft Key [Edit]. 2. Press the Right Soft Key [Options], scroll to Erase and press the OK Key. 3.
Memory Function Key Key Functions listed by language. The limitation is 160 characters. Press the key labeled with the target letter once for the first letter press twice for the second letter and so on. Press and hold the key labeled with the target number for that number. Key English Abc: Press to change mode. [T9 Word][Abc][ABC][123][Symbols] Spanish . @ ? ! - , & : ' / and 1 Next: Press to view the next matching word in the predictive mode.
Memory Function CHAPTER 5 95, 96, 97, 98 and 99 : Speed Dial entries 95(#Warranty Center), 96(#DATA), 97(#BAL), 98(#MIN) and 99(#PMT) are already assigned to Verizon Wireless Account Information. MENU FUNCTION This chapter addresses accessing the menu and using its functions and features to customize your phone. THREE TOUCH DIALING: Press the first and second digits and press and hold the third digit of the number to dial.
or renamed. NEW CONTACT TO ADD NEW GROUP TO ADD A NEW NUMBER TO YOUR CONTACTS 1. Press the OK Key [MENU], select Contacts and press the OK Key, scroll to Groups then press the OK Key. For details on adding a new contact, see page 34. 2. Press the Left Soft Key [New]. 2. Scroll to the group to rename, press the Right Soft Key [Options], select Rename, then press the OK Key. 3. Enter the new group name and press the OK Key [SAVE]. ERASE GROUP 2.
PTT GROUPS 4. Scroll to Video and press the Left Soft Key [Videos]. Select the video and press the OK Key. PTT Groups allows you to classify phone entries into groups with up to 50 contacts in each group. For details on Restrictions, see page 67. 5. Enter the remaining message information and press the OK Key [SEND] or press the SEND Key. For detail on writing video message, see page 103. TO SEND A VOICE MESSAGE TO A GROUP 1.
6. Enter the information and press the OK Key [SAVE]. TO EDIT SAVED PERSONAL INFO EDIT MY NAME CARD TO CALL AN ASSIGNED EMERGENCY CONTACT 1. Press the OK Key [MENU], select Contacts and press the OK Key, scroll to My Name Card then press the OK Key. TO REASSIGN EMERGENCY CONTACTS 1. Press the OK Key [MENU], select Contacts and press the OK Key, scroll to In Case of Emergency then press the OK Key. 1.
Turn on Bluetooth on both devices (steps 1-4) and turn Discovery Mode to On. 1. Press the OK Key [MENU], select Contacts and press the OK Key, scroll to My Name Card then press the OK Key. 2. Press the Right Soft Key [Send]. 3. Scroll to Send by Bluetooth and press the OK Key. 4. With Add New Device selected, press the OK Key. The handset will prompt you with the following message on the LCD screen: PLACE DEVICE YOU ARE CONNECTING TO IN DISCOVERABLE MODE. Press the OK Key. 5.
Recent Calls • • • • • • • • • New TXT Message: Send a TXT message to the PTT contact. New Picture Message: Send a Picture message to the PTT contact. New Video Message: Send a Video message to the PTT contact. New Voice Message: Send a Voice message to the PTT contact. Save to Contacts: Store the phone number in your Contacts or PTT Contacts. Erase: Erase a call listing. Lock/Unlock: To lock or unlock a call listing. Erase All: Erase all Received call entries. View Timers: Display usage time.
• Save to Contacts: Store the phone number in your Contacts or PTT Contacts. • Details: View contact information stored in your Contact List. • Erase: Erase a call listing. • Lock/Unlock: To lock or unlock a call listing. • Erase All: Erase all All call entries. • View Timers: Display usage time. 4. Press the Left Soft Key [Message] to access the following options. • • • • TXT Message: Send a TXT message to the contact. Picture Message: Send a Picture message to the contact.
You do not need to input the passkey for pairing when the passkey of the Bluetooth® Headset or hands-free kit is 0000. 7. Connect to: (device name) will appear on screen. Select Yes and press the OK Key. 8. Once connected, you will see the device listed in the Bluetooth menu and the Bluetooth® device connected icon will appear at the top of the screen when connected to the Bluetooth® device. • In the Bluetooth menu, you can disconnect the connected device with an icon by pressing the OK Key [Drop].
SOUNDS SETTINGS EASY SET UP 1. Press the OK Key [MENU], select Settings & Tools and press the OK Key, scroll to Sounds Settings and press the OK Key, scroll to Easy Set Up and press the OK Key. 2. Select the ringer type and press the OK Key [SET]. To skip the step, press the Right Soft Key [Skip]. 3. Select the ringtone and press the OK Key [SET]. To listen to the ringtone, press the Left Soft Key [Play]. 4. Select the volume of the keypad and press the OK Key [SET]. 5.
2. Press the Directional Key up or down to set the volume and press the OK Key. KEYPAD VOLUME 1. Press the OK Key [MENU], select Settings & Tools and press the OK Key, scroll to Sounds Settings and press the OK Key, scroll to Keypad Volume and press the OK Key. 3. Scroll to On or Off and press the OK Key. DEVICE CONNECT Allows you to turn the Device Connect On or Off: DISPLAY SETTINGS EASY SET UP To set up display options using the Easy Set-Up Wizard: 1.
Banner and press the OK Key. 2. Scroll to Personal Banner and press the OK Key. 3. Enter the banner text (up to 16 characters) and press the OK Key. 1. Press the OK Key [MENU], select Settings & Tools and press the OK Key, scroll to Display Settings and press the OK Key, scroll to Banner and press the OK Key. Even if Always On is selected for the Backlight setting, the backlight will turn off when the phone is closed.
Settings RESET GRID MENU SETTINGS MENU FONT SIZE PHONE SETTINGS 1. Press the OK Key [MENU], select Settings & Tools and press the OK Key, scroll to Display Settings and press the OK Key, scroll to Main Menu Settings and press the OK Key. To set the menu font size: 2. Scroll to Replace Menu Items and press the OK Key. 2. Scroll to Reset Menu Settings and press the OK Key. 1.
4. Scroll to Reset Shortcut (1, 2, 3 or 4) or Reset My Shortcuts and press the OK Key. 3. Scroll to UP Directional Key, LEFT Directional Key or DOWN Directional Key and press the Right Soft Key [Options]. 4. Scroll to select the desired option and press the OK Key. 5. Scroll to Yes and press the OK Key. 4. Scroll to Reset (UP, LEFT or DOWN) Key or Reset Directional Keys and press the OK Key. The Download Application Alphabet option only appears when you have downloaded Brew Applications.
Language and press the OK Key. 2. Scroll to English or Español and press the OK Key. 1. Press the OK Key [MENU], select Settings & Tools and press the OK Key, scroll to Phone Settings and press the OK Key, scroll to Location and press the OK Key. 2. Scroll to access the following options and press the OK Key. • Location On: Your location is now available to the network. • E911 Only: Your location will be hidden from the network and applications, except for 911.
modify the Lock Code using the new Lock code within the Security menu. 2. Enter the four-digit lock code and press the OK Key. The default lock code is last 4 digits of your mobile telephone number. 3. Scroll to Phone Lock Setting and press the OK Key. 4. Scroll to access the following options and press the OK Key. • Unlocked: Phone is unlocked. • On Power Up: Phone will lock when it is turned on. LOCK PHONE NOW 1.
2. Scroll to select either TTY Full, TTY + Talk, TTY + Hear or TTY Off and press the OK Key. ONE TOUCH DIAL 1. Press the OK Key [MENU], select Settings & Tools and press the OK Key, scroll to Call Settings and press the OK Key, scroll to One Touch Dial and press the OK Key. 2. Scroll to select On or Off and press the OK Key. If One Touch Dial is disabled, speed dial numbers designated in your contacts will not function. MEMORY 2. Scroll to Phone Memory Usage and press the OK Key. SAVE OPTIONS 3.
1. Press the OK Key [MENU], select Settings & Tools and press the OK Key, scroll to Memory and press the OK Key, scroll to Phone Memory and press the OK Key. 3. Scroll to Yes and press the OK Key. CARD MEMORY Select this option to display Card Memory information and to delete or move files saved in Card Memory. Memory card must be inserted into the phone to perform these functions. CARD MEMORY USAGE To check the available Card Memory capacity, used capacity and total capacity: 1.
2. Scroll to Status and press the OK Key. 1. Press the OK Key [MENU], select Settings & Tools and press the OK Key, scroll to Phone Info and press the OK Key, scroll to Software Update and press the OK Key. 2. Scroll to Check New and press the OK Key. SET UP WIZARD To set up options using the Set Up Wizard: 1. Press the OK Key [MENU], select Settings & Tools and press the OK Key, scroll to Set Up Wizard and press the OK Key. 2. Select the call sounds ringer type and press the OK Key [SET].
GO TO Use the Go To command to open an application on your phone. You can say Go To by itself and be prompted to say the application name or you can skip the prompt by saying Go To followed by the application name. 1. You will hear Please say a command and the Voice Commands menu will be displayed. 2. Say Go To followed immediately by one of the Contacts, Recent Calls, Messaging, Media Center, Settings & Tools, Mobile Web, V CAST Videos or My Music.
2. Press the Right Soft Key [Settings], scroll to Sensitivity and press the OK Key. 3. Scroll to select Most Sensitive, Recommended or Least Sensitive and press the OK Key. ADAPTATION Voice Command is speaker independent, which means that no training or adaptation is required.
Input 8 and press the Directional Key right. Input 6 and press the Directional Key left. Input 4 and press the Directional Key down. Input 2 and press the International Dial Key to input (.). Input 5. And press the OK Key and you will see the answer (9.5). press the OK Key. Shortcut: In idle mode, press the Directional Key down Calendar. to access 11. Scroll to Vibrate and press the Directional Key left or right to turn Off or On. 3. Scroll to Appointment field and enter the appointment. 12.
RESETTING THE ALARM STOP WATCH 3. Scroll to Alarm and press the Directional Key left or right to turn On or Off. Measures elapsed time for activities. 5. Press the OK Key [STOP] to pause. USING THE STOP WATCH 6. Press the Left Soft Key [View] to review the results. 4. Scroll to Time and enter the time. Press the Left Soft Key for am/pm. 1. Press the OK Key [MENU], select Settings & Tools and press the OK Key, scroll to Tools and press the OK Key, scroll to Alarm Clock and press the OK Key. 5.
NOTEPAD ERASE SAVED MEMO MY VERIZON Your phone includes an internal notepad that can be used to compose and store reminders and notes. 1. Press the OK Key [MENU], select Settings & Tools and press the OK Key, scroll to Tools and press the OK Key, scroll to Notepad and press the OK Key. To access your Verizon account information: 2. Scroll to City and press the Directional Key left or right to select the city. Tools 3. Scroll to DST and press the Directional Key left or right to turn On or Off. 4.
MEDIA CENTER Note Your phone provides a unique feature -Media Center- that enables you to download ringtones, wallpapers, games and more from your network to your phone. Please contact your service provider for the availability of these services. MEDIA CENTER CHAPTER 6 Using the microSD card Music & Tones Picture & Video Games Mobile Web Browse & Download Extras Media center info 86 Chapter 5 − Menu Function 090204_CDM8975_RAP_EN_REV02.indd 86-87 2009.2.
REMOVING THE microSD CARD To remove the microSD card: microSD The microSD card is sold separately. INSTALLING THE microSD CARD 1. Open the microSD card slot. With the gold contacts facing up, insert the microSD card into the slot located on the lower right side of your phone. 2. Push the card in until it clicks into place. MEMORY CARD DETECTED will appear on the display. Close the microSD card slot.
Media Center 3. Scroll to Get New Applications and press the OK Key. 4. Scroll to Erase and press the OK Key. 4. Select the music (song or album) to purchase. Press the OK Key [Buy] to purchase. 4. Choose the application which you want to download from the list displayed on the screen. 5. Scroll to Yes and press the OK Key. 5. The confirming the purchase screen will display, Press the OK Key [Buy] to accept the terms.
3. Scroll to the sound and press the OK Key [PLAY] to play. 4. Press the OK Key [STOP] to stop playing. Press the Right Soft Key [Options] to access the following options. • DOWNLOADED or RECORDED SOUND: Send: Send the sound. To Online Album: Upload selected sound to picture server. Rename: Rename the sound’s title. Move: Move the selected sound to the other save location when a memory card is inserted. Lock/Unlock: Locks or unlock the selected sound. Erase: Erase a selected sound.
4. After connection and buffering occurs, the video clip begins. TO DOWNLOAD A VIDEO CLIP: 1. Press the OK Key [MENU], select Media Center and press the OK Key, scroll to Picture & Video and press the OK Key, scroll to V CAST Videos and press the OK Key. on the screen and press the OK Key. 4. Scroll to the desired option and press the OK Key. Select the desired number of uses with associated charge and press the OK Key. 5. After executing the downloaded application, download the picture.
3. Select Yes and press the OK Key. Color Effects Normal, Antique, Black & White, Negative Capture Mode Landscape, Portrait TAKE PICTURE Multishote Off, 4 ( 1. To access the camera, with the flip open, press the Side Camera Key . Sub Display 2. Focus on the object. 3. Press the Directional Key left or right to zoom in or out. (Except for the 1280X960 mode). Press the Right Soft Key [Options] to access the following options.
For favorites, page name and URL need to auto-populate. MOBILE WEB Now you can access news, sports, weather and Email from your phone. Mobile Web keeps you updated by providing access to up-to-date information such as news, sports, weather and stock quotes when you subscribe to Internet service with your service provider. Please contact your service provider for a list of available websites and service details. 1.
Media Center To download Applications: 1. Press the OK Key [MENU], select Media Center and press the OK Key, scroll to Extras and press the OK Key. 2. Select Get New Applications and press the OK Key. 3. Choose the application which you want to download from the list displayed on the screen. MEDIA CENTER INFO To view App. Memory, Phone Memory, View Log and Help information: 1. Press the OK Key [MENU], select Media Center and press the OK Key. 2. Press the Right Soft Key [Info]. 3. Scroll to App.
To PTT Contacts option appears only when the PTT Mode is set to On. WHEN A NEW MESSAGE ARRIVES 2. To display the message, scroll to View Now and press the OK Key. NEW MESSAGE TXT MESSAGE 1. Press the Left Soft Key [Message], scroll to New Message and press the OK Key, scroll to TXT Message and press the OK Key. 2. Enter the phone number and press the OK Key. Or press the Right Soft Key [Add] to access the following options. • From Contacts: Search for a phone number which is stored in the contacts list.
Messaging • • • • • • Save As Draft: Save the Video Message. Add Quick Text: Inserts already written sentences in the message. Priority Level: Set the level of the priority to High or Normal. Remove Video: Remove inserted video clip in Video field. Remove Name Card: Remove inserted name card in Name Card field. Cancel Message: Cancel message. As long as one field is complete in the Video Message, the message will be saved in the draft box.
Messaging Save Sound (MMS Sound): Save a sound to the My Sounds folder. Save Objects (EMS Save Objects): Save a graphic, sound, name card. Save Name Card: Save a name card to the contacts. Save Quick Text: Save received text msg to Quick Text. Lock/Unlock: Locks or unlock the TXT, Picture, Video or Voice message. Add To Contacts: Save a number to contacts. Add To PTT Contacts: Save number to PTT contacts. Extract Addresses: Extract all phone numbers, Email addresses and URLs from the received message.
3. Select either AIM, WL Messenger or Yahoo!® and press the OK Key. EMAIL Soft Key [Select]. 4. To chat with Internet Messenger users, follow the on-screen prompts and functions. ERASE MESSAGES ENTRY MODE TXT AUTO VIEW Set a default entry mode. For example, if Abc mode is the default, its icon will appear. 1. Scroll and select On or Off and press the OK Key. 1. Scroll and select T9 Word, Abc, ABC or 123 and press the OK Key. 1.
Messaging VOICEMAIL# 1. Enter a new voicemail number or edit voicemail number and press the OK Key. CALLBACK # Edit a default callback number so that the recipient can callback or reply. 1. Scroll and select On or Off and press the OK Key. 2. If On is selected, input a new callback number and press the OK Key. SIGNATURE Create a signature that can be automatically inserted at the end of all TXT, picture, video and voice messages. 1. To deactivate Signature, select None. 2.
SAFETY INFORMATION FOR WIRELESS HANDHELD PHONES READ THIS INFORMATION BEFORE USING YOUR HANDHELD PORTABLE CELLULAR TELEPHONE In August 1996, the Federal Communications Commissions (FCC) adopted RF exposure guidelines with safety levels for handheld wireless phones. Those guidelines are consistent with the safety standards previously set by both U.S. and international standards bodies: ANSI C95.
obey all signs and instructions. Sparks in such areas could cause an explosion or fire resulting in bodily injury or even death. POSTED FACILITIES Areas with a potentially explosive atmosphere are often, but not always, clearly marked.
Safety incorporates a sub-stantial margin of safety to give additional protection for the public and to account for any variations in measurements. HEARING AID COMPATIBILITY HAC FOR WIRELESS TELECOMMUNICATIONS DEVICES PCD’S COMMITMENT PCD believes that all of our customers should be able to enjoy the benefits of digital wireless technologies. We are committed to providing a selection of compatible devices for our customers who wear hearing aids.
Safety • Support needed research into possible biological effects of RF of the type emitted by wireless phones; • Design wireless phones in a way that minimizes any RF exposure to the user that is not necessary for device function; and • Cooperate in providing users of wireless phones with the best possible information on possible effects of wireless phone use on human health.
Safety 7. How can I find out how much radiofrequency energy exposure I can get by using my wireless phone? All phones sold in the United States must comply with Federal Communications Commission (FCC) guidelines that limit radiofrequency energy (RF) exposures. FCC established these guidelines in consultation with FDA and the other federal health and safety agencies. The FCC limit for RF exposure from wireless telephones is set at a Specific Absorption Rate (SAR) of 1.6 watts per kilogram (1.6 W/kg).
• FDA web page on wireless phones (http://www.fda.gov/cellphones) • Federal Communications Commission (FCC) RF Safety Program (http://www.fcc.gov/oet/rfsafety) • International Commission on Non-Ionizing Radiation Protection (http://www.icnirp.de) • World Health Organization (WHO) International EMF Project (http://www.who.int/emf) • National Radiological Protection Board (UK) (http://www.hpa.org.uk/radiation/) AVOID POTENTIAL HEARING LOSS.
• Consult the dealer or an experienced radio/TV technician for assistance. CAUTION: Changes or modification not expressly approved by the party responsible for Compliance could void the user’s authority to operate the equipment. Connecting of peripherals requires the use of grounded shielded signal cables. Safety 124 Chapter 8 − Safety and Warranty 090204_CDM8975_RAP_EN_REV02.
THE EXTENT OF THE COMPANY’S LIABILITY UNDER THIS WARRANTY IS LIMITED TO THE REPAIR OR REPLACEMENT PROVIDED ABOVE AND, IN NO EVENT, SHALL THE COMPANY’S LIABILITY EXCEED THE PURCHASE PRICE PAID BY PURCHASER FOR THE PRODUCT. ANY IMPLIED WARRANTIES, INCLUDING ANY IMPLIED WARRANTY OF MERCHANTABILITY OR FITNESS FOR A PARTICULAR PURPOSE, SHALL BE LIMITED TO THE DURATION OF THIS WRITTEN WARRANTY. ANY ACTION FOR BREACH OF ANY WARRANTY MUST BE BROUGHT WITHIN A PERIOD OF 18 MONTHS FROM DATE OF ORIGINAL PURCHASE.