Contents Welcome! 4 Open & Close the Display 5 Prior to Using Your Device 6 Remove and Replace the Back Cover 6 Insert and Remove the SIM Card 6 Insert and Remove the Memory Card 7 Formatting the Memory Card 7 Insert and Remove the Battery 8 Charge the Battery 8 Change Locale/Language 9 Device Controls 10 Phone Controls 12 Volume Controls 13 Wireless Controls 13 Display Controls 14 Mini Media Player Controls 14 Setting Up Your Device 15 Bluetooth® Technology Setup 15 Themes 16 Font Size 16 Backlighting 17 D
AutoText & Spelling 25 Type Special Characters 25 Using the Applications 26 Instant Messaging Sign On 26 Send an Instant Message 26 Switch Between IM Conversations 27 Phone Make a Phone Call 27 Use Bluetooth Hands-Free Headset or Car Kit 28 Answer a Phone Call 28 Add a Number to Your Speed Dial List 28 Checking Your Voice Mail 28 Change Your Phone Ringtone 29 Import Contacts from Your SIM Card 29 Text Messaging Send a Text Message 29 Picture Messaging Send a Multimedia Message 30 Send an Audio Postcar
Media Player Copy Music or Video to the Memory Card 42 Play Music or Video Using the Media Player 43 Listen Using Stereo Bluetooth Headset 43 Create a Playlist 44 Games 44 Calculator 45 Keyboard Shortcuts 46 Handling and Safety Precautions 47 Regulatory and Compliance Information 50 One Year Limited Warranty 53
Welcome! Thank you for buying the PV300G. Your device will open up a whole new way of communicating, staying organized and connecting to your world. Designed to seamlessly connect to wireless 3G networks, your PV300G delivers information to you faster than ever. An intuitive phone interface and Bluetooth compatibility are only the beginning. Effortlessly exchange instant messages, browse the Internet, and send multimedia messages. Capture the moments of your life with the 3.
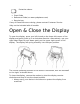
Protective sleeve • Start Guide • Reference Guide (on www.pcdphones.com) • Recycle bag If any of these items are missing, please contact Customer Service. *May not be included with all models. Open & Close the Display To open the display, press your left thumb on the lower-left corner of the display and gently push up in a clockwise direction. Alternatively, use your right index finger to push down gently on the upper-right corner of the display.
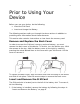
Prior to Using Your Device Before you use your device, do the following: • • Insert the SIM Card Insert and charge the Battery The following sections walk you through the above actions in addition to providing other information about these elements. This section also contains instructions on how insert the memory card. Remove and Replace the Back Cover In order to access the SIM card, memory card and battery, you must remove the back cover of the device. To do this, turn the device over.
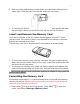
2. Hold card with gold contacts facing down and card notch facing to the upper right. Slide the card into the slot and push into place. 3. To remove the SIM card, use your finger to press down gently and slide the card right. When it’s free of the slot, lift the card to remove it. Insert and Remove the Memory Card Your device includes a slot for a Micro Secure Digital (microSD™) flash memory card. The memory card is not required for the device to function and can be inserted at any time.
2. The Memory Card screen displays the card space and format. You can use the Card Name field to give the card a unique identifier. 3. Select the Format Now button to format the card. This action will erase all card contents. Insert and Remove the Battery To replace your rechargeable battery, or if you need to insert or remove your SIM card, first you will need to remove the installed battery. Begin by powering down your device: 1. Press and hold the power button for three seconds to power down. 2.
2. Locate the battery charger that came in the box with your device. Insert the charger’s USB plug into your device’s USB port, which is next to the power button. Make sure the icon is on the top of the plug. Now plug the power cord into a standard electrical wall outlet. An orange charge indicator light will go on and a lightning bolt icon will appear over the battery icon in the title bar, indicating the charger is connected and the battery is charging.
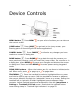
Device Controls MENU button – Press MENU the current screen. to open a list of actions you can take on JUMP button – Press JUMP to go back to the Jump screen, your starting point for launching all the device applications. CANCEL button – Press CANCEL made to a screen or dialog box. to dismiss any changes you have DONE button – Press DONE to go back through the screens you were previously viewing, until you reach the Jump screen.
LEFT and RIGHT SHOULDER buttons – The function of these buttons depends on which application you’re using. For example, while using the Camera, the right shoulder button captures a photo and when pressed halfway down, it focuses. While using the Phone, the left shoulder button toggles Mute and the right shoulder button toggles Speakerphone.
the memory card contents are not available for playing music or viewing photos via the device. To avoid the possibility of corrupting the file system on the memory card, follow your computer’s instructions on removing external hardware to safely remove the device from the computer. 9 Periodically back up your memory card onto your computer or removable media, to avoid possible loss of valuable photos, music, and videos. POWER ON/OFF button power the device on or off.
MICROPHONE – When you are using the phone, speak into the microphone, located by the DONE button. Volume Controls There are two ways you can open the volume controls: • • Press MENU + DONE to open the Sound Profile and Brightness control panels. With the Sound Profile panel highlighted, roll the trackball left or right to step through the volume levels. Left is louder, right is softer. (Read more in “Sound Profiles” on page 18.
2. Confirm the offline status by looking at the title bar; the radio tower icon and “OFF” should blink alternately. (See “Indicators” page 21 for icon definitions.) 3. To turn wireless back on, select Airplane Mode > Turn Wireless On. 9 Remember to turn wireless back on after landing so you can make and receive calls. Display Controls To adjust the display brightness, go to the Battery & Display settings screen: 1. Press MENU then select Settings > Battery & Display. 2.
To go to a specific place in a song or video, roll the trackball up, then select the progress bar at the top of the player. A slider opens: The row of bars is referred to as the “scrubber bar”. The highlighted bar indicates where you are in the currently-playing item. Roll the trackball right to fast forward, left to rewind. To close the scrubber bar, press DONE . Setting Up Your Device Bluetooth® Technology Setup Your device supports Bluetooth wireless technology Specification 2.
You can also use a Bluetooth stereo headset to listen to songs, videos, or game sounds. Bluetooth® Hands-Free Headset or Car Kit - To use a Bluetooth stereo/mono hands-free headset or car kit, do the following: 1. Press JUMP to go to the Jump screen. Press MENU and then select Bluetooth to open the submenu. Make sure Bluetooth features are “on”. 2. While you are in your car, make sure your hands-free headset or car kit is ready to pair by following the manufacturer’s instructions.
9 This font size setting does not affect the text size on pages viewed with the Opera Mini™ Web Browser. Backlighting As long as you are actively using your device, the backlight will stay on. After you stop using your device, the backlight will stay on for 15 seconds, but you can change this setting: 1. Press JUMP to go to the Jump screen. Press MENU then select Settings > Battery & Display. 2.
2. The control buttons lock and the key guard screen appears. 3. To unlock and wake the device, open the screen or press MENU + DONE . If you have set a privacy code, type it at the prompt. 9 To change the image displayed while in key guard mode, see “Use Photo for Caller ID or Key Guard Background” on page 42. 9 To turn on the backlight while in key guard or sleep, press the right shoulder button. By default, your device is set to enter key guard mode after two minutes of idle time.
Location Based Services Location Based Services (LBS) is an implementation of GPS technology that allows you to use the geographical position of your device for geotagging of photos and mapping functions. Once you turn GPS on, your device will automatically update your location at pre-set intervals. To turn GPS on: 1. Press JUMP then press MENU and select Location & Privacy. 2. Select GPS On: Show Location to show your location. Conversely, GPS Off: Hide location hides your location.
Application Customization You can set application-specific preferences using the Settings screens found within the applications. Some of application settings you can customize include: • • • Set your favorite Web home page (Opera Mini™ Web Browser). Select Photo Caller ID icons or photos (Phone/Address Book). Create your own categories and labels for contact information (Address Book). • Set different ringtones for callers (Phone/Address Book).
Indicators Wireless signal strength indicator – The number of signal bands showing to the right of the radio tower icon represents the strength of the signal at your current location. If you see an X flashing over the radio tower icon, you’ve temporarily lost your network connection and can make no calls. Service Connectivity indicators –connected to a 3G network –connected through EDGE or GPRS to a network ..
Communication services notifications – When you receive a new text, IM, MMS, or voice mail message, or when a Web page has finished loading, you’ll see a visual “balloon” notification move across the title bar, while you’re in any application except games.
Quick Find To search for an item on your device (such as a contact, message, note, task, event, song, photo, or video), use the Quick Find dialog. Note that for Multimedia messages, the To, CC, From, Date, and Subject fields are searched, not the message bodies. 1. From the Jump screen, press MENU and select Quick Find. 2. Type the name of the item or a date into the text field. You can use an asterisk (*) as a wildcard.
• • Jump to beginning/end of a word – Press ALT + D-Pad or trackball left/right. Jump to beginning/end of a line – Press MENU + trackball left/right. • Jump to beginning/end of the text box – Press MENU + / . Delete Text • • • Delete a character to the left of the cursor – Press DEL Delete a character to the right of the cursor – Press SHIFT + DEL Delete all the characters on one line – Press ALT + Cut, Copy, Paste, Undo To cut, copy, or paste text you have typed, do the following: 1.
Go to “AutoText & Spelling” (next section) to read about setting spell check options. Note that words containing numbers are never flagged as spelling errors. AutoText & Spelling To help you type accurately, the AutoText & Spelling screen provides control over the spell check function and allows you to customize rules that automatically correct common typing errors. You can add to, edit, or discard the AutoText rules that come with your device: 1. Press JUMP to go to the Jump screen.
Use the D-Pad or trackball to navigate through the list: left-right to flip through the Favorites, Recent, alphabet, and symbol sets; up-down to select specific characters. Press the trackball to insert a highlighted character. Here are some useful tips when using the Special Character selector: • • • • • With the selector open, you can show the same characters capitalized by pressing SHIFT + the character (like “a”). Toggle back to lowercase by pressing the letter again.
4. Type your message. When ready, press the Return key to send. Switch Between IM Conversations You can have up to 10 IM conversations open at the same time. You can switch between conversations quickly by doing one of the following: • From Menu – Press MENU + D to open the IM Conversations submenu, which lists all your open conversations. Scroll to highlight the conversation you want to open then press the trackball.
narrow your search. Highlight a number, then press SEND CALL to place the call. 2. To end your call, select the on-screen button , or press END CALL . Use Bluetooth Hands-Free Headset or Car Kit You can use a Bluetooth device to make or receive phone calls. To pair and set your headset or hands-free for use with the phone, read “Bluetooth Technology Setup” on page 15.
2. Press and hold the 1 key (the speed dial shortcut assigned to voice mail) to call your voice mailbox. 3. Follow the prompts to retrieve your messages. 4. To hang up, select , or press END CALL . 9 To check your voice mail from another phone, dial your mobile number and then press the star key (*) to interrupt the greeting. At the prompt, type your password. Change Your Phone Ringtone 1.
3. Address your message using the recipient’s phone number, or start typing their name to bring up Address Book matches. Add more recipients by typing a comma (,) or semicolon (;) in the To field. 4. Use the trackball to scroll to the message body; type your message or use one of the Prewritten Messages by selecting the button. Add Smileys by selecting the button. To attach a vCard, press MENU and select Attach vCard.
• Add a song or ringtone to your slide by selecting the “Add Audio” icon . Select a song/ringtone category from the audio selector list, then choose a specific song or ringtone from the pop-up menu. (Due to format and copyright limitations, not all ringtones available in other applications will be available as attachments to multimedia messages.) • Use the sec(s) pop-up menu to select how long you want the slide to play.
7. You can change the photo frame on the Compose Postcard Screen by using the trackball to select Click to change frame on the photo. Click DONE to return to the Compose Postcard screen 8. Press MENU to save your draft, select a new frame and/or photo or add more recipients. 9. When you are done editing your audio postcard, press MENU select Send. and Address Book Add a Contact to the Address Book You can store up to 2000 contacts in your Address Book and assign 50 of those as “favorites”. 1.
7. If a contact has multiple phone numbers, you can mark one of the numbers as Preferred for easy dialing from the Browse Contacts screen. 8. When finished, press DONE to save your new contact information. Assign a Contact as a “Favorite” You can assign 50 favorite contacts. A favorite contact is marked in the Browse Contacts screen with a heart . All your favorites are listed in the Favorites tab on the Browse Contacts screen.
2. The Contact Details screen lists all the information that you have stored for this contact: phone numbers, email addresses, IM screen names, and so on. 3. To open a communication with this contact, highlight the phone number or address of interest, then press the trackball to select it. A menu opens with relevant communication options. 4. Select the option to send the call, open a compose screen, or an IM conversation.
Opera Mini™ Web Browser Browse the Web 1. Press JUMP to go to the Jump screen. Scroll to highlight Browser then press the trackball. For first time use, you will need to read the Quick Tips for browsing and read and agree to the End User License Agreement. Highlight Accept and press the trackball. 2. The Opera Mini™ browser will open with 9 Speed Dial boxes. Click on the address bar (showing www.). Start typing the address of the Web page you wish to visit in the address toolbar.
• History – View a list of the websites you have visited recently on your PV300G • Saved Pages – View a list of saved pages • Downloads – View your downloads • Settings – Adjust how you view the websites • Find in Page – Type in a word or phrase to find on the website. • Help – Provides keyboard shortcuts, Learn More instructions and About Opera information. Settings The Settings menu under Toolbars allows you to change your browsing experience. 1. From the drop down menu, select Settings.
4. Name your alarm, time, repeat setting, and ring type. Check the box for Override Sound Profile if your phone is in Vibrate mode and you still want to hear the ring type selected. 5. Press DONE to save the alarm. It will now appear on the alarms tab. Timers 1. Press JUMP to go to the Jump screen. Scroll to highlight Planning then press the trackball to open the second-level ring of applications. Highlight Alarm Clock then press the trackball. 2. Use the trackball to highlight Timers. 3.
4. Press DONE to save the event. It will now appear on your Upcoming (if it’s scheduled within the next seven days), Daily, Week, or Month views. 5. To view your schedule, select one of the “Views” from the menu. Each view has a keyboard shortcut: • Upcoming MENU +0 • Day MENU +9 • Week MENU +8 • Month MENU +7 • Year MENU +6 • Trash MENU +T Notes Create a Note You can create and store up to 50 notes. Each note can be up to 8000 characters, which is about four pages in a paperback. 1.
Camera Your device comes with a built-in 3.2 megapixel photo/video camera with built-in flash and auto focus. You can store photos plus videos on your microSD™ card. The number you can store will depend on the capacity of the card and the size of the photos (Small, Medium, or Large) and length of the videos. Remember that you might be sharing the card’s capacity with sound files as well.
• giving you the option to rotate, crop, or reduce the photo and edit the item info. Note that for videos, you can only edit the item info. For information on how to send an album item(s), read “Send Media Files via Bluetooth, or MMS Message” on page 41. Take a Photo 1. Press JUMP to go to the Jump screen. Scroll to highlight Camera then press the trackball. 2. Press MENU and select Capture or simply press the right shoulder button . The screen now acts as the “viewfinder”.
Once the preview has disappeared, you can select to send the photo via Audio Postcard, Bluetooth and MMS. 9. To return to the album, select or press DONE . Capture Video Videos can only be stored on your memory card, so be sure you have a card inserted! 1. Press JUMP to go to the Jump screen. Scroll to highlight Camera then press the trackball. 2. Press MENU and select Capture, or simply press the right shoulder button . The screen now acts as the “viewfinder”. 3. Make sure you are in “Video mode”.
Use Photo for Caller ID or Key Guard Background You can assign the photos you’ve saved in one of your photo albums as a Caller ID or a key guard background image. To assign a photo as a Caller ID: Follow the instructions in “Add a Contact to the Address Book”, step 4, on page 32. To assign a photo as a key guard background image: 1. Press JUMP to go to the Jump screen, then press MENU Settings > Key Guard & Security. and select 2. Press the trackball with the Select Image pop-up highlighted.
example, you could create one folder for each album or artist. Use subfolders in the Video folder too if that helps you organize the files. 5. Copy audio or video files from your computer’s hard drive to your device’s mounted USB drive, in the folders under “Music” or “Video”, as appropriate. 6. When finished copying, close the USB drive window and “unmount” the drive as required by your computer. Remove the USB cable from your device and computer.
Create a Playlist You can create as many playlists as you wish and edit them at any time. 1. From the Media Player screen, select one of the top-level categories, then find a song, video, artist, album, genre, or composer you want in a playlist. 2. With the song, video, artist, album, genre, or composer highlighted, press MENU and select Add to Playlist > New Playlist. 3. Give your new playlist a name in the dialog box that opens. Press CREATE to save the playlist.
Calculator Your device comes with a Basic calculator and a Bill Splitter. To choose the tab you want, press the DPad left or right. On the Basic tab: 1. Using the keypad, enter the first number in your equation. 2. Use the trackball to highlight the function you want to perform (multiply, divide, add, subtract, etc.). Press the trackball to select. 3. Follow these steps until you have entered all the information. Use the trackball to highlight the = sign and press the trackball.
Keyboard Shortcuts Call a speed dial number Redial last number Answer an incoming call Ignore incoming call (call forwards) Hang up active call Mute your device when ringing Create a new note, message, event, task, to do, or contact Insert Unicode character Discard item Send a composed message Open latest unread message Delete all text in a single line Put device in key guard mode Unlock device Power device on/off Open Sound Controls Open mini music player Open Quick Jump menu Scroll page-by-page Fin
Handling and Safety Precautions The PV300G is a mobile computing device that may break if dropped, subjected to severe shock, or exposed to water. Please handle the device carefully and read the precautions listed below. These precautions provide essential information for the safe handling of the product and for the protection of the users and others from possible harm. ! During a call, the sound level on your device may vary, depending on how you are routing the sound.
• Check with your doctor if you have a pacemaker or hearing aid to make sure you can safely use the device’s cellular and Bluetooth radio frequencies. • Persons with pacemakers: - Should always keep the phone more than six inches from their pacemaker. - Should not carry the phone in a breast pocket. - Should use the ear opposite the pacemaker to minimize the potential for interference. - If you have any reason to suspect that interference is taking place, turn your phone off immediately.
- In direct sunlight - Locations or sites subject to strong vibration • Using this device for long periods of time (e.g., playing games) may harm your hands or eyes. For your health and safety, take a 10-15 minute break every hour. • If you have experienced seizures or blackouts that are caused by watching flashing lights, consult a doctor before using this device.
CAUTION IMPORTANT SAFETY INSTRUCTIONS. SAVE THESE INSTRUCTIONS DANGER TO REDUCE THE RISK OF FIRE OR ELECTRIC SHOCK, CAREFULLY FOLLOW THESE INSTRUCTIONS. FOR CONNECTION TO A SUPPLY NOT IN THE UNITED STATES, USE AN ATTACHMENT PLUG ADAPTER OF THE PROPER CONFIGURATION FOR THE POWER OUTLET. ! RISK OF EXPLOSION IF BATTERY IS REPLACED BY AN INCORRECT TYPE. DISPOSE OF USED BATTERIES ACCORDING TO THE FOLLOWING INSTRUCTIONS: BATTERY DISPOSAL THIS PRODUCT CONTAINS A LITHIUM-ION BATTERY.
Modifications not expressly approved by the manufacturer could void the user’s authority to operate the equipment. This transmitter must not be colocated or operated in conjunction with any other antenna or transmitter. This device complies with Part 15 of the FCC Rules. Operation is subject to the following two conditions: (1) this device may not cause harmful interference, and (2) this device must accept any interference received, including interference that may cause undesired operation.
States and Canada, the SAR limit for mobile devices used by the public is 1.6 watts/kg (W/kg) averaged over one gram of tissue. The FCC has granted an Equipment Authorization for this wireless device with all reported SAR levels evaluated as in compliance with the FCC RF emission guidelines. SAR information for this device is on file with the FCC and can be found under the Display Grant section of http://www.fcc.
professional may help you find results for your hearing device. The more immune your hearing aid is, the less likely you are to experience interference noise from mobile phones.
(e) Defects in appearance, cosmetic, decorative or structural items such as framing and non-operative parts; (f) Product damaged from external causes such as fire, flooding, dirt, sand, weather conditions, battery leakage, blown fuse, theft or improper usage of any electrical source.
SERVICE UNDER THIS WARRANTY OR LOSS OF USE DURING THE TIME THE PRODUCT IS BEING REPAIRED OR REPLACED. No person or representative is authorized to assume for the Company any liability other than expressed herein in connection with the sale of this product. Some states or provinces do not allow limitations on how long an implied warranty lasts or the exclusion or limitation of incidental or consequential damage so the above limitation or exclusions may not apply to you.