Contents Welcome! 4 Open & Close the Display 5 Prior to Using Your Device 6 Remove and Replace the Back Cover 6 Insert and Remove the SIM Card 6 Insert and Remove the Memory Card 7 Formatting the Memory Card 7 Insert and Remove the Battery 8 Charge the Battery 8 Device Controls 10 Phone Controls 12 Volume Controls 13 Wireless Controls 13 Display Controls 14 Mini Media Player Controls 14 Setting Up Your Device 15 Bluetooth® Technology Setup 15 Themes 16 Font Size 16 Backlighting 17 Device Privacy Code 17 Key
AutoText & Spelling 25 Type Special Characters 26 Using the Applications 26 Instant Messaging Sign On 26 Send an Instant Message 26 Switch Between IM Conversations 27 Phone Make a Phone Call 27 Use Bluetooth Hands-Free Headset or Car Kit 28 Answer a Phone Call 28 Add a Number to Your Speed Dial List 28 Checking Your Voice Mail 29 Change Your Phone Ringtone 29 Import Contacts from Your SIM Card 29 Text Messaging Send a Text Message 29 Picture Messaging Send a Multimedia Message 30 Send an Audio Postcar
Media Player Copy Music or Video to the Memory Card 42 Play Music or Video Using the Media Player 43 Listen Using Stereo Bluetooth Headset 43 Create a Playlist 44 Games 44 Calculator 45 Keyboard Shortcuts 46 Handling and Safety Precautions 47 Regulatory and Compliance Information 50 90 Day Limited Warranty 53
Welcome! Thank you for buying the PV300G. Your device will open up a whole new way of communicating, staying organized and connecting to your world. Designed to seamlessly connect to wireless 3G networks, your PV300G delivers information to you faster than ever. An intuitive phone interface and Bluetooth compatibility are only the beginning. Effortlessly exchange instant messages, browse the Internet, and send multimedia messages. Capture the moments of your life with the 3.
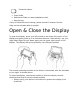
Protective sleeve • Start Guide • Reference Guide (on www.pcdphones.com) • Recycle bag If any of these items are missing, please contact Customer Service. *May not be included with all models. Open & Close the Display To open the display, press your left thumb on the lower-left corner of the display and gently push up in a clockwise direction. Alternatively, use your right index finger to push down gently on the upper-right corner of the display.
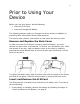
Prior to Using Your Device Before you use your device, do the following: • • Insert the SIM Card Insert and charge the Battery The following sections walk you through the above actions in addition to providing other information about these elements. This section also contains instructions on how insert the memory card. Remove and Replace the Back Cover In order to access the SIM card, memory card and battery, you must remove the back cover of the device. To do this, turn the device over.
2. Hold card with gold contacts facing down and card notch facing to the upper right. Slide the card into the slot and push to lock in place. 3. To remove the SIM card, use your finger to press down gently and slide the card right. When it’s free of the slot, lift the card to remove it. Insert and Remove the Memory Card Your device includes a slot for a Micro Secure Digital (microSD™) flash memory card. The memory card is not required for the device to function and can be inserted at any time.
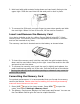
3. Select the Format Now button to format the card. This action will erase all card contents. Insert and Remove the Battery To replace your rechargeable battery, or if you need to insert or remove your SIM card, first you will need to remove the installed battery. Begin by powering down your device: 1. Press and hold the power button for three seconds to power down. 2. Remove the back cover following the steps on page 6. 3.
Now plug the power cord into a standard electrical wall outlet. An orange charge indicator light will go on and a lightning bolt icon will appear over the battery icon in the title bar, indicating the charger is connected and the battery is charging. If your device has discharged completely, it may take up to 15 minutes before you see any indication of charging on the screen. When the battery is fully charged, the indicator turns green. If any error occurs when charging, the indicator turns red. 2.
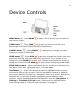
Device Controls MENU button – Press MENU the current screen. to open a list of actions you can take on JUMP button – Press JUMP to go back to the Jump screen, your starting point for launching all the device applications. CANCEL button – Press CANCEL made to a screen or dialog box. to dismiss any changes you have DONE button – Press DONE to go back through the screens you were previously viewing, until you reach the Jump screen.
LEFT and RIGHT SHOULDER buttons – The function of these buttons depends on which application you’re using. For example, while using the Camera, the right shoulder button captures a photo and when pressed half, it focuses. While using the Phone, the left shoulder button toggles Mute and the right shoulder button toggles Speakerphone.
the memory card contents are not available for playing music or viewing photos via the device. To avoid the possibility of corrupting the file system on the memory card, follow your computer’s instructions on removing external hardware to safely remove the device from the computer. 9 Periodically back up your memory card onto your computer or removable media, to avoid possible loss of valuable photos, music, and videos. POWER ON/OFF button power the device on or off.
MICROPHONE – When you are using the phone, speak into the microphone, located by the DONE button. Volume Controls There are two ways you can open the volume controls: • • + DONE to open the Sound Profile and Brightness Press MENU control panels. With the Sound Profile panel highlighted, roll the trackball left or right to step through the volume levels. Left is louder, right is softer. (Read more in “Sound Profiles” on page 18.
3. To turn wireless back on, select Airplane Mode > Turn Wireless On. 9 Remember to turn wireless back on after landing so you can make and receive calls. Display Controls To adjust the display brightness, go to the Battery & Display settings screen: 1. Press MENU then select Settings > Battery & Display. 2. Select the Brightness slider to open it for adjustment. Roll the trackball right to increase brightness; roll left to decrease. 3. Press the trackball to apply the setting.
The row of bars is referred to as the “scrubber bar”. The highlighted bar indicates where you are in the currently-playing item. Roll the trackball right to fast forward, left to rewind. To close the scrubber bar, press DONE . Setting Up Your Device Bluetooth® Technology Setup Your device supports Bluetooth wireless technology Specification 2.
Bluetooth® Hands-Free Headset or Car Kit - To use a Bluetooth stereo/mono hands-free headset or car kit, do the following: 1. Press JUMP to go to the Jump screen. Press MENU and then select Bluetooth to open the submenu. Make sure Bluetooth features are “on”. 2. While you are in your car, make sure your hands-free headset or car kit is ready to pair by following the manufacturer’s instructions. On your and select device, go into the Phone application. Press MENU Settings > Pairing. 3.
Backlighting As long as you are actively using your device, the backlight will stay on. After you stop using your device, the backlight will stay on for 15 seconds, but you can change this setting: 1. Press JUMP to go to the Jump screen. Press MENU then select Settings > Battery & Display. 2. In the Display Backlight group box, open the Dim after pop-up menu and select a timeout option, up to five minutes. The lower the time, the more battery power you will conserve. 3.
3. To unlock and wake the device, open the screen or press MENU DONE . If you have set a privacy code, type it at the prompt. + 9 To change the image displayed while in key guard mode, see “Use Photo for Caller ID or Key Guard Background” on page 42. 9 To turn on the backlight while in key guard or sleep, press the right shoulder button. By default, your device is set to enter key guard mode after two minutes of idle time.
Location Based Services Location Based Services (LBS) is an implementation of GPS technology that allows you to use the geographical position of your device for geotagging of photos and mapping functions. Once you turn GPS on, your device will automatically update your location at pre-set intervals. To turn GPS on: then press MENU and select Location & Privacy. 1. Press JUMP 2. Select GPS On: Show Location to show your location. Conversely, GPS Off: Hide location hides your location.
Application Customization You can set application-specific preferences using the Settings screens found within the applications. Some of application settings you can customize include: • • • • Set your favorite Web home page (Opera Mini™ Web Browser). Select Photo Caller ID icons or photos (Phone/Address Book). Create your own categories and labels for contact information (Address Book). Set different ringtones for callers (Phone/Address Book).
Indicators Wireless signal strength indicator – The number of signal bands showing to the right of the radio tower icon represents the strength of the signal at your current location. If you see an X flashing over the radio tower icon, you’ve temporarily lost your network connection and can make no calls. Service Connectivity indicators –connected to a 3G network –connected through EDGE or GPRS to a network ..
Sound Profile setting – When you have selected a sound profile that has sound turned off, the title bar will indicate whether you have flashing lights or vibration set for alerts or notifications. From left to right, the icons indicate: totally silent (no sound, no flashing lights, no vibration), flashing lights only, and vibration only.
Recent (recently-used applications) or Pending (messages you haven’t read yet). Note that you can use the shortcuts listed to go directly to that application or message. Quick Find To search for an item on your device (such as a contact, message, note, task, event, song, photo, or video), use the Quick Find dialog. Note that for Multimedia messages, the To, CC, From, Date, and Subject fields are searched, not the message bodies. 1. From the Jump screen, press MENU and select Quick Find. 2.
Use the control buttons and keyboard to navigate within a text box: • • Move character-by-character – Press the D-Pad or roll the trackball left/right. Jump to beginning/end of a word – Press ALT + D-Pad or trackball left/right. Jump to beginning/end of a line – Press MENU + trackball left/right. • Jump to beginning/end of the text box – Press MENU • + / .
With the focus in the text field, press MENU then select Edit Text > Check Spelling, or simply press MENU + S. 1. If you have spelling errors, a pop-up will offer spelling suggestions for each error. Select the word replacement, Ignore the word, or Add the word to “My Dictionary”. Go to “AutoText & Spelling” (next section) to read about setting spell check options. Note that words containing numbers are never flagged as spelling errors.
Type Special Characters To type special characters, including unicode characters, in any text box, press the SYM key. The Special Character selector opens. Use the D-Pad or trackball to navigate through the list: left-right to flip through the Favorites, Recent, alphabet, and symbol sets; up-down to select specific characters. Press the trackball to insert a highlighted character.
1. Press JUMP to go to the Jump screen. Scroll to highlight Instant Messaging then press the trackball. Select the IM application. 2. Sign on with your username and password; the screen listing all your IM friends’ usernames displays. 3. To start a conversation with a friend on your list, scroll to highlight the friend’s username then press the trackball to start a conversation. 4. Type your message. When ready, press the Return key to send.
to place the call. To switch back to using the embedded dial pad to type numbers, select . • Dial using a list of recently-dialed numbers – From the Phone screen, highlight then select . If the number you want to call is on the list, highlight it with the trackball, then press SEND CALL . • Dial by finding a contact’s number from your Address Book – From the Phone screen, highlight then select . Start typing a name to narrow your search. Highlight a number, then press SEND CALL to place the call. 2.
5. To dial using the shortcut, from either the Phone application or the Jump screen, simply press and hold the number on the keyboard. Checking Your Voice Mail 1. Press JUMP to go to the Jump screen then press the trackball to open the Phone application. 2. Press and hold the 1 key (the speed dial shortcut assigned to voice mail) to call your voice mailbox. 3. Follow the prompts to retrieve your messages. 4. To hang up, select , or press END CALL .
Send a Text Message 1. Press JUMP to go to the Jump screen. Scroll to highlight Phone Messaging then press the trackball to open the second-level ring of applications. Highlight Text Messaging then press the trackball. 2. Press MENU + N to open a message Compose screen. 3. Address your message using the recipient’s phone number, or start typing their name to bring up Address Book matches. Add more recipients by typing a comma (,) or semicolon (;) in the To field. 4.
• Add a photo or video by selecting the “Add Photo or Video” icon . Your Browse Albums screen opens, where you can select one photo or video. Select the item to attach it to the slide. • Add a voice recording by selecting the “Add Audio” icon . Select Record from the audio selector list that opens and begin the voice recording. Speak into the microphone (next to the DONE button). When finished, select DONE to attach it to your slide.
4. The Select Picture Frame screen appears. Use D-pad left and right to change the postcard frame. You can also D-pad up and down to zoom. Click DONE when you are finished. 5. On the Compose Postcard screen click the Add Voice Note button to add a voice message to your Audio Postcard. By default, the Start Recording button is selected. You can record a message up to 20 seconds long. Click Stop Recording to end your recording. To preview your recording, click the play button.
• To capture a new photo, press . Press again to capture, then DONE to save the photo. Press DONE again to view the album . contents. Select the photo. Press DONE A smaller version of the photo now appears on the Identity screen and will be used to identify that contact on incoming call notifications. 5. When finished with the Identity screen, select DONE . You advance to the next New Contact screen, in which you can type or select additional contact information. 6.
Communicate with a Contact From the Address Book’s Browse Contacts screen, highlight a contact, then press and hold the trackball. A menu opens that lists all the communication options available for that contact. Select the action you want to take. Alternatively, you can quickly dial the contacts preferred number by pressing the green call button directly from the Browse Contacts screen.
1. Press JUMP to go to the Jump screen. Scroll to highlight Address Book then press the trackball. 2. Scroll to highlight the contact whose vCard you want to send, then press MENU and select vCard > Send Contact’s vCard via > Text, MMS, or Bluetooth. For MMS and Text, a compose screen opens. For Bluetooth, a dialog opens that allows you to select the receiving device. Opera Mini™ Web Browser Browse the Web 1. Press JUMP to go to the Jump screen. Scroll to highlight Browser then press the trackball.
• • • Exit Icon – To exit the browser and return to the Jump screen. + Tab – Shown in the upper right hand corner, highlight the + sign to open a new web tab. You can surf another website on your new tab. Drop Down Arrow – Located under the Forward Arrow: • Bookmarks – View a list of your bookmarked sites. Also when on a site other than the home page, you can add select + sign to add the current site as a bookmarked site.
Alarm Clock The Alarm Clock feature has alarms, timers, and stopwatches. Alarms 1. Press JUMP to go to the Jump screen. Scroll to highlight Planning then press the trackball to open the second-level ring of applications. Highlight Alarm Clock then press the trackball. 2. Use the trackball to highlight Alarms. 3. Press MENU + N to open the New Alarm screen. 4. Name your alarm, time, repeat setting, and ring type. 5. Press DONE to save the alarm. It will now appear on the alarms tab. Timers 1.
1. Press JUMP to go to the Jump screen. Scroll to highlight Planning then press the trackball to open the second-level ring of applications. Highlight Calendar then press the trackball. 2. Press MENU + N to open an Event Details screen. 3. Name your event, type a location, assign a duration time, add reminders, repetitions, and notes as applicable. 4. Press DONE to save the event. It will now appear on your Upcoming (if it’s scheduled within the next seven days), Daily, Week, or Month views. 5.
Camera Your device comes with a built-in 3.2 megapixel photo/video camera with built-in flash and auto focus. You can store photos plus videos on your microSD™ card. The number you can store will depend on the capacity of the card and the size of the photos (Small, Medium, or Large) and length of the videos. Remember that you might be sharing the card’s capacity with sound files as well.
• giving you the option to rotate, crop, or reduce the photo and edit the item info. Note that for videos, you can only edit the item info. For information on how to send an album item(s), read “Send Media Files via Bluetooth, or MMS Message” on page 41. Take a Photo 1. Press JUMP to go to the Jump screen. Scroll to highlight Camera then press the trackball. 2. Press MENU and select Capture or simply press the right shoulder button . The screen now acts as the “viewfinder”.
Once the preview has disappeared, you can select to send the photo via Audio Postcard, Bluetooth and MMS. or press DONE . 9. To return to the album, select Capture Video Videos can only be stored on your memory card, so be sure you have a card inserted! 1. Press JUMP to go to the Jump screen. Scroll to highlight Camera then press the trackball. 2. Press MENU and select Capture, or simply press the right shoulder button . The screen now acts as the “viewfinder”. 3. Make sure you are in “Video mode”.
Use Photo for Caller ID or Key Guard Background You can assign the photos you’ve saved in one of your photo albums as a Caller ID or a key guard background image. To assign a photo as a Caller ID: Follow the instructions in “Add a Contact to the Address Book”, step 4, on page 32. To assign a photo as a key guard background image: 1. Press JUMP to go to the Jump screen, then press MENU and select Settings > Key Guard & Security. 2. Press the trackball with the Select Image pop-up highlighted.
example, you could create one folder for each album or artist. Use subfolders in the Video folder too if that helps you organize the files. 5. Copy audio or video files from your computer’s hard drive to your device’s mounted USB drive, in the folders under “Music” or “Video”, as appropriate. 6. When finished copying, close the USB drive window and “unmount” the drive as required by your computer. Remove the USB cable from your device and computer.
Create a Playlist You can create as many playlists as you wish and edit them at any time. 1. From the Browse Library screen, select one of the top-level categories, then find a song, video, artist, album, genre, or composer you want in a playlist. 2. With the song, video, artist, album, genre, or composer highlighted, press MENU and select Add to Playlist > New Playlist. 3. Give your new playlist a name in the dialog box that opens. Press to save the playlist.
Calculator Your device comes with a Basic calculator and a Bill Splitter. To choose the tab you want, press the DPad left or right. On the Basic tab: 1. Using the keypad, enter the first number in your equation. 2. Use the trackball to highlight the function you want to perform (multiply, divide, add, subtract, etc.). Press the trackball to select. 3. Follow these steps until you have entered all the information. Use the trackball to highlight the = sign and press the trackball.
Keyboard Shortcuts Call a speed dial number Redial last number Answer an incoming call Ignore incoming call (call forwards) Hang up active call Mute your device when ringing Create a new note, message, event, task, to do, or contact Insert Unicode character Discard item Send a composed message Open latest unread message Delete all text in a single line Put device in key guard mode Unlock device Power device on/off Open Sound Controls Open mini music player Open Quick Jump menu Scroll page-by-page Fin
Handling and Safety Precautions The PV300G is a mobile computing device that may break if dropped, subjected to severe shock, or exposed to water. Please handle the device carefully and read the precautions listed below. These precautions provide essential information for the safe handling of the product and for the protection of the users and others from possible harm. ! During a call, the sound level on your device may vary, depending on how you are routing the sound.
to observe this instruction may lead to suspension or denial of cellular telephone services to the offender, or legal action, or both. • Check with your doctor if you have a pacemaker or hearing aid to make sure you can safely use the device’s cellular and Bluetooth radio frequencies. • Persons with pacemakers: - Should always keep the phone more than six inches from their pacemaker. - Should not carry the phone in a breast pocket.
• Never use or store your device in the following locations: - Anywhere it may be exposed to water (e.g., bathroom, sauna) - Conditions of high humidity (e.g., rain or fog) - Conditions of extreme high temperatures (e.g., near fire, in a sealed car) - In direct sunlight - Locations or sites subject to strong vibration • Using this device for long periods of time (e.g., playing games) may harm your hands or eyes. For your health and safety, take a 10-15 minute break every hour.
• It is normal for the battery charger to become warm when charging. Disconnect the battery charger from the outlet when not in use. • Never attempt to disassemble or repair a battery charger, power supply cables, or plugs, because doing so exposes you to electric shock. CAUTION IMPORTANT SAFETY INSTRUCTIONS. SAVE THESE INSTRUCTIONS DANGER TO REDUCE THE RISK OF FIRE OR ELECTRIC SHOCK, CAREFULLY FOLLOW THESE INSTRUCTIONS.
equipment off and on, the user is encouraged to try to correct the interference by one or more of the following measures: • Reorient or relocate the receiving antenna. • Increase the separation between the equipment and receiver. • Connect the equipment into an outlet on a circuit different from that to which the receiver is connected. • Consult the dealer or an experienced radio/TV technician for help.
The available scientific evidence does not show that any health problems are associated with using low power wireless devices. There is no proof, however, that these low power wireless devices are absolutely safe. Low power Wireless devices emit low levels of radio frequency energy (RF) in the microwave range while being used. Whereas high levels of RF can produce health effects (by heating tissue), exposure to low-level RF that does not produce heating effects causes no known adverse health effects.
M-Ratings: Phones rated M3 or M4 meet FCC requirements and are likely to generate less interference to hearing devices than phones that are not labeled. M4 is the better/higher of the two ratings. T-Ratings: Phones rated T3 or T4 meet FCC requirements and are likely to be more usable with a hearing device’s telecoil (“T Switch” or “Telephone Switch”) than unrated phones. T4 is the better/higher of the two ratings. (Note that not all hearing devices have telecoils in them.
This Warranty extends only to consumers who purchase the product in the United States or Canada and it is not transferable or assignable. This Warranty does not apply to: (a) Product subjected to abnormal use or conditions, accident, mishandling, neglect, unauthorized alteration, misuse, improper installation or repair or improper storage; (b) Product whose mechanical serial number or electronic serial number has been removed, altered or defaced.
THE EXTENT OF THE COMPANY’S LIABILITY UNDER THIS WARRANTY IS LIMITED TO THE REPAIR OR REPLACEMENT PROVIDED ABOVE AND, IN NO EVENT, SHALL THE COMPANY’S LIABILITY EXCEED THE PURCHASE PRICE PAID BY PURCHASER FOR THE PRODUCT.ANY IMPLIED WARRANTIES, INCLUDING ANY IMPLIED WARRANTY OF MERCHANTABILITY OR FITNESS FOR A PARTICULAR PURPOSE, SHALL BE LIMITED TO THE DURATION OF THIS WRITTEN WARRANTY. ANY ACTION FOR BREACH OF ANY WARRANTY MUST BE BROUGHT WITHIN A PERIOD OF 18 MONTHS FROM DATE OF ORIGINAL PURCHASE.