PDI Communication Systems 26” and 32” Healthcare LCD TV User Manual Models PDI-CV2600 PDI-CV3200 1 Document Number: Number: PD196-167R2 PD196-167R2 Document
Healthcare Grade Television The PDI Healthcare series television is specifically designed for installation and use in a healthcare environment. The TV’s special design and safety features have been investigated by the Underwriters Laboratory and Listed for use in Hospitals, Nursing Facilities, Dialysis Clinics, and similar healthcare services.
IMPORTANT SAFETY INSTRUCTIONS 1. Read these instructions. 2. Keep these instructions. 3. Heed all warnings. 4. Follow all instructions. 5. Do not use this apparatus near water. 6. Clean only with dry cloth. 7. Do not block any ventilation openings. Install in accordance with the manufacturer’s instructions. 8. Do not install near any heat sources such as radiators, heat registers, stoves, or other apparatus (including amplifiers) that produce heat. 9.
OPTIONAL ACCESSORIES The following optional accessories are available for your PDI Healthcare television. Patient Remotes Programming Remotes POWER POWER SETUP MUTE TV/FM TV/AV CH LIST POWER MUTE SLEEP LAST CH 1 3 2 OK 4 5 6 8 9 VOL VOL OK TV/AV 7 CH 0 Page Up SSM PSM SAP 1 2 3 4 5 6 7 8 9 0 * CH VOL Page Down MTS/SAP. 1 2 3 PSM. CC.
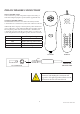
PILLOW SPEAKER CONNECTIONS PILLOW SPEAKER STYLES Control of the TV is possible using either a single-button Analog or multi-button Digital style pillow speaker (neither supplied with TV). TV PILLOW SPEAKER WIRING The PDI Healthcare television series utilizes the industry standard 3-wire interface via a 1/4 inch stereo jack located on the back of the TV. Additionally, the TV employes a universal pillow speaker interface that can be configured to operate with many different model pillow speakers.
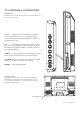
TV CONTROLS & CONNECTIONS TV Controls Standard TV controls are located on the TV’s lower right cabinet side. Basic control is provided. TV/AV Switches the TV between various Enabled Sources. Press the button once to verify the current sources. Press the button additional times to advance to the next active source. CC Closed Caption (Sub-Title) control. Press the button once to verify the current Closed Caption mode. Press the button additional times to advance to the next Closed Caption Mode.
TV Connectors ANT TV/FM ) &RQQHFWRU LQSXW MDFN IRU WKH KRVSLWDO FDEOH 79 VLJQDO 127( )0 UDGLR FKDQQHOV DUH DOVR UHFHLYHG RQ WKLV LQSXW 03(* 8SJUDGH 86% 3RUW IRU VHUYLFH XVH RQO\ CLONING 86% 3RUW IRU FORQLQJ WKH 79 7KH 79 FDQ EH SURJUDPPHG FORQHG IURP LQIRUPDWLRQ VWRUHG RQ D 86% )ODVK 'ULYH IN - L, R &RPSRQHQW /HIW DQG 5LJKW DXGLR LQSXW MDFNV IN - Y, PB, PR &RPSRQHQW 9LGHR LQSXW MDFNV ,1 &RPSRVLWH &RPSRVLWH 9LGHR LQSXW MDFN ,1 6 9LGHR 6 9LGHR 9LGHR LQSXW MDFN IN - L, R /H
Programming the TV SETUP Connect the TV to a Cable TV signal before proceeding. Verify the handheld remote control operates the TV. 1. Press the setup button on the remote. 2. From the Setup menu, select Channels. ■ ■ ■ ■ ■ ■ ■ ■ Service Level Picture Sound Channels Features OSD Language Sources FM Radio Free ▶ ▶ ▶ ▶ English ▶ ▶ Position: ST Exit: SETUP Next: WX Channel Setup 3. In the Channels menu, select Signal. Set the signal to one appropriate to your healthcare facility.
Pillow Speaker Sound Setup SETUP Proper setup of the TV’s Sound is required for use with a wired Pillow Speaker. Setup involves disabling the TV’s internal speakers and then setting the audio level to the pillow speaker. 1. Press the setup button on the handheld programming remote control. 2. From the Setup menu, select Sound.
Programming the TV’s FM Radio Connect the TV to a Cable TV signal before proceeding. Verify the handheld remote control operates the TV. 1. Press the setup button on the remote. 2. From the Setup menu, select FM Radio. NOTE: if the FM Radio item is non-selectable, enable FM Radio in the Sources menu first. SETUP ■ ■ ■ ■ ■ ■ ■ ■ Service Level Picture Sound Channels Features OSD Language Sources FM Radio Free ▶ ▶ ▶ ▶ English ▶ ▶ Position: ST Exit: SETUP Next: WX FM Radio Setup 3.
Troubleshooting Problem CHECK ವ ವ No Picture and No Sound ವ ವ No Picture, Sound OK ವ Picture OK, No Sound ವ ವ ವ ವ Ensure the TV is connected to a powered AC outlet. The TV’s front lamp will glow Red when correctly connected to power. Operate the TV directly by pressing the TV’s POWER button located on the side of the cabinet.
Cloning the TV - Saving Settings The TV settings can be saved to a USB Flash Drive and then used to program another television. A specially prepared USB Flash Drive (not supplied) is required. Please contact PDI to purchase this optional item. SAVING A TV’S SETTINGS 1. Turn the TV On and insert the USB Flash Drive into the Cloning USB Slot located on the back of the TV. A Cloning Main Menu will appear when the Drive is properly installed. 2. From the Cloning Main Menu, select Save Settings to USB.
Cloning the TV - Restoring Settings A TV settings once saved to a USB Flash Drive and then be used to program another television. A specially prepared USB Flash Drive (not supplied) is required. Please contact PDI to purchase this optional item. RESTORE A TV’S SETTINGS 1. Turn the TV On and insert the USB Flash Drive into the Cloning USB Slot located on the back of the TV. A Cloning Main Menu will appear when the Card is properly installed. 2. From the Cloning Main Menu, select Restore Settings to TV.
TV Menu Navigation Color Temperature SETUP ■ ■ ■ ■ ■ ■ ■ ■ Service Level Picture Sound Channel Setup Features OSD Language Source Setup FM Radio Picture Free ▶ ▶ ▶ ▶ English ▶ ▶ ■ ■ ■ ■ ■ ■ ■ ■ Brightness Contrast Color Tint Color Temp Sharpness PC Analog/HDMI Picture Component Input Picture 50 50 50 50 ▶ 50 ▶ ▶ ■ ■ ■ ■ ■ Standard Reddish Greenish Blueish User R G B Position: ST Exit: SETUP Position: ST Exit: SETUP Next: WX Position: ST Exit: SETUP Next: WX Sound ■ ■ ■ ■ ■ ■ ■ ■ Balance Mi
TV Menu Navigation- continued SETUP ■ ■ ■ ■ ■ ■ ■ ■ Service Level Picture Sound Channel Setup Features OSD Language Source Setup FM Radio Clear Service Level Free ▶ ▶ ▶ ▶ English ▶ ▶ Position: ST Exit: SETUP Next: WX Programmed ▶ Blank ▶ Blank ▶ ■ Confirmation Position: ST Exit: SETUP Next: WX Exit: SETUP Channel Setup ■ ■ ■ ■ ■ ■ ■ ■ ■ Signal Auto Program Add/Delete Channels Clear Service Level Copy Service Level Parental Control Power On Channel Channel Lock Channel Memory Override Position: S
TV Menu Navigation- continued Digital Captions SETUP ■ ■ ■ ■ ■ ■ ■ ■ Service Level Picture Sound Channel Setup Features OSD Language Source Setup FM Radio Position: ST Exit: SETUP Features Free ▶ ▶ ▶ ▶ English ▶ ▶ Next: WX ■ ■ ■ ■ ■ ■ ■ ■ ■ ■ ■ ■ ■ Power On Caption Mode Auto Power On Power Management Bed A/B Caption Text Modes Digital Captions Digital Mode Time Setup Diagnostics Channel Up Power Off Channel to other Sources Power on ARC Mode Slot Standby Power Standby Power Last Disabled Disabled A
TV Menu Explanations Menu Item Explanation Sub-Item Explanation Setup Service Level 3 programmable Service Levels (banks of channels) plus a Disable service level. Picture Adjusts picture appearance. Sound Adjusts sound parameters. Brightness Adjust the brightness of the dark areas in the picture. 50% is the default value. Contrast Adjust the brightness of the light areas in the picture. 50% is the default value. Color Adjust the strength of the color in the picture.
TV Menu Explanations - continued Menu Item Explanation Sub-Item Explanation 3URJUDPV GLᚎHUHQW FKDQQHOV DQG VRXUFHV into each of the 3 service levels Channel Setup Signal 6HWV WKH 79 WR WXQH RI GLᚎHUHQW VLJQDO styles: Air, Cable STD, Cable IRC, Cable HRC Auto Program TV automatically scans for active channels and memorizes them into the selected service level. Mode Scan for “Analog Only”, “Digital Only”, or “Analog and Digital” channels.
TV Menu Explanations - continued Menu Item Parental Control Explanation Sub-Item Explanation Control Access of TV and Movie content. TV Rating Displays a list of parental TV viewing levels and allows for Blocking or Unblocking of TV content. MPAA Rating Displays a list of parental Movie viewing levels and allows for Blocking or Unblocking of Movie content. Advanced Rating Digital TV content Rating levels listing menu.
TV Menu Explanations - continued Menu Features Item Digital Captions Digital Mode Time Setup Diagnostics OSD Language Explanation Sub-Item Customize the look of captions when tuned to a digital channel. Timing information provided by Digital FKDQQHOV FDQ EH VHW WR WKH VSHFLᚏF 7LPH Zone and also Daylight Savings. A display menu that provides a readout of the TV’s internal operations. Channel Up 3RZHU 2ᚎ :KHQ (QDEOHG WKH 79 VKXWV Rᚎ ZKHQ LW reaches the highest channel.
TV Menu Explanations - continued Menu Item Explanation Sub-Item Explanation Setup Source Setup The individual auxiliary inTV put connectors on the back of the TV can be turned On RU 2ᚎ 7KH VRXUFH FDQ DOVR EH VHW WR $XWR 3RZHU 2ᚎ (APO) after 5 minutes of a no signal condition.
This page intentionally blank.
PDI Limited Warranty PDI Communication Systems (PDI) warrants this product, except as set forth below, ONLY TO THE ORIGINAL PURCHASER to be FREE FROM DEFECTIVE MATERIAL AND WORKMANSHIP from the date of original purchase for a period of 2 years for parts and 2 years for labor (“The Warranty Period”). THIS LIMITED WARRANTY IS VALID ONLY IN THE FIFTY (50) UNITED STATES, THE DISTRICT OF COLUMBIA, AND CANADA.
PDI Communication Systems, Inc.