OE TPMS Diagnostic Programmer(PC) All copyright reserved by PDW International © 2019
Contents User Manual . . . . . . . . ..................................... ..............................................2 1. Programmer Overview .............................................................................2 1.1. Features . . . . ....................................................................................3 1.2. Specifications .................................................................................3 1.3. Symbol Conventions ........................... ........................
Thank you for purchasing the tyre pressure product of PDW Technology. It is an innovatively designed tyre sensor-programming tool and used to program general-purpose tyre sensors designed and manufactured by PDW Technology. This tool can activate and read the tyre sensor information of over 90% vehicle models, including the sensor ID, barometric pressure, temperature, quantity of electricity, accessory number, and learning method. I. Programmer Overview 1.1.
1.2. Specifications Operating frequency bands: 125 kHz, 433/434 MHz, and 315 MHz Operating voltage: 5 V Operating temperature: 0°C to 50°C Storage temperature: –20°C to +85°C Dimensions: 1.3. Symbol Conventions Symbol Description The USB flash drive is disconnected. The sensor has normal quantity of electricity. The sensor has low quantity of electricity. 1.4.
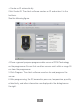
II. Basic Functions Note: Before using the product, ensure that the client software has been installed on the PC and the device is connected to the PC by a USB cable. The USB connection icon is green during normal connection. Note: When reading, writing, and activating a sensor, ensure that the sensor is no more than 10cm from the product. 2.1. Installing the Client Software 1.Download the client software from www.pdwgroup.com. It can be found in the TPMS section of the website.
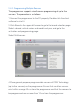
selection page. 5.Select a vehicle series and model such as 1 series and go to the year selection page. 6.Select a year and go to the activation and programming page. 7.Place the sensor on the programmer. Ensure that no other sensors exist within a range 50 cm from the programmer and that the sensor to be activated is no more than 10 cm from the programmer. 8.Click Activate to activate the sensor and read sensor information. 9.
Create an ID automatically. Click Create ID. The client software creates an ID and enters it in the text box. See the following figure. 4.Place a general-purpose programmable sensor of PDW Technology on the programmer. Ensure that no other sensors exist within a range 50 cm from the programmer. 5.Click Program. The client software searches for and programs the sensor. 6.
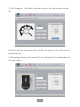
2.3.2. Programming Multiple Sensors The programmer supports simultaneous programming of up to five sensors. The procedure is as follows: 1.Connect the programmer to the PC properly. Double-click the client software to start it. 2.Click Brand in the upper-left corner to go to the brand selection page. Select a brand, vehicle series and model and year, and go to the activation and programming page. Select Multisensor.. 4.
5.Click Program. The client software searches for and creates sensor IDs. 6.Check that the sensor quantity and IDs are correct. Click OK to start programming. 7.After programming, the sensor IDs are displayed in the dialog box on the right again.
2.3.3. Activating and Programming based on Accessory Numbers Quickly The client software provides the function of quick searching and programming based on accessory numbers. The function enables quick activation or programming. 1.Connect the programmer to the PC properly. Double-click the client software to start it. 2.Click OE No. in the upper-left corner to go to the accessory number search page. 3.Enter an accessory number and click Search. The activation and programming page appears.
4.You can perform activation in accordance with section 2.2 or perform programming in accordance with sections 2.3.1 and 2.3.2. 2.4. Viewing the Learning Method You can enable vehicles to identify, match, or learn new sensor IDs to replace sensors easily during use. The procedure is as follows: 1.Start the client software and click Brand in the upper-left corner to go to the brand selection page. Select a brand, vehicle series and model and year, and go to the activation and programming page. 2.
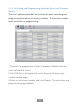
2.5. Viewing Sensor OE Information (Accessory Number) You can enable vehicles to identify, match, or learn new sensor IDs to replace sensors easily during use. The procedure is as follows: 1.Start the client software and click List in the upper-left corner to go to the vehicle model list page. Select a brand, vehicle series and model and year. 2.The OE information (accessory number) of the selected vehicle model is displayed next to the year.
III. System Functions 3.1. Software Upgrade 1.When you need to upgrade the client software to the latest version, you can obtain it from the distributor/dealer or download it from www.pdwgroup.com. Then, install the software in overwrite mode. 2.If firmware upgrade is required, the product will be automatically upgraded when the programmer is connected to the client software in the PC. 3.2. Language Switching 1.Click Language in the upper part of the software page. 2.Select the desired language. 3.
3.3. Unit Switching 1.Click Setup in the upper part of the software page. 2.On the system setup page, change the barometric pressure unit, temperature unit, and ID format.
FCC Requirement changes or modifications not expressly approved by the party responsible for compliance could void the user’s authority to operate the equipment. This device complies with Part 15 of the FCC Rules. Operation is subject to the following two conditions: (1) this device may not cause harmful interference, and (2) this device must accept any interference received, including interference that may cause undesired operation.
– Connect the equipment into an outlet on a circuit different from that to which the receiver is connected. – Consult the dealer or an experienced radio/TV technician for help.