BAM 210 Operation Manual For more information on other great Peavey products, go to your local Peavey dealer or online at www.peavey.
Intended to alert the user to the presence of uninsulated “dangerous voltage” within the product’s enclosure that may be of sufficient magnitude to constitute a risk of electric shock to persons. Intended to alert the user of the presence of important operating and maintenance (servicing) instructions in the literature accompanying the product. CAUTION: Risk of electrical shock — DO NOT OPEN! CAUTION: To reduce the risk of electric shock, do not remove cover. No user serviceable parts inside.
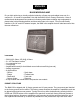
ENGLISH BAM™ 210 BASS MODELING AMP Do you think achieving a virtually unlimited collection of bass amp and cabinet tones out of a compact 2 x 10 combo is impossible? Not with the BAM 210 from Peavey Electronics. Years of research and development have produced a feature-packed bass modeling amp engineered to please today’s discriminating bassist and those who listen to the music.
prior to your purchase. If you become dissatisfied with your user presets at any time, reinitialization will return all user presets to the factory settings. Suppose you like factory setting A 1 but desire more low frequency response. Press the USER button on the front panel. Since the unit has been reinitialized, user preset A 1 is the same as factory preset A 1. Now simply adjust the low frequency to your liking and press STORE twice.
(5) USER This control determines whether the presets available at the PRESET MATRIX (4) selector (4) are factory settings or user settings. The adjacent yellow LED will illuminate when the user presets are active. (6) STORE This control allows the storage of presets in specific locations. When a preset has been finalized and is ready for storage, press this switch once. The LED indicating the current storage location will begin to flash.
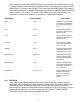
been selected via the MODEL SELECTOR (12) control, pressing this button allows the user to change cabinets without altering the amplifier selection. For example, the current model is B-MAN 2X12. To hear this amp through a 1X15, press the CAB SWAP button. The adjacent green LED will illuminate to indicate Cab Swap mode. Rotate the MODEL SELECTOR switch to the FLIPTOP 1X15 setting. The sound is now B-MAN 1X15 (amp model B-MAN; cab model 1X15). See the chart below for a description of cabinet characteristics.
(15) EQUALIZATION The EQ on the BAM 210 allows adjustment of the amp model selected. Each of the models emulated has differences in EQ circuitry, whether it be active or passive, or just a different center frequency or bandwidth. Since the EQ on the BAM simulates the EQ on the amp it is modeling, adjusting the controls in this section is like adjusting the controls on the amp being modeled.
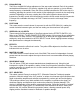
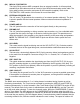
BACK PANEL 23 24 26 27 28 29 25 30 31 32 33 34 35 (23) CIRCUIT BREAKER RESET This button resets the internal circuit breaker. Under normal operating conditions, the breaker should not trip. Conditions such as a short circuit or continuous operation at overload or clipping may cause this breaker to trip. In the event this occurs, turn off power to the unit and wait 60 seconds before pressing this button to reset the breaker. Efforts should be made to determine the cause of the overload.
(28) MIDI IN / FOOTSWITCH This 8-pin DIN is receives MIDI commands from an external controller. It will accept both standard 5-pin DIN cables as well as Peavey’s 8-pin MIDI/Communication combo cable. The 8-pin cable provides connection and power to the footswitch (supplied). Refer to the FOOTSWITCH / MIDI section of this manual for more information. (29) EXTERNAL SPEAKER JACK This 1/4" mono (TS) jack allows the connection of an external speaker cabinet(s).
decrease as the note comes closer to tune, and rotation will stop when the note reaches correct pitch. The LEDs for the SPEED/ADJ (17) control show a more standard tuning display where the 12 o’clock position illuminates when the note is in tune. The DEPTH (18) control sets tuner volume in this mode. In the Bass mode, the tuner searches for standard bass notes and automatically selects the closest standard tuning note in relation to the note being played.
BANK SELECT MODE Pressing button 37 when in Preset Mode selects Bank Select Mode. The corresponding yellow LED (A, B, C, D) will blink as an indication of the active bank upon entering this mode. Buttons 38 - 41 change the active bank. The LED will illuminate continuously when a bank is selected. Pressing button 37 again returns to the Preset Mode. EFX SELECT MODE Pressing button 36 selects this mode. The corresponding green LED will illuminate when this mode is selected.
The green LEDs indicate the note the tuner is tracking. In the chromatic mode the two LEDs that a note falls between will light if the note being tracked is not a note in standard bass tuning. Once a note is being tracked, the yellow and red LEDs function similarly to a strobe tuner, that is they light sequentially to form a ring. Counterclockwise movement of the ring indicates the note being tracked is flat; clockwise movement indicates it is sharp.
DETAILS PRESET: • Analog Overdrive Enable - Enabled or disabled by amp model selection, after which this can override. • Tweeter Enable - Enabled or disabled by cabinet model selection, after which this can override. • Tweak 1 & 2 - See table below. GLOBAL: • MIDI Channel - Goes from 1 (matrix LED A1) to 16 (matrix LED D4). Footswitch / Sysex will always work. Channel messages will be sent with this channel, and will be ignored upon receive unless on this channel.
EFFECT PARAMETERS / TWEAKS Effect Speed/Adj Depth Tweak 1 Tweak 2 Chorus Flanger Phaser Octave Synth Fretless Funk Wah Distortion Speed Speed Speed Dry Level Sensitivity Sensitivity Sensitivity Pre Gain Depth Depth Depth Wet Level Mix Mix Mix Post Gain Delay Time Tone Frequency Frequency Frequency Low Rolloff Crossover Frequency Crossover Frequency Resonance Resonance Resonance Dry Level MIDI IMPLEMENTATION The BAM™ is designed to be an all-in-one bass amplification system using the PFC4B footswit
PRESET BACKUP You can back your presets up to a computer, sequencer, or other type of MIDI librarian / recorder. You can also transfer them to another BAM™! Connect a MIDI cable from the BAM’s MIDI Out to the MIDI In of the recording device. Prepare the recording device or software program to receive data. (In the case of transferring to another BAM, it just needs to be on.) We’re now ready to send the presets.
Here is the common part, along with descriptions of each byte’s purpose: F0 00 00 1B 11 00 CMD F7 - Start of Sysex [SOX] Peavey Manufacturer ID = 00 00 1B BAM Product ID (10 for PFC4B commands: CMD = 00, 01) Reserved for future use (keep fixed at zero) Command byte that defines which Sysex message it is - Optional data End of Sysex [EOX] NOTE: Each time a preset is recalled, it is first loaded into a RAM buffer that we call the Edit Buffer (could also be called “current preset”).
Partial addressing is a way of programming a portion of an EdBuf byte, while not disturbing the other bits in that byte. A partial address is made up of 3 bytes. The first is the byte address of the preset byte you are targeting (00-1E). The second byte is the bit number you want to start writing at (0 for least significant, 7 for most significant). The third byte defines how many bits you want to program. The next byte will be the value, and since it is a partial value, it does not need to be nibblized.
Address (Hex) PRESET DEFINITION Name 00 Model Selection 01 Hardware Control Bits 02 03,04 Pre Gain (non-boost, boost) Range (Decimal) High nib is Cabinet Model, 0-7 Low nib is Amp Model, 0-7 Clockwise rotation for both nibs: 0 = Red / 2x10 1 = 360 / 1x18 ::: 7 = Freddie K / Alloy 4x10 0-3,7 = 4 = Compressor On 5 = Analog Overdrive On 6 = Tweeter On 0 1-33 (active when Analog Overdrive enabled) Low (non-boost, boost) 1-33 Mid (non-boost, boost) 1-33 Mid Shift (non-boost, boost)
GLOBALS Offset (Hex) Name Range (Decimal) 00 Reserved (keep at zero) 01 Bank Select Method 0 = Preset (1-4) stays the same after bank select (default) 1 = Preset goes to #1 after bank select 2 = Preset light blinks, waits for user preset selection 02 PFC4B All Info 0 = Inactive mode - LEDs off 1 = Inactive mode - LEDs dim (default) 2 = Inactive mode - LEDs bright for both modes 03 MIDI Channel (- 1) 0-15 for 1-16 (default = 0, channel 1) 04 Global Bits Bit 0 set for User patches
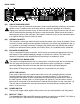
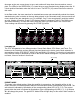
BAM 210 BLOCK DIAGRAM
BAM™ SPECIFICATIONS SYSTEM SPECIFICATIONS: PREAMPLIFIER SECTION: GENERAL: D/A AND A/D CONVERSION: • • • • • Mains circuit breaker: 6 amps (resettable) Power consumption: 500 Watts, 120 VAC 60 Hz Power consumption: 500 Watts, 230 VAC 50/60 Hz Hum and noise: Typically greater than -80 dB unweighted Internal speakers: Two professional 10 inch cast frame 8-Ohm speakers wired in parallel for a total impedance of 4 Ohms. One Foster compression horn with crossover and tweeter protection. • Rate: 44.
ESPAÑOL BAM™ 210 AMPLIFICADOR DE BAJO DE MODELACIÓN DE SONIDO ¿Crees que conseguir una colección ilimitada de tonos de amplificadores y gabinetes de un combo de 2 x 10 es imposible? No con el BAM 210 de Peavey Electronics. Años de estudios y diseño han producido un amplificador de modelación cargado de ventajas y diseñado para los bajistas más exigentes de nuestros días, así como a los que gustan de escuchar música.
desempacada por primera vez y conectada para borrar cualquier alteración que pudieran haber sufrido los presets antes de la compra. Si en cualquier momento te sientes inconforme con tus presets de usuario, la reinicialización regresará todos los presets a sus valores de fábrica. Supongamos que te gusta el preset de fábrica A 1, pero deseas más respuesta en las frecuencias graves. Oprime el botón USER en el panel frontal.
el interruptor de MATRIX DE PRESETS permite la selección de 16 presets de fábrica y 16 presets de usuario. El preset activo es indicado por la iluminación del LED. Los presets también pueden ser seleccionados por medio del control de pedal o controlador MIDI. (5) USUARIO Este control determina si los presets disponibles en el interruptor de MATRIX DE PRESETS (4) son de fábrica o de usuario. El LED amarillo adyacente se iluminará cuando los presets del usuario estén activos.
modelo está activo (rojo = modelo de amplificador, verde = modelo de gabinete, naranja = modelo de gabinete y ampli combinados). Si se desea salvar algún modelo en particular, oprime el interruptor STORE (6) para salvar el modelo en la locación de preset presente. Ver el diagrama en la pagina 6 para una descripción de las características de los amplificadores. (13) CAMBIO DE GABINETE (CAB SWAMP) Este control permite que se cambien los modelos de gabinetes de bocinas .
(15) ECUALIZACIÓN El EQ del BAM 210 permite ajustes del modelo de amplificador seleccionado. Cada modelo emula diferentes circuitos de ecualización, sean activos, pasivos, o sólo con un centro de frecuencia o rango diferentes. Dado que el BAM simula ecualizaciones en el ampli que está modelando, ajustar los controles en esta sección es como ajustar los controles del amplificador modelado.
PANEL TRASERO 23 24 26 27 28 29 25 30 31 32 33 34 35 (23) REINICIALIZACIÓN DEL FUSIBLE Este botón reinicializa el fusible interno. Durante condiciones de operación normales, el fusible no debe fallar. Condiciones como cortos circuitos, u operación continúa en niveles de saturación pueden causar que el fusible se bote. Si esto sucediera, apaga el amplificador y espera 60 segundos antes de oprimir el botón para reinicializar el fusible. Se debe averiguar la razón de la falla.
(29) SALIDA DE PARLANTE EXTERNO Este conectador mono de 1/4" TS permite la conexión de parlante(s) externo(s). La salida está cableada en paralelo con el parlante interno. La impedancia mínima de parlantes externos debe ser de 4 ohmios. (30) ENTRADA DE AMPLIFICADOR Este conectador de 1/4" permite la conexión de señales de nivel de línea directamente al amplificador. (31) SALIDA DEL PREAMPLIFICADOR Este conectador de 1/4" Permite la conexión a consolas, grabadoras, etc.
En el modo de bajo, el afinador busca las notas estándar de un bajo y automáticamente selecciona la nota estándar más cercana en relación a la que se está tocando. En el modo cromático, el afinador busca todas las notas, ya sean estándar o no. Por ejemplo si se toca un Fa (F) se buscaría como tal, iluminando los LEDs de Mi (E) y Sol (G), ya que Fa se encuentra entre Mi y Sol. El afinador del BAM también permite afinación de Mi bemol (Eb).
iluminará de manera constante una vez que el banco sea seleccionado. Oprimir el botón 37 una vez más regresará al Modo de Preset. MODO DE SELECCION DE EFECTOS (EFX) Oprimir el botón 36 selecciona este modo. El LED verde correspondiente se iluminará cuando este modo es seleccionado. Los botones 37-41 funcionarán de la siguiente manera. 37 38 39 40 41 – Compresor apagado – Cambia entre ajustes primarios y secundario en los controles 14-16.
Los LEDs verdes indican la nota que el afinador está buscando. En el modo cromático los dos LEDs adyacentes a la nota se iluminarán si la nota que se busca no es una nota estándar en la afinación de un bajo. Una vez que una nota es buscada los LEDs rojos y amarillos funcionan similarmente a un afinador tipo ‘strobe’, encendiéndose secuencialmente en forma de anillo. La rotación en contra reloj indica que la nota está bemol, rotación en dirección de las manecillas del reloj indica que la nota está aguda.
DETALLES PRESETS: • Saturación Análoga – Depende de la selección de modelo de amplificador, después este interruptor la puede cambiar. • Tweeter - Depende de la selección de modelo de amplificador, después este interruptor la puede cambiar. • Tweak (Cambios) 1 & 2, - Ver tabla siguiente. GLOBAL: • Canal MIDI – Va de 1 (LED del matriz A1) a 16 (LED de matriz D4). Pedalera/sysex siempre funcionarán.
EFFECT PARAMETERS / TWEAKS Effect Speed/Adj Depth Tweak 1 Tweak 2 Chorus Flanger Phaser Octave Synth Fretless Funk Wah Distortion Speed Speed Speed Dry Level Sensitivity Sensitivity Sensitivity Pre Gain Depth Depth Depth Wet Level Mix Mix Mix Post Gain Delay Time Tone Frequency Frequency Frequency Low Rolloff Crossover Frequency Crossover Frequency Resonance Resonance Resonance Dry Level IMPLEMENTACIÓN MIDI El BAM ha sido diseñado para ser un sistema completo de amplificación de bajo usando la ped
COPIAS DE SEGURIDAD DE PRESETS Puedes hacer copias de seguridad en tu computadora, secuenciado u otro tipo de librería MIDI. También puedes transferir la información a otro BAM. Conecta un cable MIDI de la salida (OUT) MIDI a la entrada (In) de la unidad donde salvarás la información. Prepara la unidad o el software para recibir información (en caso de transferir a otro BAM, este sólo tiene que estar encendido). Ahora estamos listos para mandar los presets.
Todos los mensajes sysex del BAM comienzan con una titulo común y terminan con un byte de Fin de Sysex [EOX]. La siguiente tabla muestra la sección “única” (incluyendo la información de comandos y opcional) de cada mensaje que cae entre el titulo y el EOX.
Ahora las cosas únicas: CMD Number (in HEX) / Name 00 / PFC4B Online 01 / PFC4B Switch Press 02 / Version Request 03 / Version of Software 04 / Send Presets 05 / Receive Presets 06 / Send Single Preset 07 / Receive Single Preset 08 / Send EdBuf 09 / Receive EdBuf 0A / Store EdBuf 0B / Send EdBuf Byte 0C / Receive EdBuf Byte 0D / Send EdBuf Partial Byte 0E / Receive EdBuf Partial Byte 0F / Send EdBuf Current 10 / Receive EdBuf Current description Resulting Action None Amp sends PFC4B setup data F
*** La dirección “actual” un método alternativo para controlar los ocho parámteros de presets que tienen ajustes dobles. En lugar de que el aparato programador necesite tener dos hilos para los dos niveles de, digamos, la preganancia, puede usar estos mensajes con la dirección del primer parámetro de la preganancia, y el estatus del incremento determinará cuál de los dos bytes será escrito o leido.
Address (Hex) PRESET DEFINITION Name 00 Model Selection 01 Hardware Control Bits 02 03,04 Pre Gain (non-boost, boost) Range (Decimal) High nib is Cabinet Model, 0-7 Low nib is Amp Model, 0-7 Clockwise rotation for both nibs: 0 = Red / 2x10 1 = 360 / 1x18 ::: 7 = Freddie K / Alloy 4x10 0-3,7 = 4 = Compressor On 5 = Analog Overdrive On 6 = Tweeter On 0 1-33 (active when Analog Overdrive enabled) Low (non-boost, boost) 1-33 Mid (non-boost, boost) 1-33 Mid Shift (non-boost, boost)
GLOBALS Offset (Hex) Name Range (Decimal) 00 Reserved (keep at zero) 01 Bank Select Method 0 = Preset (1-4) stays the same after bank select (default) 1 = Preset goes to #1 after bank select 2 = Preset light blinks, waits for user preset selection 02 PFC4B All Info 0 = Inactive mode - LEDs off 1 = Inactive mode - LEDs dim (default) 2 = Inactive mode - LEDs bright for both modes 03 MIDI Channel (- 1) 0-15 for 1-16 (default = 0, channel 1) 04 Global Bits Bit 0 set for User patches
ESPECIFICACIONES BAM™ SECCIÓN DEL PREAMPLIFICADOR: ESPECIFICACIONES DEL SISTEMA GENERAL Conversión D/A y A/D: • Razón: 44.
FRANÇAIS BAM™ 210 AMPLIFICATEUR DE MODELISATION BASSE Vous pensez qu’obtenir une multitude de sonorités d’amplificateurs et enceintes basses avec un seul combo 2 x 10 est impossible? Pas avec le BAM 210 de Peavey Electronics. Des années de recherches et développements nous ont permis de créer un amplificateur combo qui émerveillera les bassistes de part ses possibilités. Le BAM redéfinit de nouveaux standarts en terme de polyvalence et facilité d’utilisation.
Supposons que vous soyez satisfait des réglages de la preset A1 mais désirez plus de réponse dans les fréquences graves. Pressez le bouton USER sur le panneau avant. Si votre unité a été réinitialisée, la preset User A1 est identique à la preset Factory A1. Maintenant, ajustez le niveau des fréquences graves selon votre convenance et appuyez sur le bouton STORE du panneau avant. Ce nouveau réglage sera rappelé à chaque sélection de la preset User A1.
(5) USER L’interrupteur User permet de passer des presets “usine” aux presets “utilisateur” et viceversa. La Led située à côté de l’interrupteur s’allume lorsque vous êtes dans le mode “utilisateur” ou que vous modifiez un paramètre d’une preset “usine”. (6) STORE Cet interrupteur est utilisé pour mémoriser les paramètres d’un son sur une preset définie, ou pour “déplacer” une preset existante. Lorsque vous voulez sauvegarder les paramètres d’un son, appuyez sur l’interrupteur une première fois.
ce boutons vous permet de modéliser le même ampli avec une configuration de haut-parleurs différente. Par exemple, si le mode actuel est B-MAN 2X12, pour entendre la tonalité obtenue avec une enceinte 1X15, pressez le bouton CAB SWAP (la Led verte adjacente s’illumine). Sélectionnez alors grace au MODEL SELECTOR l’unité FLIPTOP 1X15. La sélection de modélisation devient le B-MAN 1X15 (amp model B-MAN; cab model 1X15). Reportez-vous au tableau ci-dessous pour le détail des configurations.
caractéristique permet de reproduire très efficacement la palette sonore de l’ampli en question. Pour les amplis possédant un réglage de médium semi-paramétrique, Pour les modèles équippés d’un contrôle de médium semi-paramétrique, le contrôle SHIFT vous permet de sélectionner le centre de la bande de fréquence affecté par le contrôle des medium. (16) POST GAIN Le contrôle de Post Gain permet de régler le volume pour chaque preset. Le tourner horairement augmente la valeur correspondante.
PANNEAU ARRIERE 23 24 26 27 28 29 30 31 32 25 33 34 35 (23) CIRCUIT BREAKER RESET Ce bouton vous permet de réenclencher le disjoncteur interne de votre unité. En condition normale, celui-ci ne doit pas ‘sauter’. Si cela se produit, mettre votre unité hors-tesion pour au moins 60 secondes avant de réenclencher le disjoncteur. Si le problème persiste, votre unité doit être vérifié par un technicien agréé Peavey pour en déterminer la cause (Courtcircuit, utilisation extrême prolongée,...).
(31) PREAMP OUT Ce jack 1/4" vous permet d’envoyer un signal de niveau ligne vers une unité externe (table de mixage, enregistreur,...). Utilisez un cable blindé entre cette sortie et l’entrée de l’autre unité. Cette connexion n’aura aucune incidence sur le fonctionnement de l’ampli qui continuera à amplifier le signal de votre préampli.j NOTE: Les connections PREAMP OUT / POWER AMP IN peuvent ègalement être utilisées en boucle avec une unité externe de niveau ligne.
L’accordeur de votre BAMvous permet aussi de vous acorder un demi-ton plus bas (le fameux accordage en Mib). Pour passer dans ce mode,appuyez sur le bouton USER (5) dans le mode accordeur. Vous pouvez mémoriser le mode d’accordeur voulu en pressant le bouton STORE (6). PEDALIER Le PFC™4B possède 4 modes de fonctionnement différents : Preset, Bank Select, EFX Select et Accordeur. Les boutons du pédalier auront des fonctions différentes selon le mode sélectionné.
EFX SELECT MODE Pour passer en mode EFX Select (Sélection d’effets), appuyez sur le bouton 36. La Led verte correspondante s’illuminera pour indiquer l’activation de ce mode. Les boutons 37 - 41 fonctionnent comme suit : 37 38 39 40 41 – Compression on/off – Change entre mémoires primaires et secondaires pour les contrôles 14 – 16. – Tweeter on/off – Effets on/off – Change entre mémoires primaires et secondaires pour les effets.
(42) REMOTE CABLE CONNECTOR Le connecteur MIDI IN 8-broches DIN est prévu pour recevoir des informations envoyées par un controleur Midi. Il accepte tout aussi bien les cables Midi 5 et 8-broches. En utilisant le cable 8-broches (fourni), il permet de connecter le PFC 4B (pédalier fourni) tout en l’alimentant. CONTROLES CACHES Le BAM possèdent tous les contrôles nécessaires accéssibles de la face avant et du pédalier.
DETAILS PRESET: • Analog Overdrive - Active ou non, si la fonction existe suivant la modélisation choisie. • Tweeter Enable - Active ou non le tweeter de l’enceinte, si la fonction existe en fonction de l’enceinte sélectionnée. • Tweak 1 & 2 - Voir ci-dessous GLOBAL: MIDI Channel va de 1 (Sélecteur Preset Matrix Led A1) à 16 (Sélecteur Preset Matrix Led D4). Le pédalier continuera de fonctionner. Les messages d’interruption Midi seront envoyés sur ce canal (et aucun autre).
EFFECT PARAMETERS / TWEAKS Effect Speed/Adj Depth Tweak 1 Tweak 2 Chorus Flanger Phaser Octave Synth Fretless Funk Wah Distortion Speed Speed Speed Dry Level Sensitivity Sensitivity Sensitivity Pre Gain Depth Depth Depth Wet Level Mix Mix Mix Post Gain Delay Time Tone Frequency Frequency Frequency Low Roll off Crossover Frequency Crossover Frequency Resonance Resonance Resonance Dry Level MIDI IMPLEMENTATION The BAM™ is designed to be an all-in-one bass amplification system using the PFC4B footswi
PRESET BACKUP Vous pouvez sauvegarder vos paramètres de sons des presets via un ordinateur, un séquenceur ou toute autre “librairie” Midi. Pour ce faire, connectez un cable MIDI entre les MIDI OUT (BAM) et MIDI IN (“appareil de sauvegarde”).Pour commencer l’envoi des informations du BAM, gardez enfoncé le bouton Tap/Tempo, en appuyant sur le bouton MODULATION. Les Leds du BAM s’éteignent durant 1 à 2 secondes avant de refonctionner pour confirmer l’opération.
NOTE: A chaque fois qu’une preset est sélectionnée, ses paramètres se placent dans une mémoire de type RAM appelée “Edit Buffer” (ou “EdBuf”). Si une autre preset est appelée, ses données “écrasent” celles de la précédente. Reportez vous au tableau ci-dessous pour les commandes du SysEx et les valeurs correspondantes.
F0 00 00 1B 11 00 0E 01 06 01 01 07 Le Le Le Le “1D” localise l’effet. “07” indique la position du paramètre désiré. “01” (le premier) indique que la modification se fait sur 1 octet. deuxième “01” donne la nouvelle valeur du paramètre (OFF). ***(Current addressing) Cette méthode de programmation permet de passer facilement des valeurs primaires à secondaires (et vice-versas) pour les paramètres à double-mémoire. Elle permet de “simuler” l’action du PFC 4B (en mode EFX).
Address (Hex) PRESET DEFINITION Name 00 Model Selection 01 Hardware Control Bits 02 03,04 Pre Gain (non-boost, boost) Range (Decimal) High nib is Cabinet Model, 0-7 Low nib is Amp Model, 0-7 Clockwise rotation for both nibs: 0 = Red / 2x10 1 = 360 / 1x18 ::: 7 = Freddie K / Alloy 4x10 0-3,7 = 4 = Compressor On 5 = Analog Overdrive On 6 = Tweeter On 0 1-33 (active when Analog Overdrive enabled) Low (non-boost, boost) 1-33 Mid (non-boost, boost) 1-33 Mid Shift (non-boost, boost)
GLOBALS Offset (Hex) Name Range (Decimal) 00 Reserved (keep at zero) 01 Bank Select Method 0 = Preset (1-4) stays the same after bank select (default) 1 = Preset goes to #1 after bank select 2 = Preset light blinks, waits for user preset selection 02 PFC4B All Info 0 = Inactive mode - LEDs off 1 = Inactive mode - LEDs dim (default) 2 = Inactive mode - LEDs bright for both modes 03 MIDI Channel (- 1) 0-15 for 1-16 (default = 0, channel 1) 04 Global Bits Bit 0 set for User patches
BAM™ SPECIFICATIONS SYSTEM SPECIFICATIONS: PREAMPLIFIER SECTION: GENERAL: D/A AND A/D CONVERSION: • • • • • Mains circuit breaker: 6 amps (resettable) Power consumption: 500 Watts, 120 VAC 60 Hz Power consumption: 500 Watts, 230 VAC 50/60 Hz Hum and noise: Typically greater than -80 dB unweighted Internal speakers: Two professional 10 inch cast frame 8-Ohm speakers wired in parallel for a total impedance of 4 Ohms. One Foster compression horn with crossover and tweeter protection. • Rate: 44.
DEUTSCH BAM™ 210 BASS-MODELING-VERSTÄRKER Sie glauben, es ist unmöglich, mit einem kompakten 2 x 10-Combo eine nahezu unbegrenzte Anzahl verschiedener Bassverstärker- und Bassboxenklänge zu erzielen? Mit dem BAM 210 von Peavey Electronics geht’s! Durch jahrelange Erfahrung in der Forschung und Entwicklung ist ein an Funktionen reichhaltiger Bass-Modeling-Verstärker entstanden, der durch seine Konstruktion den anspruchsvollen Bassisten von heute und die Musikfreunde begeistert.
Presets machen deutlich, über welche Fähigkeiten der Verstärker verfügt, und sie können als Anwender-Presets geändert und gespeichert werden. Durch Einschalten des Geräts und gleichzeitiges Drücken der Tasten USER und STORE an der Vorderseite des Verstärkers werden sowohl Werks- als auch Anwender-Presets auf ihre ursprünglichen Einstellungen zurückgesetzt.
möglichem Clipping gewarnt. Leuchtet sie stark rot auf, muss der INPUT TRIM (2) verändert werden. (4) PRESET MATRIX Mit diesem Regler kann zusammen mit dem USER-Schalter (5) unter den 32 verfügbaren Presets ausgewählt werden. Die Matrix ist in vier Banken aufgeteilt (A, B, C, D), wobei jede Bank vier Presets enthält (1, 2, 3, 4). Je nach Position des USER-Schalters ist mit dem PRESET MATRIX-Wahlschalter die Auswahl der 16 Werks-Presets oder der 16 AnwenderPresets möglich.
(10) LEVEL Mit diesem Regler wird der Ausgangspegel des Kompressors festgelegt, zudem erlaubt er, Verstärkung zurückzugewinnen, die durch die Kompression verloren ging („Make-up Gain"). (11) GAIN REDUCTION-LEDs Diese Anzeigen zeigen die Höhe der Gain-Verringerung durch die Kompression an. (12) MODEL SELECTOR Mit diesem Regler ist zusammen mit dem CAB SWAP-Schalter (13) die Auswahl zwischen den Verstärker- und Lautsprecherboxenmodellen des BAM möglich.
PEAVEY MAX BAM 2 X 10 WEST COAST 4 X 10 FREDDIE K ALLOY 4 X 10 Hybrid-Bass-Vorverstärker mit aktivem halbparametrischem 3-Band-EQ. BAM-Box ohne Modeling. Modernes Hybrid-Bass-Topteil mit aktivem halbparametrischem EQ. Moderne 4 X 10-Box mit Ports vorne und Horn. Modernes Solid-State-Topteil mit aktivem 4-Band-EQ. Metallkegellautsprecher in 4 X 10-Box mit Ports und ohne Hochtöner.
(19) EFFECTS Mit diesem Regler wird der aktive Effekt ausgewählt. Die gelben LEDs neben den Effektnamen zeigen an, welcher Effekt aktiv ist. (20) MASTER VOLUME Mit diesem Regler wird der Gesamtlautstärkepegel des BAM festgelegt. Dieser Regler ist unabhängig von gespeicherten Presets und kann je nach verschiedenen Spielsituationen zur Einstellung der Ausgangslautstärke verwendet werden. (21) KOPFHÖRERKLINKE Diese 1/4"-Stereo- (TRS-) Klinke ist ausschließlich für Standard-Stereokopfhörer geeignet.
(24) ERDUNGSPOLARITÄT Dieser Wippenschalter mit 3 Positionen muss normalerweise auf der mittleren Position (0) stehen. Ist aus dem bzw. den Lautsprechern ein Brummen oder Rauschen zu hören, kann der Schalter auf die Positionen (+) oder (-) gestellt werden, um dieses Brummen oder Rauschen zu verringern. Kann das Problem durch Verändern der Polarität nicht behoben werden, wenden Sie sich bitte an Ihren autorisierten Peavey-Händler, das Peavey-Werk oder an einen qualifizierten Kundendiensttechniker.
Signal empfangen soll, ein geschirmtes Kabel. Dieser Anschluss wirkt sich nicht auf den Betrieb des Verstärkers oder auf die Weiterleitung des Signals zum Verstärker und zu den Lautsprechern aus. HINWEIS: Die Klinken PREAMP OUT/POWER AMP IN können auch zum Anschluss von Line-Pegel-Effektgeräten verwendet werden. (32) XLR LEVEL Mit diesem Regler wird der Signalpegel eingestellt, der aus dem XLR OUTPUT (33) gesendet wird.
ein F gespielt, wird es als solches überprüft, und es leuchten die LED-Anzeigen sowohl für E als auch für G auf, da F zwischen E und G liegt. Das Stimmgerät des BAM ermöglicht auch die Stimmung von Eb. Um diesen Modus einzuschalten, drücken Sie die USER-Taste (5), während der Stimmgerät-Modus eingeschaltet ist. Die Einstellungen des Stimmgeräts können durch Drücken der STORE-Taste (6) gespeichert werden.
Modus aktiv ist. Mit den Tasten 38-41 wird die aktive Bank verändert. Ist eine Bank ausgewählt, leuchtet die LED kontinuierlich auf. Durch Drücken von Taste 37 wird wieder zum Preset-Modus zurückgeschaltet. EFX SELECT-MODUS Dieser Modus wird durch Drücken von Taste 36 ausgewählt. Die zugehörige grüne LED leuchtet auf um anzuzeigen, dass dieser Modus ausgewählt wurde.
TUNER-MODUS Der Tuner-Modus wird durch gleichzeitiges Drücken der Tasten 36 und 37 ausgewählt. Die vier gelben LEDs leuchten schwach auf um anzuzeigen, dass der Tuner-Modus aktiv und bereit ist, ein Signal zu empfangen. Durch Drücken einer beliebigen Taste verlassen Sie den Tuner-Modus und kehren zum vorhergehenden Modus und Preset zurück. Die grünen LEDs zeigen die Note an, die das Stimmgerät prüft.
TIPP FÜR MEHR POWER! KOPIEREN VON BOOST/FX-EINSTELLUNGEN Die Boost-Funktion ermöglicht zwei vollständige Einstellungen (pro Preset) für Pre Gain, Post Gain und 3-Band-EQ. Beim Erstellen eines Presets erzeugen Sie in der Regel zuerst den Sound ohne Boost (Boost-LED am PFC4B leuchtet nicht auf), und danach verändern Sie ihn mit Boost. Die Einstellungen unterscheiden sich meist etwas, und es ist recht mühselig, sie manuell zu synchronisieren.
TUNER: • Store Tuner Tweaks – Das Stimmgerät kann Ihre Wünsche nur dann wieder aufrufen, wenn Sie sie speichern (nur einmal drücken). • Eb Mode – Drücken Sie einmal, um zwischen E- und Eb-Modus umzuschalten. Die LED für den Eb-Modus leuchtet auf. Sämtliche Noten werden auf der Anzeige angehoben, selbst im chromatischen Modus. Diese Funktion bieten wir an, da die Eb-Stimmung in der Popmusik so beliebt ist.
wird. Dies wird als „Soft Thru" bezeichnet, d.h. er hängt von der Software des Geräts ab (Bearbeitungsfähigkeit und MIDI-Buffer). Und was ist ein „Hard Thru”? In diesem Fall ist eine Klinke mit “Thru” und nicht mit “Out” oder “Out/Thru” gekennzeichnet. In der Regel verfügt sie über einen eigenen MIDI In und Out, und sie befindet sich meist in der Mitte.
HINWEIS: Main Volume befindet sich hinter Vorverstärker, EQ und Effekten. Andere Kanalmeldungen werden an den MIDI Out wiedergegeben, beeinflussen jedoch nicht den BAM. Der BAM wird die folgenden Kanalmeldungen auf seinem MIDI-Kanal erzeugen: • Program Change (siehe oben) – wenn eine Preset-Änderung über die Vorderseite oder den PFC4B erfolgt. • Bank Select (siehe oben) – wenn die MATRIX-Bank von Factory auf User umgestellt wird oder umgekehrt.
Und nun zu den individuellen Angaben: CMD Number (in HEX) / Name 00 / PFC4B Online 01 / PFC4B Switch Press 02 / Version Request 03 / Version of Software 04 / Send Presets 05 / Receive Presets 06 / Send Single Preset 07 / Receive Single Preset 08 / Send EdBuf 09 / Receive EdBuf 0A / Store EdBuf 0B / Send EdBuf Byte 0C / Receive EdBuf Byte 0D / Send EdBuf Partial Byte 0E / Receive EdBuf Partial Byte 0F / Send EdBuf Current 10 / Receive EdBuf Current description Resulting Action None Amp sends PFC4B
Zum Einstellen des Bits für Kompressor ein/aus wird die folgende Kette gesendet: F0 00 00 1B 11 00 0E 01 06 01 01 F7 01 verweist auf die Hardware Control-Bits (siehe Tabelle unten), deren Bit 6 den Kompressor steuert. 06 bedeutet, dass Bit 6 angestoßen wird. Die erste 01 bedeutet, dass wir ein Bit programmieren. Die zweite 01 bedeutet, dass wir das Bit setzen (anstatt es zu löschen).
Address (Hex) PRESET DEFINITION Name 00 Model Selection 01 Hardware Control Bits 02 03,04 Pre Gain (non-boost, boost) Range (Decimal) High nib is Cabinet Model, 0-7 Low nib is Amp Model, 0-7 Clockwise rotation for both nibs: 0 = Red / 2x10 1 = 360 / 1x18 ::: 7 = Freddie K / Alloy 4x10 0-3,7 = 4 = Compressor On 5 = Analog Overdrive On 6 = Tweeter On 0 1-33 (active when Analog Overdrive enabled) Low (non-boost, boost) 1-33 Mid (non-boost, boost) 1-33 Mid Shift (non-boost, boost)
GLOBALS Offset (Hex) Name Range (Decimal) 00 Reserved (keep at zero) 01 Bank Select Method 0 = Preset (1-4) stays the same after bank select (default) 1 = Preset goes to #1 after bank select 2 = Preset light blinks, waits for user preset selection 02 PFC4B All Info 0 = Inactive mode - LEDs off 1 = Inactive mode - LEDs dim (default) 2 = Inactive mode - LEDs bright for both modes 03 MIDI Channel (- 1) 0-15 for 1-16 (default = 0, channel 1) 04 Global Bits Bit 0 set for User patches
BAM™ SPECIFICATIONS SYSTEM SPECIFICATIONS: PREAMPLIFIER SECTION: GENERAL: D/A AND A/D CONVERSION: • • • • • Mains circuit breaker: 6 amps (resettable) Power consumption: 500 Watts, 120 VAC 60 Hz Power consumption: 500 Watts, 230 VAC 50/60 Hz Hum and noise: Typically greater than -80 dB unweighted Internal speakers: Two professional 10 inch cast frame 8-Ohm speakers wired in parallel for a total impedance of 4 Ohms. One Foster compression horn with crossover and tweeter protection. • Rate: 44.
PEAVEY ELECTRONICS CORPORATION LIMITED WARRANTY Effective Date: July 1, 1998 What This Warranty Covers Your Peavey Warranty covers defects in material and workmanship in Peavey products purchased and serviced in the U.S.A. and Canada.
IMPORTANT SAFETY INSTRUCTIONS WARNING: When using electric products, basic cautions should always be followed, including the following: 1. 2. 3. 4. 5. 6. 7. 8. 9. 10. 11. 12. 13. 14. 15. 16. 17. 18. Read all safety and operating instructions before using this product. All safety and operating instructions should be retained for future reference. Obey all cautions in the operating instructions and on the back of the unit. All operating instructions should be followed.