Operating Guide ® Bandit 112 ® Studio Pro 112 Envoy 110 ®
Intended to alert the user to the presence of uninsulated “dangerous voltage” within the product’s enclosure that may be of sufficient magnitude to constitute a risk of electric shock to persons. Intended to alert the user of the presence of important operating and maintenance (servicing) instructions in the literature accompanying the product. CAUTION: Risk of electrical shock — DO NOT OPEN! CAUTION: To reduce the risk of electric shock, do not remove cover. No user serviceable parts inside.
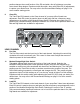
ENGLISH Envoy® 110, Studio® Pro 112 and Bandit® 112 TransTube® Series Instrument Amplifiers Congratulations on your purchase of a Peavey TransTube® Series instrument amplifier. Whether you are a beginner or seasoned pro, you could not have found a more practical, feature-packed amplifier. Peavey’s patented TransTube circuitry has moved forward into the second generation of products, leading the industry in tube emulation.
AC POWER In order to apply power to your TransTube Series amp you must first identify its required AC supply voltage. The proper voltage for your unit is labeled on the upper left corner of the rear panel. 1. AC Power Cord (Under Chassis) Locate the power cord tucked into the rear speaker compartment. This line cord provides the AC power to the unit. Connect the line cord to a properly grounded AC supply. Damage to the equipment may occur if improper line voltage is used. (See voltage marking on unit.
CHANNELS Your TransTube Series amp offers two-channel operation. Both the Clean and Lead channels provide a flexible platform for you to establish your favorite tone. The footswitch (optional on Envoy 110 and Studio Pro 112) allows remote switching between the two channels and is explained in detail on page 8 of this guide. 6 6. Channel Select Switch The Channel Select Switch determines which channel of the TransTube Preamp, LEAD or CLEAN, is active.
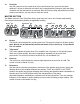
position changes the overall function of the EQ and adds a hint of brightness to emulate some classic amp designs. Experiment with this switch, along with Clean EQ (9) adjustments, to capture your desired tone. You may refer to the Recommended Settings on page 11 for some creative starting points. 9. Clean EQ The TransTube EQ featured on the Clean channel of your amp offers 3-band tone adjustment.
13. Post Gain Use this control to set the overall level of the Lead channel once your tone has been achieved. It is best to start with the control fully counterclockwise (minimum gain) and adjust clockwise until the desired level is achieved. After all EQ and voicing adjustments have been made to the channel, you may wish to reset this control. MASTER SECTION The Master sections of the TransTube Series amps vary from unit to unit. Please read carefully.
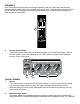
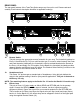
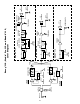
REAR PANEL The rear panel features of the TransTube Series amps vary from unit to unit. Please read each carefully. Each feature’s description identifies its applicable model(s). 19 1 18 21 1 20 18 22 25 1 21 23 24 20 18 18. Remote Switch This jack accepts the appropriate remote footswitch for your amp. The footswitch (optional on Envoy 110 and Studio Pro 112) is a multi-function type. It is used to select between the Clean and Lead channels.
21. External Speaker Jack This 1/4" jack is provided for the connection of an external speaker cabinet such as the Peavey 412M. The minimum external speaker impedance is 8 ohms. This jack disconnects internal speaker when used on Studio Pro 112 NOTE: The remaining features apply to the Bandit 112 model only. 22. Preamp Out The Preamp Output can be used to route the preamp signal to a mixing console, tape recorder, etc.
INPUTS FOOT SWITCH SWITCH LOGIC SWITCH LOGIC CLEAN VINTAGE MODERN SWITCH LOGIC VOLUME LO MID HI HI GAIN EQUALIZATION LO MID HI VINTAGE MODERN PRE LEAD POST FOOT SWITCH FOOT SWITCH LEVEL REVERB ® ® ENVOY 110 ENVOY FOOT SWITCH LEVEL REVERB BYPASS EFFECTS SEND RETURN POWER AMP EFFECTS SEND RETURN ® ® STUDIO STUDIOPRO PRO112 LEVEL REVERB BANDIT ® BANDIT® 112 T. DYNAMICS POWER AMP PRE PWR OUT IN PRESENCE POWER AMP HEADPHONES 10" SPEAKER EXT. SPEAKER 12" SPEAKER T.
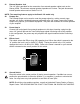
RECOMMENDED SETTINGS Clean Metal Your Preference Your Preference Jazz Moderate Distortion Your Preference Your Preference Clean Blues Dirty Blues ** Your Preference NOTE: The Bandit 112 is used for demonstration purposes. The settings illustrated above are also applicable to the Envoy 110 and Studio Pro 112, with the exception of the resonance and presence controls.
ENVOY® 110 SPECIFICATIONS POWER AMPLIFIER SECTION: Power @ Clipping: (Typically) Preamp Low Gain Input: Impedance: High Z, 44k Ohms Nominal Input Level: -7dBV, 450mV RMS Minimum Input Level: -16dBV, 164mV RMS Maximum Input Level: +6dBV, 2V RMS (5% THD, 1 kHz, 120V AC line) 40W RMS into 6 Ohms Frequency Response: Headphone Output: +0, -2 dB 100 Hz to 20 kHz @ 35W RMS into 6 Ohms Load Impedance: 16 Ohms or greater Nominal Output Level: -3 dBV, 0.
STUDIO® PRO 112 SPECIFICATIONS POWER AMPLIFIER SECTION: Preamp Low Gain Input: Rated Power and Load: Power specs measured with T-Dynamics @ 100% 65W RMS into 8 Ohms Impedance: High Z, 44 k Ohms Nominal Input Level: -6 dBV, 500mV RMS Minimum Input Level: -17dBV, 142mV RMS Maximum Input Level: +6 dBV, 2V RMS Power @ Clipping: (Typically) (5% THD, 1 kHz, 120V AC line) 65W RMS into 8 Ohms Effects Send: Load Impedance: 1k Ohms or greater Nominal Output Level: Effects Level -9dBV, 355 mV RMS Frequency Respo
BANDIT® 112 SPECIFICATIONS POWER AMPLIFIER SECTION: Rated Power and Load: Effects Send: Load Impedance: 1 k Ohms or greater Nominal Output Level: Effects Level switch “out”: -10 dBV, 0.
ESPAÑOL Envoy® 110, Studio Pro® 112 y Bandit® 112 de la Serie Transtube® de Amplificadores para Instrumentos Felicitaciones por la compra de un amplificador para instrumento de la serie Transtube de Peavey. Seas un principiante o un profesional consagrado, no podrías haber encontrado un amplificador más práctico y con mejores características. Los circuitos patentados Transtube de Peavey han avanzado a la segunda generación de productos, siendo los primeros en la industria en emulación de bulbos.
• • • • • Salida de preamplificador Entrada para amplificador de poder Conexión para bocinas externas Control T-Dynamics® Control de presencia PODER DE CORRIENTE ALTERNA Para poder aplicar poder a tu amplificador de la Serie Transtube, primero debes identificar su suministro de voltaje de CA. El voltaje apropiado para tu unidad está rotulado en la esquina superior izquierda del panel trasero. 1.
5. Entrada de Baja Ganancia Esta entrada monofónica de 1/4" se incluye para instrumentos con salidas extremadamente altas, lo que puede resultar en una distorsión de la entrada de alta ganancia (4). Si se usan simultáneamente las entradas de alta y baja ganancia, los niveles de ambas son de baja ganancia. CANAL Tu ampli de la Serie Transtube ofrece operación a dos canales. Tanto el canal ‘clean’ como el ‘lead’ proveen una plataforma flexible para que establezcas tu tono favorito.
hacia la derecha hasta lograr el nivel deseado. Después de hacer todos los ajustes de ecualización y voces en el canal, tal vez querrás reajustar este control. 8. Switch Modern/Vintage Este switch te permite cambiar instantáneamente el tono para emular amplificadores modernos y clásicos. La posición MODERN mantiene un tono cálido y estándar. La posición VINTAGE cambia la función general de la ecualización añadiendo algo de brillo y emulando algunos diseños de amplis clásicos.
que depende de la posición del switch Modern/Vintage. Si reduces el control a la posición “0” (totalmente hacia la izquierda) introducirás el máximo corte de nivel para esa banda en particular. Están disponibles bandas para ajuste de graves, medios y agudos. 13. Post Ganancia Usa este control para ajustar el nivel de canal líder una vez que tu tono haya sido logrado. Lo más recomendable es empezar con el control totalmente hacia la izquierda y ajustarlo hacia la derecha hasta alcanzar el nivel deseado.
PANEL TRASERO Las características del panel trasero de los amplis de la Serie Transtube varían de unidad a unidad. Por favor lee cuidadosamente la descripción de cada característica e identifica a los modelos aplicables. 1 19 18 20 21 1 18 22 25 1 21 23 24 20 18 18. Switch Remoto Esta entrada recibe al pedal apropiado para tu amplificador. El pedal (opcional en los modelos Envoy 110 y Studio Pro 112) es del tipo multifuncional. Se usa para alternar entre los canales Limpio y Líder.
ya que la señal sale de tu ampli (envío) y regresa (retorno) a éste. En el Bandit 112, el circuito de efectos puede ser insertado, o no, en el paso de la señal usando el Switch Remoto incluido (18). 21. Entrada para Bocina Externa Esta entrada de 1/4" sirve para conectar una bocina externa como la 412M de Peavey. La mínima impedancia para la bocina externa es de 8 ohmios. Esta entrada desconecta la bocina interna al usarse en el Studio Pro 112.
ENVOY® 110 ESPECIFICACIONES SECCIÓN DE AMPLIFICADOR DE PODER: Poder en distorsión: (Normalmente) Entrda de Preampli de Baja Ganancia: Impedancia: ‘High Z’, 44k Ohmios Nivel Nominal de Entrada: -7dBV, 450mV RMS Nivel Mínimo de Entrada: -16dBV, 164mV RMS Nivel Máximo de Entrada: +6dBV, 2V RMS (5% THD, 1 kHz, 120V línea CA) 40W RMS a 6 Ohmios Respuesta de Frecuencias: +0, -2 dB 100 Hz a 20 kHz @ 35W RMS a 6 Ohmios Salida de Audífonos: Impedancia de Carga: 16 Ohmios o mayor Nivel Nominal de Salida: -3 dBV,
STUDIO® PRO 112 ESPECIFICACIONES SECCIÓN DEL AMPLIFICADOR DE PODER: Poder y Carga Clasificados: Entrada de Preampli de Baja Ganancia: Impedancia: High Z, 44 k Ohmios Nivel Nominal de Entrada: -6 dBV, 500mV RMS Nivel Mínimo de Entrada: -17dBV, 142mV RMS Nivel Máximo de Entrada: +6 dBV, 2V RMS Especificaciones de Poder Marcadas con T-Dynamics @ 100% 65W RMS a 8 Ohmios Poder en Saturación (Normalmente) (5% THD, 1 kHz, 120V CA línea) 65W a 8 Ohmios Envío de Efectos: Carga de Impedancia: 1k Ohmios o mayor Ni
BANDIT® 112 ESPECIFICACIONES SECCIÓN DE AMPLIFICADOR DE PODER: Especificaciones de Poder Medidas con T-Dynamics @ 100% Envío de Efectos: Carga de Impedancia: 1 k Ohmios o mayor l Nivel Nomina de Salida: Switch de Nivel de Efectos “out”: -10 dBV, 0.
FRANÇAIS Envoy® 110, Studio® Pro 112 et Bandit® 112 Amplificateurs d'instrument de la Série TransTube® Nous vous félicitons pour votre achat d’un amplificateur d’instrument de la Série TransTube® de Peavey. Que vous soyez un débutant ou un professionnel, vous avez choisi l’amplificateur le plus pratique et le plus performant. Leader du secteur de l’émulation par tube, les circuits TransTube brevetés par Peavey ont ouvert la voie à la deuxième génération de produits.
• • • • Prise pour haut-parleur externe Commande T-Dynamics® Commande de présence (rondeur du son) Commutateur de résonance ALIMENTATION C.A. Avant de mettre sous tension votre ampli de la Série TransTube, vérifiez d’abord que la tension d’alimentation c.a. est appropriée. La tension requise pour votre appareil figure sur l’étiquette située dans le coin supérieur gauche du panneau arrière. 1. Cordon d’alimentation c.a.
5. Entrée de gain bas Cette entrée mono de 6,3 mm est conçue pour les instruments à sorties extrêmement puissantes, qui peuvent provoquer une surcharge (distorsion) sur l’entrée de gain élevé (4). Si vous utilisez les entrées de gains bas et élevé simultanément, le niveau des deux sera bas. CANAL Votre ampli de la série TransTube peut fonctionner sur deux canaux. Les canaux Clean (“son pur”) et Lead (“son meneur, arrangé“) constituent une plate-forme flexible qui vous permet de créer votre ton préféré.
Après avoir effectué tous les réglages EQ et d’agencements sonores du canal, il est possible que vous souhaitiez réinitialiser cette commande. 8. Commutateur Modern/Vintage (Moderne/Millésimé) Ce commutateur vous permet de changer instantanément l’agencement sonore pour reproduire les tonalités des amplificateurs modernes et millésimés. La position MODERN produit un agencement sonore chaud et standard.
12. Lead EQ La fonction TransTube EQ du canal Lead de votre ampli vous donne le choix entre 3 bandes de réglages de tonalité. Chaque commande EQ est passive (n’ajoute aucun gain) et possède une gamme de fréquences qui dépend de la position du commutateur Modern/Vintage/High Gain. En mettant la commande en position “0” (tourner entièrement dans le sens antihoraire), vous coupez au maximum le niveau de la bande en question. Les bandes Basse, Médium et Aigu servent à effectuer ces réglages. 13.
coffre sert à donner plus de basses aux fins des sons, simulant l’effet d’un plus grand coffre. Cette commande se trouve uniquement sur le Bandit 112. PANNEAU ARRIÈRE Les fonctions du panneau arrière des amplis de la série TransTube varient suivant les appareils. Veuillez les lire attentivement. Chaque description de fonction indique le(s) modèle(s) correspondant(s). 1 19 18 20 21 1 18 22 25 1 21 23 24 20 18 18.
20. Boucle à effets Cette paire de prises mono de 6,3 mm produit un parcours SEND (Envoi) et RETURN (Retour) des effets pour le signal du préampli. Brancher la prise SEND à l’entrée du matériel de traitement de signal externe à faible niveau (effets). Renvoyez le signal de votre matériel externe vers la prise RETURN. Ceci est appelé “boucle à effets” car le signal sort de votre ampli (envoi) et revient en boucle (retour) vers ce même ampli.
REMARQUE: Si le problème de bruit persiste, consultez un revendeur Peavey agréé ou le centre de réparation Peavey. L’INTERRUPTEUR DE MISE A LA TERRE NE FONCTIONNE PAS SUR LES MODELES DE 220/240 VOLT.
STUDIO PRO 112 SPECIFICATIONS SECTION AMPLIFICATEUR DE PUISSANCE: Puissance et charge nominales: Entrée de gain bas du préampli: Impédance: High Z, 44 k Ohms Nominal Input Level (Niveau d'entrée nominal): -6 dBV, 500mV RMS Minimum Input Level (Niveau d'entrée minimal): -17dBV, 142mV RMS Maximum Input Level (Niveau d'entrée maximal): +6 dBV, 2V RMS Les spécifications de puissance sont mesurées avec T-Dynamics à 100% 65W RMS en 8 Ohms Puissance au point de saturation: (en général) (5% THD, 1 kHz, ligne CA
BANDIT® 112 SPECIFICATIONS SECTION AMPLIFICATEUR DE PUISSANCE: Entrée de gain bas du préampli: Puissance et charge nominales: Les spécifications de puissance sont mesurées avec T-Dynamics à 100% 80W RMS en 8 Ohms 100W RMS en 4 Ohms Impédance: High Z, 44 k Ohms Nominal Input Level (Niveau d'entrée nominal): -8 dBV, 380mV RMS Minimum Input Level (Niveau d'entrée minimal): -17 dBV, 136 mV RMS Maximum Input Level (Niveau d'entrée maximal): +6 dBV, 2 V RMS Puissance au point de saturation: (en général) (5% T
Correction: Spéciale basse, médium et aigu passive de type EQ (« équaliseur ») Commutateur Modern/Vintage (Clean): Deux agencements sonores EQ différents Commutateur Modern/Vintage/High Gain: Trois agencements sonores EQ et Gain différents Présence: +6 dB à 5 kHz Résonance de poussée: +6 dB à fréquence de résonance du coffre Fonctions de l'interrupteur à pied externe: Sélection: Sélection canal Clean ou Lead Effets: Dérivation de boucle à effets Dimensions (H x L x P): 19,75" x 23,63" x 11,5" 50,16cm x 60
DEUTSCH Envoy® 110, Studio® Pro 112 und Bandit® 112 Transtube® Series-Instrumentenverstärker Herzlichen Glückwunsch zum Kauf eines Peavey Transtube®-Series-Instrumentenverstärker. Ob Sie nun ein Anfänger sind oder semiprofessionell arbeiten, Sie werden keinen praktischeren Verstärker mit so vielen Funktionen finden. Der patentierte Transtube von Peavey ist Marktführer der zweiten Generation von Röhren emulierenden Verstärkern.
• • • • • • Preamp-Ausgang Verstärker-Eingang Externe Lautsprecherbuchse T-Dynamics®-Regler Presence-Regler Resonance-Schalter NETZANSCHLUSS Bevor Sie Ihren Transtube-Series-Verstärker an das Netz anschließen, prüfen Sie die Spannungsleistung Ihrer Stromquelle. Die geeignete Spannungsleistung für Ihren Verstärker ist auf der oberen linken Ecke Ihres rückseitigen Bedienfeldes abzulesen. 1. Netzkabel (im Gehäuse) In der hinteren Gehäuseöffnung, bei dem Lautsprecher, finden Sie das Netzkabel.
5. Low Gain-Eingang Dieser 6,3 mm Mono-Eingang ist für Instrumente mit sehr hohen Output-Levels gedacht, welche den High Gain-Eingang (4) übersteuern (verzerren) können. Wenn beide, der Low Gain- und der High Gain-Eingang gleichzeitig benutzt werden, sind ihre Levels beide Low Gain. Die Kanäle Ihres Tube Series-Verstärkers bieten Ihnen einen 2-Kanal-Betrieb an. Beide, der Clean- und der Lead-Kanal, liefern Ihnen eine flexible Plattform für Ihren eigenen, bevorzugten Ton.
8. Modern/Vintage-Schalter Mit diesem Schalter können Sie sehr schnell zwischen Voicings eines modernen und eines Vintage-Verstärkers wählen. Die Schalterposition MODERN beschreibt ein warmes StandardVoicing. Die Funktion des EQs wird grundlegend mit der Position VINTAGE verändert und fügt dem Klang einen Hauch Helligkeit hinzu. Damit bildet Ihr Verstärker die Klangvorstellungen klassicher Verstärker nach (Emulation).
der “0” Position (gegen den Uhrzeigersinn bis zum Anschlag) reduzieren Sie maximal die Frequenz des jeweiligen Bandes. Low-, Mid- und High-Bänder sind zur Klangregelung vorhanden. 13. Post Gain Wenn Sie jetzt Ihre eigene Klangvorstellung eingestellt haben, benützen Sie den Post GainRegler für die Settings des Gesamt-Levels des Lead-Kanals.
RÜCKSEITIGES BEDIENFELD Die Funktionen auf dem rückseitigen Bedienfeld der Transtube-Series-Verstärker variieren von Modell zu Modell. Bitte lesen Sie dazu sorgfältig die einzelnen Funktionen nach. Jedes Modell hat seine eigene Funktionsbeschreibung. 1 19 18 20 21 1 18 22 25 1 21 23 24 20 18 18. Fußschalterbuchse Diese Buchse ist der Eingang für den passenden Fußschalter Ihres Verstärkers. Der Fußschalter (optional für Envoy 110 und Studio Pro 112) ist ein multifunktionales Gerät.
des externen, Low-Level-Effektgerätes. Legen Sie das Return-Signal von Ihrem externen Gerät zu der RETURN-Buchse Ihres Verstärkers. Diese Verbindung nennt sich Einschleifweg für Effekte, da ein Signal von Ihrem Verstärker ausgeht (Send) und wieder zurück (Return) eingeschleift wird. Mit dem Modell Bandit 112 können Sie die Effekt-Einschleifung mit dem Fußschalter (18) aktivieren/deaktivieren. 21. Externe Lautsprecherbuchse Die 6,3 mm-Buchse ermöglicht den Anschluss einer externen Lautsprecher-Box, wie z.
BEACHTEN SIE: Lassen sich die Geräusche nicht beseitigen, sprechen Sie mit Ihrem PeaveyHändler. DER GROUND-SCHALTER FUNKTIONIERT NICHT BEI 220/240 VOLT-BETRIEB.
STUDIO® PRO 112 SPEZIFIKATIONEN VERSTÄRKER-TEIL: Preamp Low Gain-Input: Nennleistung und Belastung: Power-Spezifikationen, gemessen mit T-Dynamics @ 100% 65W RMS in 8 Ohm Impedanz: High Z, 44 k Ohm Nominaler Input-Level: -6 dBV, 500mV RMS Minimum-Input-Level: -17dBV, 142mV RMS Maximum-Input-Level: +6 dBV, 2V RMS Power @ Clipping: (Standard) Effects Send: (5% THD, 1 kHz, 120V AC-Line) 65W RMS in 8 Ohm Load-Impedanz: 1k Ohm oder mehr Nominaler Output-Level: Effects-Level -9dBV, 355 mV RMS Frequency Re
BANDIT® 112 SPEZIFIKATIONEN VERSTÄRKER-TEIL: Nennleistung und Belastung: Effects Send: Power-Spezifikationen, gemessen mit T-Dynamics @ 100% 80W RMS in 8 Ohm 100W RMS in 4 Ohm Load-Impedanz: 1 k Ohm oder mehr Nominaler Output-Level: Effects Level-Schalter “out”: -10 dBV, 0,32V RMS Effects Level-Schalter “in”: 0 dBV, 1V RMS Power @ Clipping: (Standard) Effects Return: (5% THD, 1 kHz, 120V AC-Line) 80W RMS in 8 Ohm 100W RMS in 4 Ohm Impedanz: High Z, 22k Ohm Designed Input-Level: Effects Level-Schalter
IMPORTANT SAFETY INSTRUCTIONS WARNING: When using electric products, basic cautions should always be followed, including the following: 1. Read these instructions. 2. Keep these instructions. 3. Heed all warnings. 4. Follow all instructions. 5. Do not use this apparatus near water. For example, near or in a bathtub, swimming pool, sink, wet basement, etc. 6. Clean only with a damp cloth. 7. Do not block any of the ventilation openings. Install in accordance with manufacturer’s instructions.
PEAVEY ELECTRONICS CORPORATION LIMITED WARRANTY Effective Date: July 1, 1998 What This Warranty Covers Your Peavey Warranty covers defects in material and workmanship in Peavey products purchased and serviced in the U.S.A. and Canada.
Features and specifications subject to change without notice. Peavey Electronics Corporation • 711 A Street • Meridian • MS • 39301 (601) 483-5365 • FAX (601) 486-1278 • www.peavey.com ©2000 80304681 Printed in the U.S.A.