COMBO COVER
Intended to alert the user to the presence of uninsulated "dangerous voltage" within the product's enclosure that may be of sufficient magnitude to constitute a risk of electric shock to persons. Intended to alert the user of the presence of important operating and maintenance (servicing) instructions in the literature accompanying the product. CAUTION: Risk of electrical shock – DO NOT OPEN! CAUTION: To reduce the risk of electric shock, do not remove cover. No user serviceable parts inside.
ENGLISH Introduction Congratulations and thank you for purchasing one of our Combo Series bass amps. The Combo™ 115 and Combo™ 210TX represent the finest in bass amplification available on the market today. The Combo 115, featuring a 15" Black Widow® speaker, and the Combo 210TX, featuring two heavy-duty 10" bass speakers and a horn-loaded tweeter, are identical with respect to controls and power rating. Because of this, we have put together this owner’s manual to cover both units.
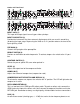
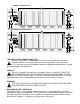
Combo 115 Front Panel 4 2 1 3 13 8 5 6 7 9 10 11 14 15 16 12 17 19 18 Combo 210TX Front Panel 4 2 1 3 13 8 5 6 7 9 10 11 14 15 16 17 19 12 INPUT JACK (1) This input will accept signals from all types of bass pickups. INPUT PAD SWITCH (2) Provided for instruments that have extremely high output, which can result in overdriving (distorting) the input stage. Depressing the switch to its “in” position reduces the level of the input signal by 10 dB.
HIGH (11) An active tone control (shelving type, +/- 15 dB) that varies the high-frequency boost or cut. GRAPHIC IN/OUT SWITCH (12) The “in” position of this switch routes the instrument signal through the 7-band equalizer. The “out” position removes the graphic equalizer from the signal path. GRAPHIC EQUALIZER (13) This 7-band, one octave graphic equalizer provides 15 dB of boost or cut at each center frequency. POST GAIN (14) Controls the overall volume level of the amplifier.
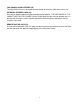
Combo 115 Rear Panel 22 21 20 22 21 23 25 24 25 24 Combo 210TX Rear Panel 23 20 LINE CORD (120V PRODUCTS ONLY) (20) For your safety, we have incorporated a 3-wire line (mains) cable with the proper grounding facilities. It is not advisable to remove the ground pin under any circumstances. If it is necessary to use the equipment without the proper grounding facilities, suitable grounding adapters should be used. FUSE (21) The fuse is located in the cap of the fuse holder.
LINE (MAINS) CORD RETAINER (23) The heatsink on the unit is designed to allow storage of the mains cable when not in use. EXTERNAL SPEAKER JACK (24) An external speaker cabinet may be connected to the amplifier. THE IMPEDANCE OF THE CABINET MUST NOT BE LOWER THAN 4 OHMS. Note that the external speaker jack is in parallel with the internal 4 ohm speaker to produce maximum power (300 watts) into the resultant 2 ohm load.
SPECIFICATIONS: POWER AMPLIFIER SECTION RATED POWER & LOAD: 210W RMS into 4 ohms (with DDT™ compression) 300W RMS into 2 ohms (with DDT™ compression) POWER AT CLIPPING (typically 5% THD, 1 kHz 120 VAC line): 130W RMS into 8 ohms 230W RMS into 4 ohms 340W RMS into 2 ohms FREQUENCY RESPONSE: +0, -1 dB, 100mW to 200W RMS, 20 Hz to 20 kHz into 4 ohms typically below 0.1% THD DDT™: Dynamic Range: Maximum THD: Greater than 20 dB Below 0.
PRE-EQ EFFECTS PATCH PATCH OUT: Function: Low-level pre-EQ effects send Load impedance: 1K ohms or greater Nominal output: -10 dBV, 0.3 V RMS PATCH IN: Function: Low-level pre-EQ effects return Impedance: High Z, 220K ohms Designed input level: -10 dBV, 0.
ESPAÑOL Consulte los diagramas del panel delantero en la sección de inglés de este manual. Introducción Lo felicitamos y le agradecemos la compra de uno de nuestros amplificadores para bajos de la Serie Combo. Los amplificadores Combo™ 115 y Combo™ 210TX representan lo mejor en amplificación para bajos que está disponible en el mercado hoy en día.
ENCHUFE HEMBRA INPUT (Entrada) (1) Esta entrada acepta señales de todos los tipos de pastillas fonocaptoras de bajos. CONMUTADOR DE PAD (Atenuador fijo) (2) Provisto para los instrumentos que tienen una salida extremadamente alta, lo que puede dar como resultado la saturación (distorsión) de la etapa de entrada. Al deprimir el conmutador a su posición hacia “adentro” se reduce el nivel de la señal de entrada en 10 dB.
GRAPHIC EQUALIZER (Ecualizador gráfico) (13) Este ecualizador gráfico de una octava provee un refuerzo o corte de 15 dB a cada frecuencia central. POST GAIN (Ganancia posterior al procesamiento de la señal) (14) Controla el nivel del volumen total del amplificador. El ajuste final del nivel debe hacerse una vez logrado el sonido que se busca. CROSSOVER (Separador de frecuencias) (15) El control FREQUENCY (frecuencia) varía la frecuencia de entrecruzamiento desde 100 Hz a 1 kHz.
NOTA: Es altamente recomendable utilizar el sistema de protección de altavoces DDT CONMUTADOR POWER (Encendido) (19) Para encender el amplificador, oprímalo hasta la posición “ON” (encendido). CABLE DE ALIMENTACIÓN (SÓLO EN PRODUCTOS DE 120 V) (20) Para su seguridad hemos incorporado un cable de alimentación de línea (principal) de tres conductores, con las facilidades de puesta a tierra adecuadas. No es recomendable quitar la clavija de puesta a tierra bajo ninguna circunstancia.
FRANCAIS Veuillez vous référer au “front panel art” situé dans la section en langue anglaise de ce manuel. Introduction Félicitations et merci pour votre achat de l’un de nos amplificateurs pour basse Combo. Le Combo™ 115 et le Combo™ 210TX représentent ce qui se fait de mieux au monde en matière d’amplification de basse. Le Combo 115, équipé d’un haut-parleur Black Widow® de 38 cm (15 po.), et le Combo 210TX, équipé de deux haut-parleurs à haut rendement de 25,4 cm (10 po.
JACK D’ENTREE (1) Ce jack d’entrée accepte des signaux de tous types de basses. COMMUTATEUR DE PAD D’ENTREE (2) Destiné aux instruments à sortie très élevée pouvant provoquer la distorsion de la phase d’entrée. En position enfoncée (position « in »), ce commutateur permet de réduire le niveau du signal d’entrée de 10dB. PRE-GAIN (3) Contrôle le gain d’entrée du préampli. COMMUTATEUR DE BRIGHT (4) Fournit une augmentation (boost) de 8 dB aux fréquences aiguës.
POST GAIN (14) Contrôle le volume général de l’amplificateur. Ne procédez au réglage final qu’après avoir obtenu le son désiré. CROSSOVER (15) La commande de FREQUENCE fait varier la fréquence de séparation de 100 Hz à 1kHz. Réglez cette commande sur la fréquence désirée tout en respectant les recommandations du fabricant des haut-parleurs. Pour installer le COMBO 115/210 pour une utilisation avec deux amplis, un ampli et une enceinte de haut-parleur supplémentaires sont nécessaires.
COMMUTATEUR D’ALIMENTATION (19) Pour mettre l’ampli sous tension, appuyez sur ce commutateur (position « on »). CORDON D’ALIMENTATION (POUR APPAREILS ALIMENTES EN 120 V UNIQUEMENT) (20) Pour votre sécurité, nous avons incorporé un câble d’alimentation à 3 fils avec dispositif de mise à la terre. Il est recommandé de ne jamais retirer la broche de mise à la terre. Toutefois, s’il s’avère nécessaire d’utiliser l’appareil sans ce dispositif, utilisez toujours un adaptateur de mise à la terre.
DEUTSCH Siehe Diagramm der Frontplatte im englischen Teil des Handbuchs. Einführung Herzlichen Glückwunsch und vielen Dank für den Erwerb dieses Baßverstärkers aus unserer Combo Serie. Bei dem Combo™ 115 und dem Combo™ 210TX handelt es sich um Baßverstärker der Spitzenklasse. Der Combo 115 mit seinem 38 cm Black Widow® Lautsprecher und der Combo 210TX mit zwei 25 cm Hochleistungs-Baßlautsprechern und einem Horn-Hochtöner sind in bezug auf Bedienungselemente und Leistungsbemessung identisch.
EINGANGSBUCHSE (1) Über diesen Eingang können Signale von Baßgitarren-Tonabnehmern aller Art zugeführt werden. EINGANGSPUFFERSCHALTER (2) Dieser Schalter ist für Instrumente mit einem extrem hohen Ausgang vorgesehen, der zur Übersteuerung (Verzerrung) der Eingangsstufe führen kann. Wenn der Schalter gedrückt ist, wird der Pegel des Eingangssignals um 10 dB reduziert. PRE GAIN (3) Dient zum Einstellen der Eingangsverstärkung des Vorverstärkers. BRIGHT-SCHALTER (4) Hebt die Höhen um 8 dB an.
GRAPHIC EQUALIZER-SCHALTER (12) Wenn dieser Schalter gedrückt ist (IN), wird das Instrumentensignal durch den Equalizer mit 7 Frequenzbereichen geführt. Bei nicht gedrücktem Schalter (OUT) umgeht das Signal den Graphic Equalizer. GRAPHIC EQUALIZER (13) Dieser Graphic Equalizer mit 7 Frequenzbereichen und einer Oktave gestattet 15 dB Anhebung oder Absenkung an jeder Mittenfrequenz. POST GAIN (14) Dient zur Einstellung des Gesamtlautstärkepegels des Verstärkers.
gelegentlich kurz aufblinkt. Wenn die Anzeige permanent leuchtet, weist dies darauf hin, daß der Leistungsverstärker zu hoch angesteuert wird. Um diesen Zustand zu beheben, reduzieren Sie entweder die Verstärkung oder die Equalizer-Einstellungen, bis die DDT-Anzeige nur gelegentlich aufleuchtet. Das DDT-Lautsprecherschutzsystem läßt sich ausschalten, indem der Schalter gedrückt wird. HINWEIS: Es wird ausdrücklich empfohlen, das DDT-Lautsprecherschutzsystem zu verwenden.
BUCHSE FÜR EXTERNEN LAUTSPRECHER (24) An den Verstärker kann ein externes Lautsprecherkabinett angeschlossen werden. DIE IMPEDANZ DES LAUTSPRECHERKABINETTS DARF NICHT UNTER 4 OHM LIEGEN. Die Buchse für den externen Lautsprecher ist mit dem internen 4 Ohm-Lautsprecher parallel geschaltet, um die maximale Leistung (300 Watt) in die resultierende Belastung von 2 Ohm bereitzustellen.
THIS LIMITED WARRANTY VALID ONLY WHEN PURCHASED AND REGISTERED IN THE UNITED STATES OR CANADA. ALL EXPORTED PRODUCTS ARE SUBJECT TO WARRANTY AND SERVICES TO BE SPECIFIED AND PROVIDED BY THE AUTHORIZED DISTRIBUTOR FOR EACH COUNTRY. Ces clauses de garantie ne sont vaiables qu’aux Etats-Unis et au Canada. Dans tour les autres pays, les clauses de garantie et de maintenance sont fixees par le distributeur national et assuree par lul seion la legislation envigueur.
IMPORTANT SAFETY INSTRUCTIONS WARNING: When using electric products, basic cautions should always be followed, including the following. 1. Read all safety and operating instructions before using this product. 2. All safety and operating instructions should be retained for future reference. 3. Obey all cautions in the operating instructions and on the back of the unit. 4. All operating instructions should be followed. 5. This product should not be used near water, i.e.