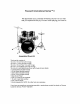
Peavey® International Series™ II We appreciate your purchase of Peary drums! It is our wish that you experience the joy of music while playing your new Kit. Assembled Drum Kit The drum Kit consists of: 12 inch x 10 inch Tom with 12 lugs 13 inch x 11 inch Tom with 12 lugs 18 inch x 16 inch Floor Tom with 12 lugs 22 inch x 14 inch Bass Drum with 16 lugs 14 inch x 6.
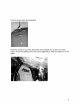
|. Unpacking Make sure that you receive 2 cartons. One labeled 1/2 and the other labeled 2/2. Open carton labeled 1/2. Remove the bass drum heads and 18” tom heads(A) and set to the side. Remove the rest of the contents: 12" tom, 16” tom, bass drum, and drum throne seat(B).
Open carton labeled 2/2. Remove the top box that contains the cymbals. There is no need to open it yet. Remove longest box under the cymbals and open. This box contains the tom lugs, 16" tom legs, bass drum lugs and hoop clamps, tom arms, and 1 pair of drumsticks. Open this box and find the bag that has the bass drum hardware (rim claws, lug bolts, washers, and drum key).
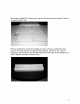
1. Assembly Take the plastic protective bag from the bass drum (the largest drum) and place in front of you with the tom mount facing you and the Peary logo upside down. Get the bass drum heads that were in box 1/1. Find the clear bass drum head with the black Peary logo.
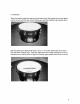
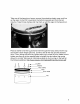
Take one of the bass drum hoops, remove the protective plastic wrap, and line up the seam in the PVC covering to the bottom (opposite end from the tom mounts). Take 8 hoop clamps and line them up with the lugs on the bass drum. Place a washer onto the lug bolt and insert through the hoop clamp into the lug and screw it down finger tight only. Continue this all the way around the bass drum. Then, taking the drum key tighten each lug a couple of turns.
Take the black bass drum head and line up the Peary logo straight across the top of the bass drum. Repeat the above steps for this side of the bass drum in larder to put the front head on. Find the box labeled pedal and remove the contents. Remove the plastic protective wrap. Insert the beater into the top of the pedal and tighten. Insert the pedal stabilizer by squeezing it together and inserting the prong into the hole at the base of the pedal.
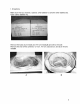
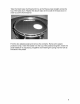
Locate the 16" tom shell. Find the Peary logo and orient it face up toward you. Remove the two rims (held on by two lug bolts). Find the two 15" heads and place one on top of the shell. Take one of the rims and place it on top of the head being sure to line up the lug bolt holes with the lugs. Take 6 lug bolts and 6 washers and tighten them down finger tight. As with the bass drum, tighten them down with the drum key to the desired pitch by going across not around to tune.
Take the two tom arms out of the hardware box and insert them into the top of the bass drum. Make sure that the adjustment key for the arm is to the outside and not together in the middle.
Find the snare stand and assemble. Place the snare on top of the stand with the movable arm to the front of the snare. This is the stabilizer arm and can be tightened to hold the snare firm in the stand.
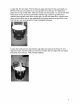
Remove the high hat stand from the stand box and assemble. Place the pole into the top fitting and tighten down. Loosen the screw on the legs and extend them aut. Place the support arms into the holes at the base of the stand by squeezing together and inserting them into place. Remove the high hat clutch from the top of the stand and place one high hat cymbal (one of the two smaller cymbals) on the felt pad at the base.
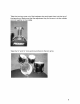
Ta install the clutch onto the other cymbal remove the small thin nut and remove it as well as the washer and one of the two pieces of felt. Slide the high hat cymbal onto the clutch and replace the other felt, washer, and nut. Tighten finger tight Assemble the cymbal stand by placing the top tube into the tube with legs and tightening the screw. Extend the legs so the stand is stable. Remove the wing nut from the top of the stand along with the washer and felt and place the cymbal on the stand.
Find the drum throne (seat and stand) and remove plastic bags. Insert the tube anti the base and make sure that the screw is seated in the grooves, then finger tighten. Take the seat and place on the top tube making sure that it is seated all the way down.