GEN ERA LM US IC ® OWNERS MANUAL English Generalmusic PRO 1/PRO 2 Page 1
Generalmusic PRO 1/PRO 2 Page 2
Table of contents Section 1: Instrument Layout Section 5: Master/Midi Front panel layout; PRO 1 ...................................... 4 PRO 2 ...................................... 5 Back panel ................................... 6 Power and headphones ................ 7 Pedal connections ........................ 8 Midi functions ............................ 30 Master functions ........................ 32 Section 6: Sequencer / Recorder Description of controls .............. 36 Recording ..............
Generalmusic PRO 1/PRO 2 Page 2
Section 1 Instrument Layout Generalmusic PRO 1/PRO 2 Page 3
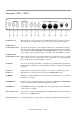
Front and rear panel Front panel - PRO 1 (6) (1) (2) (3) (1) VOLUME SLIDER (2) DATA SLIDER (3) PAGE UP/DOWN BUTTONS (4) MASTER/MIDI (5) PERF EDIT (6) STORE (7) SPLIT (8) BRILLIANCE (9) TRANSPOSE (10) SELECTION BUTTONS (11) SOUNDS/PERF (12) VARIATION (13) REVERB (14) EFFECT (15) TOUCH (16) LOCAL OFF (17) DEMO (7) (4) (5) (8) (9) (12) (10) (11) (13) (14) (15) (16)(17) Controls the main volume of the instrument. Adjusts values shown in the display when using programmable functions.
Front panel - PRO 2 (1) (2) (3) (4) (1) VOLUME SLIDER (2) DATA SLIDER (3) PAGE UP/DOWN BUTTONS (4) EQ SECTION (5) EQ ON/OFF (6) STORE (7) SPLIT (8) TUNE (9) MASTER/MIDI (10) PERF EDIT (11) TRANSPOSE (12) SELECTION BUTTONS (13) VARIATION (14) SOUNDS/PERF (15) REVERB (16) EFFECT (17) TOUCH (18) PLAY AND RECORD (19) LOCAL OFF (20) DEMO (5) (6) (7) (8) (9)(10) (11) (13) (12) (14) (15) (16) (17) (18) (19)(20) Controls the main volume of the instrument.
Rear panel - PRO 1 / PRO 2 (1) (2) (3) (1) SPEAKER JACK (2) RIGHT INPUT (3) LEFT /MONO INPUT (4) (5) (6) (7) (8) (9) (10) (11) (12) (13) This jack allows you to connect a pair of multimedia monitor speakers for practice. This output offers a small amount of power to drive the speakers at a low level. You can use these inputs to connect another instrument or sound module to the piano.
Power switch and headphones Power switch The power switch is located on the back panel at the lower left side. You should always ensure that the power switch is in off position when connecting or disconnecting the power adaptor. Applying power while the switch is on may damage the components inside the unit. Power switch Headphone jack The headphone jack is located at the extreme left side of the metal rail which runs beneath the keyboard.
Pedal connections There are three pedal jacks on the back panel of the PRO 1/PRO 2. The DAMPER pedal jack can accept any type of generic footswitch to provide a "sustain pedal" effect. It should be noted however that this socket can also accept a special "continuous damper pedal", (available from your Generalmusic dealer), which more faithfully replicates the action of an acoustic piano's damper pedal.
Section 2 Quick Study Guide For those of you who don't like to read manuals or wish to read the manual in detail later, here is everything you need to get started.
Basic Functions and Features If you are eager to “dive in” to your new keyboard or if you plan to study the manual more carefully at a later date, read this section first to get an overall feel for the basic operation of the PRO1 and PRO2. These instruments follow a simple and logical design so you should be able to use and understand many of the features without exhaustive description.
If you wish to further edit the sound combination you are making, for example, to adjust the relative volumes of the two sounds or to change the effect send amount for each sound, you can use the features in the PERF EDIT menu. Pressing PERF EDIT will display one of the many available edit pages allowing you to change some aspect of the current combination. The DATA slider is used to adjust the value of whatever is currently displayed.
Storing a Performance Performance selection There are 64 PERFORMANCE memories on-board the PRO1 and PRO2. They are arranged in eight banks from A to H. Each bank contains eight Performances numbered 1 - 8. The sound selection buttons are used to select Performances when the instrument is in PERF mode. Beneath each button you will see different coloured print which indicates that button’s function when the instrument is in PERF mode. Each Performance has both an alpha- numeric reference, (e.g.
Making a Performance from scratch Lets try a complete step by step example. The aim is to make a combination of E. Piano 1, (without variation) and Choir Variation 1. We need the Choir sound to be about half the volume of the Electric Piano. We will add some hall reverb to the sound but we need to have much more reverb on the Choir than on the Electric Piano. When we have finished making this sound combination, we will store it in performance B1. 1.
“Quick Piano” feature Since the PRO 1 and PRO 2 are designed to be played primarily as a piano, both instruments include a function designed to quickly return the instrument to a basic piano sound with no effects. To activate this “Quick Piano” feature, first hold the PIANO 1 button and then press the SOUNDS/PERF button. “Quick Piano” function It is important to remember that PIANO 1 must be held down before you press SOUNDS/PERF.
Section 3 Basic Features This section will explain how to approach the instrument for the first time in a simple fashion. It will help you to get quickly acquainted with the most important features of the instrument.
Selecting sounds After switching the instrument on, pressing any of the sound selection buttons on the front panel will instantly change the sound. The display will show the name of the sound which is currently selected. Variations On the PRO 1, each sound button actually contains two sounds. The second sound can be selected by pressing the VAR button. Refer to the screen to see the name of the variation sound. On the PRO 2, each sound button actually contains three sounds.
Performances What is a performance ? A Performance is simply a memory location in which a sound or combination of sounds has been stored. Usually, when you use an instrument like the PRO 1 or PRO 2, you will spend some time experimenting with different single sounds or combinations of sounds, different effects etc., until you really get the instrument sounding the way you want.
Changing the pitch of the instrument Transpose The TRANSPOSE buttons are located to the left of the sound selection buttons. TRANSPOSE b # Pressing either button will adjust the pitch of the instrument in half-step (semitone) increments. Each press of the (flat) button will reduce the pitch of the instrument by one half step. Each press of the (sharp) button will increase the pitch of the instrument by one half step.
Tone control (PRO 1 model only) Brilliance controls The BRILLIANCE controls on the PRO 1 model allow you to adjust the brightness of the instrument’s tone. BRILLIANCE When both LEDs are off, the tone of the instrument is normal. Press the + button for a brighter tone and the button for a softer tone. (PRO 2 model only) EQ Section The EQ section of the PRO 2 allows you to accurately adjust the tone color of the sound according to taste.
Adding effects Reverb Room, Stage, Hall Both the PRO 1 and PRO 2 offer three reverb presets. These can be selected by repeatedly pressing the REVERB button until the light for the desired effect turns on. The size and depth of these effects can be fully edited using the REVERB SEND and REVERB TIME functions under the PERF EDIT button. (PRO 2 model only) Others When the “Others” light is displayed in the reverb section, you can use the DATA slider to choose from 13 additional reverb types.
Keyboard response Touch Soft, Normal, Hard Both the PRO 1 and PRO 2 offer three different keyboard touch responses or “velocity curves”. These can be selected by repeatedly pressing the TOUCH button until the light for the desired effect turns on. The responses available are; SOFT This is useful for a player with a lighter touch or somebody more accustomed to a synth action keyboard. It requires only a relatively soft touch to achieve maximum volume.
Other controls Local Off This button isolates the PRO 2 from its internal sound engine allowing it to be used as a MIDI controller. When Local Off is selected the display will show only the current program number but not the name of the related internal sound. When in Local Off mode, you may select any bank and program number to be sent to the external MIDI instrument. To do this press the Page up button and use the DATA slider to select a bank number in the range 0-127.
Section 4 Performance Edit When you construct a combination of sounds there are many powerful features available under the PERF EDIT button which can help you tailor the sound combination to your needs.
Editing your performance The functions available under PERF EDIT are divided into a series of individual numbered screens. The screen you see when you press the PERF EDIT button will be the last one used during a previous PERF EDIT session. If you have not used PERF EDIT since first switching the instrument on, you will see the first screen - “Volume & Transpose”. For each PERF EDIT function, you will see the screen number in the top right corner of the display.
3. Reverb Time If a reverb effect has been selected, this function can be used to control the “reverb time” or the delay amount for the particular reverb preset. Basically this allows you to make the overall effect larger or smaller than the factory programmed settings. For example, if you select “HALL” in the reverb section, adjusting the reverb time allows you to create the effect of a larger hall or a smaller hall according to your preference. 4(b).
Assigning pedal functions 7. Pedal 1 Function 8. Pedal 2 Function When a foot pedal is connected to the Pedal 1 or Pedal 2 jack, it can perform a number of different functions. These screens are used to select the function of your choice for each pedal respectively. Each jack can accept either a switch type pedal or a continuous type, (volume), pedal.
12. Auto Wah-Wah Auto Wah-Wah is a classic effect from the vintage keyboard era. The effect can be applied to a single sound or to either of the two sounds in a layer or split. Use the DATA slider to assign the effect. The “Auto Wah-Wah” effect is particularly effective on CLAVI and E. PIANO sounds. 13. Microtuning This feature allows you to select from a variety of alternative tunings. The selection available is as follows; EQUAL Equal temperament tuning.
Other features of PERF EDIT 14. Detune NOTE: This function is only available when a layered or split sound is being used. Increasing the detune value with the DATA slider will detune sound #1 by the number of cents displayed. Lower values are useful for creating a natural chorus effect between two sounds. At higher values a “Honky Tonk” effect can be achieved. 15. Delay Snd 2 NOTE: This function is only available when a layered sound is being used.
Section 5 Master/MIDI Functions The Master/MIDI button contains both the MIDI controls of the instrument and a number of important "Master Control Features".
MIDI functions (PRO 1 Model Only) Tuning This feature allows the entire instrument to be tuned to match another instrument or backing track which may be slightly out of tune. The tuning display uses a standard reference for the pitch of concert A = 440Hz. The available range is 427.5 - 452.5. NOTE: PRO 2 users have a separate front panel control for this same feature (see page 18). 1. 1.Midi Channel This allows you to change the “primary MIDI channel” for the instrument.
The messages that can be filtered are as follows; Program - Midi program change messages Volume - Midi volume message All Cont. - All midi controller functions, (volume, modulation, pan etc.) Prog + Vol - Program change and volume Pedals - Hold, sustain, sostenuto, soft Pitch - Pitch bend 6. Midi OUT Filters. This function is used to stop the instrument from transmitting certain MIDI messages which might be unwanted on some occasions.
Master functions 8. Computer Here you can set the operating mode for the computer serial port on the instrument’s back panel. This port allows two-way communication between the instrument and a PC without the need for a MIDI interface. A cable to connect the instrument to your IBM or Macintosh serial port can be obtained from your Generalmusic dealer. There are three modes which can be selected from this screen. Select the one which is most compatible with your type of computer. 1. Apple Macintosh 2.
13. Restore Perfs This feature allows you to restore all of the factory pre-programmed performances. NOTE: Doing this will destroy any performances which you have saved into the instrument yourself. To activate the function, move the DATA slider until the screen says “All Performances”. Then press the Page up button. Respond to the “Press ^ to restore” prompt by pressing the Page up button once more. 14. Restore Tune This feature allows you to reset the USER tuning temperament, (PERF EDIT page 12).
16. Numbering This feature allows you to select your preferred program numbering system when controlling external instruments in LOCAL OFF mode. In some sound modules and keyboards the first sound is referred to as program #1 and the last sound as #128. In other systems the first sound is referred to as program #0 and the last sound as #127. This parameter allows you to select which of the two systems, 0-127 or 1-128, you wish to use.
Section 6 Sequencer / Recorder The PRO 2 features a simple but powerful sequencer which allows you to faithfully record your playing or create simple two track songs.
Play and record The recorder or “sequencer” section in the PRO 2 allows you to record a two-track Song of about 45,000 events, (around 20,000 notes). You can record one track at a time. In playback, you can play along with up to two Sounds in real time, you can deactivate a recorded track and play along with just one recorded track. Controls Play/Stop Starts and stops either playback or recording. Pause Stops a playback or recording midway.
Quick & easy recording There are two ways to record on the PRO 2: A. Record your song just as you play it. For example, you may want to record in Layer mode using Concert Grand and Strings. B. Record one track at a time. While the first recorded track is in playback, you can record the second track. For example, you can record a Bass sound in Track 1 and a Piano sound in Track 2. Refer to the recording procedure detailed on the next page. Recording your song just as you play it.
Recording a two track song Setting up You can enter record mode after selecting the sound or sounds that you want to use for your recording, or you can select the required sound configuration after entering record mode. • When you first enter record mode, the PRO 2 will be configured to record a song in 4/4 time with a Tempo of 120 beats per minute. • The tempo can be adjusted by pressing the METRON. button and using the page buttons to increase or decrease the current tempo.
7. When you have finished, press Play/Stop to stop the recording. • The instrument will remain in Record mode. • The recorded track is confirmed (the relative LED stops flashing and remains permanently on.) NOTE: If you pressed REC to exit record mode at this point, you could play along with the recorded track using any sound of your choice. 8. Press the Track 2 button. • The led above the button starts to flash. You may select a sound for the new track a this stage. 9.
Advanced features Pause / Continue The PAUSE button actually has two functions; 1. PAUSE: To temporarily stop playback while recording or listening. 2. CONTINUE: To commence playback or recording from a pre-determined point. If PAUSE is pressed during playback or recording the song will immediately stop. If you wish to resume playback or recording from the point where you stopped then you must press PAUSE again instead of pressing START/STOP.
Section 7 Reference Section
Generalmusic PRO 1/PRO 2 Page 42
Technical specifications - PRO 1 Keyboard 88 keys, Hammer action Play Modes Single, Split (programmable), Layer mode - 2 sounds max 64 programmable performances Sound Generation 64 oscillators + Dynamic Filter Polyphony: 64 notes maximum, 32 notes minimum Presets 32 sounds: Piano1, Piano2, El.Grand, El. Piano 1, El.Piano 2, Dx Piano, Clav, Vibes, Harpsi, Organ, Pipe, Strings, Choir, Pad 1, Pad 2, Bass. Each sound has 2 variations.
Technical specifications - PRO 2 Keyboard 88 keys, Hammer action Play Modes Single, Split (programmable), Layer mode - 2 sounds max 64 programmable performances Sound Generation 128 oscillators + Dynamic Filters Polyphony: 128 notes maximum, 64 notes minimum Presets 48 sounds: Piano1, Piano2, El.Grand, El. Piano 1, El.Piano 2, Dx Piano, Clav, Vibes, Harpsi, Organ, Pipe, Strings, Choir, Pad 1, Pad 2, Bass. Each sound has 3 variations.
Technology The PRO 1 and PRO 2 feature three unique applications of sound design technology including “physical modelling” to simulate the internal characteristics of a piano soundboard. Natural string resonance The first physical modelling technology, patented by Generalmusic as “Natural String Resonance”, allows all of the complex harmonics normally produced by the piano soundboard to be faithfully reproduced.
Generalmusic PRO 1/PRO 2 Page 46
Index A G Advanced release technology ......................................... 45 Generalmusic damper pedal ............................................. 8 All Notes Off .................................................................. 22 Alternate tunings ............................................................ 27 H Auto detect, (pedal) .......................................................... 8 Hard touch setting ........................................................... 21 Auto Wah-Wah .......
O S Octave shift, (transpose) .......................................... 18, 24 “Others”, (reverb and effects) ......................................... 20 Output jacks ...................................................................... 6 Overdubbing ................................................................... 39 Saving performances ...................................................... 12 Sequencer controls .......................................................... 36 Serial port .............
FEDERAL COMMUNICATIONS COMMISSION Note: This equipment has been tested and found to comply with the limits for a Class B digital device, pursuant to Part 15 of FCC Rules. These limits are designed to provide reasonable protection against harmful interference in a residential installation. This equipment generates, uses, and can radiate radio frequency energy and, if not installed and used in accordance with the instructions, may cause harmful interference to radio communications.
Stock Code 271099 Specifications are subject to change without prior notice. PRINTED IN ITALY Sales Division: I -47848 S.Giovanni in Marignano (RN) - Italy – Via delle Rose, 12 Tel. +39 541 959511 – fax +39 541 957404 – tlx 550555 GMUSIC I – Internet: http://www.generalmusic.