TRANSCHORUS 210 ™ Operating Guide
Intended to alert the user to the presence of uninsulated Òdangerous voltageÓ within the productÕs enclosure that may be of sufficient magnitude to constitute a risk of electric shock to persons. Intended to alert the user of the presence of important operating and maintenance (servicing) instructions in the literature accompanying the product. CAUTION: Risk of electrical shock Ñ DO NOT OPEN! CAUTION: To reduce the risk of electric shock, do not remove cover. No user serviceable parts inside.
ENGLISH TransChorusª 210 Congratulations on your purchase of the Peavey TransChorusª 210. The TransChorusª 210 combines PeaveyÕs patented TransTube¨ tube emulation with the latest developments in chorus design. If you havenÕt played through a Peavey TransTube¨ amp you are in for a real treat. Transtube¨ technology produces a tone so similar to tubes that itÕs deceiving to even the most experienced ears.
Step 9. Experiment with the footswitch to get familiar with how the three different channels are selected. Note: The Select button on the amp must be pressed (down position) in order for the footswitch to work. Step 10. To adjust the overall level of each channel, use the Volume knob for the Clean channel and the Post Gain controls for the Crunch and Lead channels. Step 11. To adjust the amount of distortion in the Crunch and Lead channels, use the Pre Gain knob.
Crunch Channel Pregain (7) Controls the input level of the Crunch channel. Adjusting this control clockwise will increase the input level, thus increasing distortion. Thrash Switch (8) When activated (in), this switch attenuates a preset portion of the mid range resulting in a more ÒheavyÓ sound and an apparent increase in distortion. Gain Switch (9) When activated (in), this switch boosts the pregain of the Crunch channel resulting in increased distortion.
Depth (18) Adjusting this control clockwise will result in an increase in the depth or intensity of the chorus effect. This control adjusts the amount of chorus you actually hear from the output of the amp. T. Dynamics¨ (19) This control adjusts the usable power of the internal power amps from 10% (counter clockwise) to 100% (clockwise). Rotating this control clockwise will result in more available power.
AC LINE CORDÑ120 V PRODUCTS ONLY (26) For you safety, we have incorporated a three-wire line (mains) cable with proper grounding facilities. It is not advisable to remove the ground pin under any circumstances. If it is necessary to use the equipment without proper grounding facilities, suitable grounding adapters should be used. Less noise and greatly reduced shock hazard exists when the unit is operated with the proper grounded receptacles.
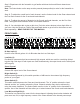
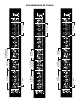
To Taste Out In JAZZ RHYTHM Out JAZZ CLEAN Out Out In In Out CLEAN BLUES RHYTHM BLUES In In JAZZ LEAD Out In LEAD BLUES Out In In To Taste In In MODERATE DISTORTION In CLEAN METAL To Taste To Taste To Taste RECOMMENDED SETTINGS:
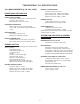
TRANSCHORUSª 210 SPECIFICATIONS PREAMP LOW GAIN INPUT: (ALL MEASUREMENTS @ 120 V AC, 60HZ) Impedance: High-Z, 44 k ohms Nominal Input Level: -6 dBV, 500 mV RMS Minimum Input Level: -16 dBV, 158 mV RMS Maximum Input level: 6 dBV, 2 V RMS POWER AMPLIFIER SECTION RATED OUTPUT POWER: Power specs measured with T.
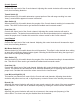
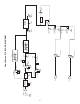
INPUTS SPEAKER FOOT SWITCH SPEAKER SWITCH LOGIC CLEAN/ULTRA PUSH CHANNEL 1st GAIN STAGE PREGAIN CRUNCH FOOT SWITCH LEAD SWITCH LOGIC PUSH BRIGHT CLEAN PREGAIN PUSH BRIGHT LEAD PUSH THRASH POST LEAD POST MID HI T. DYNAMICS ¨ POWER AMP T.
IMPORTANT SAFETY INSTRUCTIONS WARNING: When using electric products, basic cautions should always be followed, including the following: 1. Read these instructions. 2. Keep these instructions. 3. Heed all warnings. 4. Follow all instructions. 5. Do not use this apparatus near water. For example, near or in a bathtub, swimming pool, sink, wet basement, etc. 6. Clean only with a damp cloth. 7. Do not block any of the ventilation openings. Install in accordance with manufacturerÕs instructions.
ESPA„OL TransChorusª 210 Felicitaciones por su compra del amplificador Peavey TransChorusª 210. Este amplificador combina la emulaci—n de tubos de vac’o Transtube¨ patentada de Peavey con los œltimos avances en cuanto a dise–o de amplificadores corales. Si nunca us— un amplificador Peavey TransTube¨ para ejecutar, ahora tiene una oportunidad para deleitarse. La tecnolog’a Transtube¨ produce un tono tan similar a la de los tubos de vac’o que enga–a hasta a los o’dos con m‡s experiencia.
Paso 6. Enchufe el conmutador de pedal en el enchufe hembra del conmutador remoto situado en la parte posterior de la unidad. Paso 7. Reduzca el volumen de la guitarra y utilice el interruptor de alimentaci—n situado en la parte posterior de la unidad para encender el amplificador. Paso 8. Aumente gradualmente el volumen de la guitarra hasta alcanzar el valor m‡ximo o el nivel o tono con el que se sienta c—modo. Paso 9.
posici—n Òhacia adentroÓ para que el conmutador de pedal estŽ operativo. El conmutador de pedal tambiŽn le permitir‡ seleccionar entre los canales de efectos estridentes y l’der. Ecualizaci—n de bajos, medios y altos (6) Esta secci—n corresponde al control de tonos pasivos del canal limpio. Si lleva estas perillas hacia la derecha pasar‡ m‡s contenido de bajas, medias y altas frecuencias del canal limpio a los amplificadores de potencia internos.
Ecualizaci—n de bajos, medios y altos (15) Esta secci—n corresponde al control de tonos pasivos de los canales de efectos estridentes y l’der. Si lleva estas perillas hacia la derecha pasar‡ m‡s contenido de bajas, medias y altas frecuencias a los amplificadores de potencia internos. Reverberaci—n (16) Lleve este control hacia la derecha para obtener m‡s contenido de reverberaci—n en la salida del amplificador independientemente del canal.
Entrada del amplificador de potencia (23) Estos enchufes hembra monoaurales izquierdo y derecho de 1/4 pulg. constituyen una entrada para cada uno de los amplificadores de potencia. Cuando se usan junto con los enchufes hembra de salida del preamplificador (24), se forma un circuito de efectos estereof—nicos que permite emplear retardos estereof—nicos y diversos efectos. Salida del preamplificador (24) Estos enchufes hembra monoaurales izquierdo y derecho de 1/4 pulg.
ESPECIFICACIONES DEL AMPLIFICADOR TRANSCHORUSª 210 Entrada de baja ganancia del preamplificador: (TODAS LAS MEDIDAS SE ESPECIFICAN PARA 120 V CA, 60 Hz) Impedancia: Alta impedancia, 44 kW Nivel de entrada nominal: Ð6 dBV, 500 mVef Nivel de entrada m’nimo: Ð16 dBV, 158 mVef Nivel de entrada m‡ximo: 6 dBV, 2 Vef SECCIîN DEL AMPLIFICADOR DE POTENCIA Salida del preamplificador: Potencia de salida nominal: Impedancia de carga: 300 W o mayor Nivel de salida nominal: 0 dBV, 1 Vef Las especificaciones de pot
INSTRUCCIONES DE SEGURIDAD IMPORTANTES ADVERTENCIA: Al utilizar productos elŽctricos se deben respetar las precauciones b‡sicas, que incluyen las siguientes: 1. Lea estas instrucciones. 2. Conserve estas instrucciones. 3. Preste atenci—n a todas las advertencias. 4. Respete todas las instrucciones. 5. No utilice este aparato cerca del agua. Por ejemplo, cerca o dentro de ba–eras, piscinas, lavaderos, s—tanos hœmedos, etc. 6. Limpie el aparato solamente con un trapo hœmedo. 7.
FRAN‚AIS TransChorusª 210 Nous vous fŽlicitons pour lÕachat de cet amplificateur Peavey TransChorusª 210. Le TransChorusª 210 associe lÕŽmulation des lampes brevetŽe TransTube¨ aux design le plus moderne en mati•re de chorus. La technologie TransTube¨ reprŽsente des annŽes de recherche sur lÕŽmulation du Óson lampeÓ et sur les amplis pour guitare en gŽnŽral. Le prŽampli a ŽtŽ dŽveloppŽ afin de recrŽer toutes les caractŽristiques du rendu harmonique et de la distorsion de lampes.
10. Utilisez le contr™le de Volume pour dŽterminer le volume du canal Clean et utilisez les contr™les Post Gain pour les canaux Crunch et Lead. 11. Utilisez le contr™le Pre Gain pour dŽterminer la quantitŽ de distorsion des canaux Crunch et Lead. Tourner le contr™le dans le sens horaire pour augmenter le niveau de saturation. 12. Jouez et utilisez les diffŽrents sŽlecteurs de lÕamplificateur afin de comprendre leur effet sur le son de lÕamplificateur.
10. Post Gain Contr™le le niveau gŽnŽral du canal Crunch. Ce contr™le doit •tre ajustŽ une fois que vous avez trouvŽ votre son et peut •tre considŽrŽ comme le contr™le de volume du canal Crunch. Canal Lead 11. Pregain Contr™le le niveau dÕentrŽe du canal Lead. En tournant ce contr™le dans le sens horaire, le niveau de saturation du signal est accrut. 12. SŽlecteur Mid Boost Permet de booster les frŽquences mŽdium (en position enfoncŽe).
FACE ARRIéRE 22 21 23 24 23 24 25 26 21. Interrupteur dÕalimentation Appuyez sur cet interrupteur pour mettre lÕappareil sous tension. La LED dÕalimentation sÕallumera pour indiquer que lÕappareil est alimentŽ. 22. Ecouteurs stŽrŽo Cette entrŽe Jack vous permet de connecter des Žcouteurs standards. LÕutilisation dÕun casque dŽconnecte les amplificateurs de puissance. Aucun son ne peut donc •tre entendu lorsque vous utilisez des Žcouteurs. 23.
TRANSCHORUSª 210 SPECIFICATIONS PREAMP LOW GAIN INPUT: (ALL MEASUREMENTS @ 120 V AC, 60HZ) Impedance: High-Z, 44 k ohms Nominal Input Level: -6 dBV, 500 mV RMS Minimum Input Level: -16 dBV, 158 mV RMS Maximum Input level: 6 dBV, 2 V RMS POWER AMPLIFIER SECTION RATED OUTPUT POWER: Power specs measured with T.
NOTE IMPORTANTE CONCERNANT LA SECURITE ATTENTION: Lors de lÕutilisation de appareils Žlectriques, certaines mesures de sŽcuritŽ doivent •tre respectŽes: 1. Lisez toutes les instructions. 2. Conservez ces instructions. 3. Tenez compte de tous les avertissements. 4. Suivez prŽcisemment les instructions. 5. NÕutilisez pas lÕappareil ˆ proximitŽ de lÕeau. Par exemple prŽs dÕun bain, dÕune piscine, dÕun Žvier, ou dans un sous-sol humide. 6. Nettoyez avec un chiffon sec uniquement. 7.
DEUTSCH TransChorusª 210 Herzlichen GlŸckwunsch zum Kauf des Peavey TransChorusª 210. Dieses GerŠt kombiniert die patentierte TransTube¨ Emulation mit den neuesten Techniken in der Chorus-Effektverarbeitung. Die TransTube¨ Technologie und der neue Chorus-Effekt mit dem klaren und ÒbreitenÓ Klang werden Sie mit Sicherheit zum Staunen bringen. Weitere Features am TransChorusª 210 sind der Reverb, die drei KanŠle, zwei Equalizer und die Stereo-Endstufe mit PeaveyÕs T. Dynamics¨ Schaltung.
Step 12. Nun sind Sie mit den Voreinstellungen fertig und kšnnen anfangen zu spielen. Probieren Sie alle Knšpfe und Regler aus, um die Funktionsweise und die EffektivitŠt kennen zu lernen, gerade bei den Reverb und Chorus-Reglern.....UND NUN VIEL SPA§. DIE FRONT Siehe Diagramm der Frontplatte im englischen Teil des Handbuchs. Hi Gain Input (1) Wird von den meisten E-Gitarren benštigt. Dieser Eingang ist ca. 6 dB lauter als der Low Gain Input.
Gain Switch (13) Dieser Schalter fŸhrt zu mehr Verzerrung und dem damit verbundenen Sustain. Auch der Feedbackeffekt lŠsst sich mit diesem Schalter erreichen. Post Gain (14) ...regelt die LautstŠrke des Lead Kanals. Low, Mid, and High EQ (15) Diese Sektion ist eine passive Klangregelung fŸr die KanŠle Clean und Lead. Drehen Sie z.B. den Bass/Low Regler rechts herum, so lŠ§t dieser mehr tiefe Frequenzen des Originalsignal zur Endstufe durch.
Power Amp In (23) Diese EingŠnge L/R sind dazu geeignet den Preamp zu umgehen und einen anderen VorverstŠrker zu benutzen. Werden aber normalerweise dazu benutzt, um einen Effekt einzuschleifen in Verbindung mit den Preamp Out Buchsen (24). Preamp Out (24) Diese AusgŠnge L/R sind dazu geeignet die Endstufe zu umgehen und eine andere Endstufe zu benutzen. Werden aber normalerweise dazu benutzt, um einen Effekt einzuschleifen in Verbindung mit den Preamp In Buchsen (23).
TRANSCHORUSª 210 SPECIFICATIONS PREAMP LOW GAIN INPUT: (ALL MEASUREMENTS @ 120 V AC, 60HZ) Impedance: High-Z, 44 k ohms Nominal Input Level: -6 dBV, 500 mV RMS Minimum Input Level: -16 dBV, 158 mV RMS Maximum Input level: 6 dBV, 2 V RMS POWER AMPLIFIER SECTION RATED OUTPUT POWER: Power specs measured with T.
WICHTIGE SICHERHEITSRICHTLINIEN WARNUNG: Beim Einsatz elektrischer GerŠte sollten stets nachfolgend genannte grundlegende Sicherheitsrichtlinien beachtet werden: 1. Lesen Sie diese Richtlinien. 2. Bewahren Sie diese Richtlinien stehts griffbereit auf. 3. Beachten Sie sŠmtliche Richtlinien. 4. Befolgen Sie alle Anweisungen. 5. Benutzen Sie das GerŠt nicht in unmittelbarer WassernŠhe (z. B. Badewanne, Waschbecken, Swimming-Pool, etc.). 6. Nur mit einem feuchten oder klammen Tuch reinigen. 7.
PEAVEY ELECTRONICS CORPORATION LIMITED WARRANTY Effective Date: July 1, 1998 What This Warranty Covers Your Peavey Warranty covers defects in material and workmanship in Peavey products purchased and serviced in the U.S.A. and Canada.
Features and specifications subject to change without notice. Peavey Electronics Corporation ¥ 711 A Street ¥ Meridian, MS 39301 ¥ U.S.A. (601) 483-5367 ¥ Fax (601) 486-1678 ¥ www.peavey.com ©1999 80304550 Printed in U.S.A.