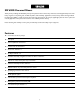
XR®600G Operation Manual For more information on other great Peavey products, go to your local Peavey dealer or online at www.peavey.
Intended to alert the user to the presence of uninsulated “dangerous voltage” within the product’s enclosure that may be of sufficient magnitude to constitute a risk of electric shock to persons. Intended to alert the user of the presence of important operating and maintenance (servicing) instructions in the literature accompanying the product. CAUTION: Risk of electrical shock — DO NOT OPEN! CAUTION: To reduce the risk of electric shock, do not remove cover. No user serviceable parts inside.
IMPORTANT SAFETY INSTRUCTIONS WARNING: When using electrical products, basic cautions should always be followed, including the following: 1. 2. 3. 4. 5. 6. 7. 8. 9. 10. 11. 12. 13. 14. 15. 16. 17. 18. Read these instructions. Keep these instructions. Heed all warnings. Follow all instructions. Do not use this apparatus near water. Clean only with a dry cloth. Do not block any of the ventilation openings. Install in accordance with manufacturer’s instructions.
ENGLISH ® XR 600G Powered Mixers Thank you for purchasing the XR600G by Peavey. This powered mixer includes many of the latest technological developments from Peavey engineers. Incorporating two‚ 200 Watt amplifiers‚ dual 9-band EQ‚ digital effects‚ FLS® (Peavey’s award-winning Feedback Locating System)‚ DDT™ speaker protection as well as many other features‚ this compact‚ lightweight powered mixer is perfect for most any application. More power. More features. More reliability.
QUICK SET-UP GUIDE 1. Connect speakers to your XR600G. Route speaker cable for safety‚ taping down if necessary. 2. Be certain that all levels are down and your EQ is flat. 3. Connect all microphones and instruments. Turn on power to the XR600G and set master controls to the 12:00 position. 4. Use mode switch to select both power amplifiers for main speakers or one amplifier for mains and one amplifier for monitors. 5. Adjust channel level controls for proper volume mix.
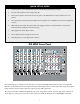
Channel Section Channels 1–4 feature all of the same great controls. Channels 5 and 6 include all of the features of the first four channels except the -25 dB pad. These two channels also feature dual 1/4" input jacks (summed to mono); perfect for digital keyboards or other devices with stereo outputs. Channel 7 is designed primarily for tape players/recorders‚ CD players or other similar devices. 9 Channels 1–4 8 1.
Channels 5–6 10 & 11. Line Inputs: High impedance 1/4" input for line-level signals. The inputs are summed to mono‚ allowing a stereo source to be input into these channels. In critical situations‚ two mono line sources can be connected to one input. 11 10 Channel 7 12. Line In: This pair of RCA phono jacks accepts a stereo input (nominally -10 dBV) from the output of a tape deck‚ CD player or other similar device. The signal is placed on the main channel as well as the monitor mix. 13.
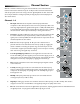
Master Section You’ll find enough features in the Master Section of the XR600G to fit most sound reinforcement situations. Our audacious engineers (these guys are nuts) have been busy adding features to these products that you won’t find in any other powered mixer. A DSP effects processor‚ 9-band EQ‚ FLS® Feedback Locating System‚ DDT™ speaker protection and much more.
15. EFX Defeat: Depressing this button defeats the Effects. The effects may also be defeated via the footswitch input (32). 16. EFX Select: This rotary switch selects one of sixteen available effects. See the table below.
24. DDT™ Speaker Protection: Peavey’s award-winning speaker protection is built into the XR600G. This important feature allows you to maximize the power amplifiers without fear of distortion. 25. Graphic EQ: These 9-band EQs are fixed on one-octave centers. They are designed for 12 dB of cut or boost. The equalizers are placed before the Preamp outputs and therefore‚ the Main and monitor preamp outputs are post-EQ. 26.
35. AC Power Inlet: This is the receptacle for the supplied IEC line cord. This provides AC power to the unit. Connect the supplied line cord to this connector to provide power to the unit. Damage to the equipment may result if improper line voltage is used (see line voltage markings on the unit). 36. Power: The main power switch for the XR600G. The power on LED indicator (front) will light when the unit is powered. 37. Fuse: This is the main safety fuse for the AC line voltage.
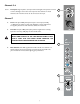
XR600G Hookup Diagrams The following hookup diagrams are only suggestions. This powered mixer provides enough flexibility for a variety of needs. Just use common sense when hooking up your equipment. When in doubt‚ consult your authorized Peavey dealer.
XR600G Monitor/Main Mode Keyboard 13
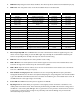
XR®600G · Technical Specifications XR600G · Input Specifications: Input Z Function Input Gain Control Input Levels Bal (ohms) Min Settings Min** Nominal* Lo-Z Mic (150 ohms) 2k Max w/o pad (50dB) Max w/pad (25dB) -59dBu -34dBu -29dBu -4dBu -11dBu +14dBu Bal Line Input 22k Max w/o pad (30dB) Max w/pad (5dB) -27dBu -2dBu +2dBu +27dBu +21dBu +46dBu Unbal Tape 20k Max Gain (30dB) -26dBu +4dBu +21dBu Unbal Max Connector Unbal XLR Pin 1 Gnd Pin 2 (+) Pin 3(-) 1 ⁄4" TRS; Tip (+) Ri
XR600G · Hum and Noise: Output Residual Noise Test Conditions Ref: 4dBu Main Monitor -100dB -90dB -81dB -100dB -90dB -82dB All controls down 1 channel nominal‚ Master nominal Master Fader Nominal‚ Channel Faders Nominal‚ Mic Inputs Terminated @ 150ohms All controls down 1 channel nominal‚ Master nominal Master Fader Nominal‚ Channel Faders Nominal‚ Mic Inputs Terminated @ 150ohms (Hum and Noise measurements: 22Hz–22kHz BW) S/N Ratio: >85dB below rated power output‚ Mic/Line to Speaker Output Equival
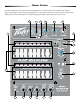
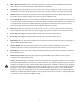
XR600G Block Diagram 16
ESPAÑOL ® Mezcladoras Amplificadas XR 600G Gracias por tu compra de la XR600G de Peavey. Esta mezcladora amplificada incluye muchos de los últimos avances tecnológicos desarrollados por los ingenieros de Peavey.
GUÍA DE INSTALACIÓN RÁPIDA 1. Conectar los parlantes a la XR600G. Acomodar los cables tomando en cuenta la seguridad, asegurándolos con cinta adhesiva si es necesario. 2. Asegurarse que todos los niveles están abajo y que el EQ está en posición plana. 3. Conectar todos los micrófonos e instrumentos. Encender la XR600G y ajustar los controles maestros a la posición de las 12:00. 4.
Selección de Canales Los canales 1-4 ofrecen los mismos controles. Los canales 5 y 6 incluyen todas las características de los primeros cuatro canales excepto la reducción (pad) de -25 dB. Estos dos canales también ofrecen entradas dobles de 1/4" (sumadas a mono), perfectas para teclados digitales u otros aparatos con salidas estéreo. El canal 7 ha sido diseñado para reproductores de cintas, de CDs u otros apartaos similares. 9 Canales 1–4 1. 2. 3. 4.
Canales 5–6 10 & 11 Entradas de Línea: Entradas de alta impedancia de 1/4" para señales de nivel de línea. Estas entradas son sumadas a mono, permitiendo la conexión de una fuente estéreo a estos canales. En situaciones críticas, se pueden conectar dos fuentes mono a una entrada. 11 10 Canale 7 12. Entrada de Línea: Este par de conectadores estéreo RCA aceptan una entrada estéreo (nominal -10 dBV) de la salida de un CD, Reproductor de cintas u otro aparato similar.
Sección Maestra Encontrarás suficientes posibilidades y características en la sección maestra de la XR600G para satisfacer la mayoría de situaciones de amplificación de sonido. Nuestros audaces ingenieros (estos tipos están locos) han estado ocupados añadiendo funciones a estos productos que no podrás encontrar en otras consolas amplificadas. Un procesador digital, ecualizador de 9 bandas, sistema contra retroalimentación FLS™, protección de parlantes DDT™ y mucho más.
15. Cancelación de Efecto: Oprimir este botón cancela los efectos. Los efectos también pueden ser cancelados por medio de la pedalera (33). 16. Selección de Efectos: Este interruptor rotativo selecciona el preset de efecto o preset definido por el usuario. Ver la tabla abajo.
24. Protección de parlantes DDT™: El reconocido sistema de protección de parlantes de Peavey está incluido en la XR600G. Esta importante función te permite maximizar el poder de los amplificadores sin miedo a distorsión. 25. Ecualizador gráfico: Estos ecualizadores de 9 bandas están centrados en puntos de una octava. Han sido diseñados para 12 dB de incremento o recorte.
37. 35. Entrada de Corriente CA: Este es el receptáculo para el cable de corriente IEC incluido. Este provee corriente a la unidad. Conecta el cable a este conectador para alimentar de energía la unidad. El equipo puede sufrir daños si se usa el voltaje equivocado (ver marcas de voltaje en la unidad). 36. Poder: El interruptor de poder principal para la XR600G. El LED de poder (al frente) se encenderá cuando la unidad esté encendida.
DEUTSCH ® XR 600G Power-Mischer Wir möchten uns bei Ihnen dafür bedanken, dass Sie sich für den XR600G von Peavey entschieden haben. Dieser Power-Mischer weist zahlreiche modernste technische Neuerungen auf, die von unseren Peavey-Technikern entwickelt wurden.
KURZANLEITUNG FÜR SETUP 1. Schließen Sie die Lautsprecher an Ihren XR600G an. Achten Sie darauf, dass die Lautsprecherkabel sicher verlegt sind, und kleben Sie sie bei Bedarf ab. 2. Stellen Sie sicher, dass alle Pegel heruntergedreht sind und der EQ keinen Ausschlag zeigt. 3. Schließen Sie sämtliche Mikrophone und Instrumente an. Schalten Sie den XR600G ein, und stellen Sie die MasterRegler auf die Position 12 Uhr. 4.
Kanalauswahl Die Kanäle 1-4 sind sämtlich mit denselben hervorragenden Regelmöglichkeiten ausgestattet. Die Kanäle 5 und 6 umfassen alle Funktionen der ersten vier Kanäle mit Ausnahme der 25dB-Dämpfung. Diese beiden Kanäle sind zudem mit zweifachen 1/4"-Eingangsklinken (zu Mono summiert) ausgestattet, die sich ideal für digitale Keyboards oder andere Geräte mit Stereo-Ausgängen eignen. Kanal 7 ist in erster Linie für Tonbandgeräte, Kassettenrekorder, CD-Player oder dergleichen geeignet. 9 Kanäle 1–4 1.
Kanale 5 UND 6 10 & 11. Line Input: Hochohmiger 1/4"-Eingang für Line-Pegelsignale. Die Eingänge werden zu Mono summiert, sodass eine Stereo-Quelle an diese Kanäle angeschlossen werden kann. In kritischen Situationen können zwei Mono-Line-Quellen an einen Eingang angeschlossen werden. 11 10 Kanal 7 12. Line In: An diese Cinch-Kopfhörerklinken kann ein Stereoeingang (nominal 10 dBV) vom Ausgang eines Tonbandgerätes, CD-Players oder dergleichen angeschlossen werden.
Master-Stufe Die Master-Stufe des XR600G ist mit so vielen Funktionen ausgestattet, dass für nahezu jeden Beschallungszweck die richtige dabei ist. Unsere innovativen Techniker – geniale Tüftler – haben diese Produkte mit allerlei zusätzlichen Merkmalen ausgestattet, die kein anderer Power-Mischer vorweisen kann. Dazu gehören ein DSP-Effektprozessor, ein 9-Band-EQ, FLS® Feedback Locating System, DDT™-Lautsprecherschutz und vieles mehr.
15. EFX Defeat: Bei Tastendruck werden die Effekte deaktiviert. Die Effekte können auch über den Fußschaltereingang (32) deaktiviert werden. 16. EFX Select: Mit diesem Drehschalter wird einer der 16 verfügbaren Effekte ausgewählt. (Siehe Tabelle unten.
24. DDT™-Lautsprecherschutzschaltung: Peaveys preisgekrönte Lautsprecherschutzschaltung ist in den XR600G integriert. Dank dieser beeindruckenden Funktion können Sie aus Ihren Endstufen das Letzte herausholen, ohne sich Gedanken um Verzerrung machen zu müssen. 25. Graphic EQ: Diese 9-Band-Equalizer sind auf Einoktav-Mitten festgelegt. Sie sind für eine Absenkung oder Anhebung um 12 dB ausgelegt.
35. AC Power Inlet: Diese Steckdose steht für das beiliegende IEC-Netzkabel zur Verfügung, über das das Gerät mit Wechselstrom versorgt wird. Schließen Sie das Netzkabel an diesen Stecker an, um das Gerät mit Strom zu versorgen. Wird eine ungeeignete Netzspannung verwendet, kann dies das Gerät beschädigen (siehe Spannungsangaben am Gerät). 35 36 37 36. Power: Dies ist der Netzschalter für den XR600G. Wird das Gerät mit Strom versorgt, leuchtet die ON-LED auf der Vorderseite auf. 37.
FRANÇAIS ® XR 600G Powered Mixers Merci d’avoir choisi la XR 600G de Peavey. Ce mixeur amplifié inclue bon nombre des dernières technologies développées par notre équipe d’ingénieurs.
DEMARRAGE RAPIDE 1. Connectez les haut-parleurs à votre XR 600G. Prétez attention au cheminement des cables, qui seront fixés au sol si nécessaire. 2. Assurez-vous que les niveaux soient au minimum et les égalisation plates. 3. Connectez tous les micros et instruments. Mettez votre unité sous tension et les volumes principaux de sorties en position 12:00. 4.
Section Canaux Les canaux 1 à 4 vous proposent tous les mêmes contrôles. Les canaux 5 et 6 vous proposent de plus deux entrées Jack 1/4’’ (sommés sur le canal) mais sans proposer de pad d’atténuation, parfaits pour accepter tout signal d’un lecteur CD, clavier ou autre. 9 Canaux 1–4 1. 2. 3. 4. ENTRÉE MICRO: Entrée XLR symétrique basse impédance optimisée pour un microphone ou toute autre source de signal bas niveau. La broche 2 est l’entrée positive.
Canaux 5–6 10 & 11. ENTRÉE LINE (double, sommée): Entrée symétrique Jack de 6,35 mm (TRS) pour signaux de niveau ligne. Idéale pour les sorties de modules de sons ou d’équipement audio stéréo, cette entrée somme (mixe) les signaux droit et gauche (L/R) en un signal mono. Il est aussi possible de connecter un clavier différent à chacune des entrées et ainsi mixer leur signal en n’utilisant qu’un seul canal. 11 10 Canal 7 12.
Section Principale Incluant toutes les fonctionnalités nécessaires à la plupart des applications, le section principale de votre XR 600G vous permet de contrôler la diffusion de votre signal de mix.
15. EFX Defeat: Cet interrupteur vous permet d’activer/désactiver le processeur d’effets. Vous pouvez également obtenir la même fonction à partir de l’entrée pédalier (32). 16. EFX Select: Ce contrôle rotatif vous permet de choisir parmis les 16 combinaisons d’effets disponibles. Reportezvous au tableau ci-dessus pour plus de détail.
24. DDT™ Speaker Protection: Un des nombreux brevets Peavey! Ce système vous réduit automatiquement le gain du signal amplifié dans le cas de détection de distortion dans celui-ci. Il permet d’optimiser la puissance de votre système. 25. EQ Graphique: Ces égaliseurs à 9 bandes sont centrés sur 1 octave. Conçus pour une réduction de 12 dB et une augmentation de 12 dB. Ils sont directement reliés aux entrées de leurs amplis de puissance respectifs. 26.
35. CONNECTEUR D’ALIMENTATION: Prise pour cordon d’alimentation IEC, fournissant l’électricité à la console de mixage/ampli. Branchez le cordon d’alimentation pour mettre la console sous tension. L’équipement peut être endommagé si une tension d’alimentation incorrecte est utilisée (voir les spécifications de tension sur la console). 36. Power: Interrupteur d’alimentation principal de la table de mixage. La LED d’alimentation s’allume lorsque la console est sous tension. 37.
NOTES: 41
NOTES: 42
PEAVEY ELECTRONICS CORPORATION LIMITED WARRANTY Effective Date: July 1, 1998 What This Warranty Covers Your Peavey Warranty covers defects in material and workmanship in Peavey products purchased and serviced in the U.S.A. and Canada.
Features and specifications subject to change without notice. Peavey Electronics Corporation • 711 A Street • Meridian • MS • 39301 (601) 483-5365 • FAX (601) 486-1278 • www.peavey.com ©2003 80302143 Printed in the U.S.A.