
Installation User guide

ISSUED: 01-25-07 SHEET NO: 009-9035-2 01-18-11
2 of 3
Visit the Peerless Web Site at www.peerlessmounts.com For customer care call 1-800-729-0307 or 708-865-8870.
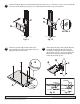
Slide screen mount bracket (F) onto upright so
that 1/4-20 nuts (I) slide into slots of upright as
shown in fi gure 2.1 and detail 1. Slide screen
mount bracket to desired position, level, then
tighten 1/4-20 x 12mm screws (H) using 4mm
allen wrench (L).
Loosely attach four 1/4-20 x 12mm screws (H) and
1/4-20 nuts (I) to screen mount bracket (F).
F
K
I
HD
A
C
F
SLOT
fi g 2.1
H
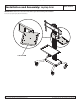
NOTE: If you are adding new shelf to an already assembled product, reverse steps up to the shelf installation step
(removing screen and adapter plate from cart) following the main instruction sheet.
E
I
UPRIGHT
F
H
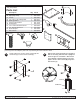
Description Qty. Part #
A
laptop tray 1 009-1227
B laptop tray clamp 1 009-1020
C T-knob 1 590-1057
D 1/4" - 20 x 1 3/4" carriage bolt 1 520-1017
E plastic grommet 2 590-1074
F screen mount bracket 1 201-1156
G shelf support 1 009-1230
H 1/4 x 12 mm decorative screw 7 520-2325
I 1/4 - 20 mm square nut 4 530-1050
K button bumper 5 590-1209
L allen wrench 1 560-9646
Parts List
Before you begin, make sure all parts shown are included
with your product.
B
L
G
1 2
DETAIL 1
I
H