IB14X14-W, IB14X14-AC-W MAX 25 lb (11 kg) ENG ESP FRN DEU NEL ITL ČEŠ SLK POR TÜR 1 2019-07-09 #:120-9228-1
WARNING ENG - This product is designed to be installed on wood stud walls or drywall. Hardware is included for wood stud and drywall installation. Before installing make sure the supporting surface will support the combined load of the equipment and hardware. Screws must be tightly secured. Do not overtighten screws or damage can occur and product may fail. Never exceed the Maximum Load Capacity. Always use an assistant or mechanical lifting equipment to safely lift and position equipment.
AVVERTENZA ITL - Questo prodotto è stato progettato per essere installato su pareti in cartongesso o con montanti in legno. È inclusa la viteria per l’ installazione sia su montanti in legno che su cartongesso. Prima di iniziare l’installazione, accertarsi che la superficie di supporto sia in grado di sorreggere il carico combinato unità/dispositivi di fissaggio. Le viti devono essere strette in maniera ben salda. Non serrare le viti oltre il necessario, altrimenti si rischiano danni o guasti al prodotto.
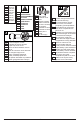
ENG ESP FRN DEU NEL ITL ČEŠ SLK POR TÜR Symbols Símbolos Symboles Symbole Symbolen Simboli Symboly Symboly Símbolos Semboller ENG ESP FRN DEU Do not overtighten screws. No apriete de más los tornillos. Ne pas trop serrer les vis. Ziehen Sie die Schrauben nicht zu fest an. Draai de schroeven niet te strak aan. Non stringere troppo le viti. Šrouby neutahujte příliš silně. Skrutky neuťahujte príliš silno. Não apertar demasiado os parafusos. Vidaları gereğinden fazla sıkmayın.
ENG ESP FRN DEU NEL ITL ČEŠ SLK POR TÜR Tools Needed for Assembly. Herramientas necesarias para el ensamblaje. Outils nécessaires au montage. Für den Zusammenbau erforderliche Werkzeuge. Voor montage benodigd gereedschap. Attrezzi necessari per l’assemblaggio. Nástroje potřebné k montáži. Nástroje potrebné na montáž. Ferramentas necessárias para a montagem. Montaj İçin Gerekli Aletler. ENG To properly tighten screws: Tighten until screw head makes contact, then tighten another 1/2 turn.
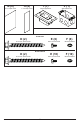
ENG ESP FRN DEU NEL ITL ČEŠ SLK POR TÜR Parts (Before beginning, make sure you have all parts shown below). Piezas (antes de iniciar, asegúrese de tener todas las piezas siguientes). Pièces (avant de commencer, assurez-vous d’avoir toutes les pièces illustrées ci-dessous). Teile (Achten Sie vor Beginn der Arbeiten darauf, dass alle unten abgebildeten Teile vorhanden sind). Onderdelen (hoort u zich ervan te overtuigen dat u alle onderdelen hebt, die hieronder te zien zijn).
G (2) 3" x 4" tape cover H (4) 1" x 3" tape cover D (2) I (1) IB14X14-W #14 x 2.5" wood screw D (2) J (1) surge suppressor steel switch box E (6) #6 x 1/4 hex screw IB14X14-AC-W #14 x 2.
1 ENG ESP FRN DEU NEL ITL ČEŠ SLK POR TÜR ENG ESP FRN DEU NEL ITL ČEŠ SLK POR TÜR Wood stud wall. Pared de madera. Mur en bois. Holzwand. Houten muur. Parete di legno. Dřevěná stěna. Drevená stena. Parede de madeira. Ahşap duvar. 1a Drywall Tablaroca Cloison sèche Trockenbauwand Gipsplaat Wallboard 5/8" Sádrokarton Sadrokartón Contraplacado Alçıpan 1b ENG ESP FRN DEU NEL ITL ČEŠ SLK POR TÜR New construction. (Pre-Drywall) Nueva construcción. Construction neuve. Neue Konstruktion. Nieuwe constructie.
WAARSCHUWING NEL - Als de Peerless-wandbevestiging op een muur bestaand uit houten balken en gipsplaat wordt geïnstalleerd, horen deze houten balken een afmeting van ten minste 5 x 10 cm te hebben. De wandbevestiging mag niet worden geïnstalleerd op gipsplaat met een dikte van meer dan 19mm.
1a-2 14-7/16" (367mm) 14-7/16" (367mm) ENG Using dimensions shown, draw outline for in-wall box. Make sure lines are level before removing drywall. ESP Utilizando las dimensiones indicadas, trace un bosquejo de la caja que va dentro de la pared. Cerciórese de que las líneas estén niveladas antes de quitar el yeso-cartón. FRN Tracez le contour du boîtier encastré à l’aide des dimensions indiquées. Assurez-vous que les lignes sont de niveau avant de retirer la cloison sèche.
1a-4 ENG Box flush with front of drywall. Mark mounting holes. ESP Caja colocada a ras frente al yeso-cartón. Marque los orificios de montaje. FRN Boitier aligné avec la plaque de plâtre. Marquez les trous de fixation. DEU Box bündig mit der Vorderseite der Trockenwand. Markieren Sie die Montagelöcher. NEL Box mag niet buiten de voorkant van de gipsplaat uitsteken. Markeer montagegaten. ITL Scatola a filo con la parte anteriore della parete in cartongesso. Contrassegna I fori di montaggio.
1a-6 1.5" (38mm) 5/32" (4mm) 5/32" (4mm) ENG Drill mounting holes into supporting surface (1.5" (38mm) minimum depth required). ESP Taladre los agujeros de montaje en la superficie de apoyo; se requiere una profundidad mínima de 1.5" (38mm). FRN Percez les trous de fixation dans la surface de support, une profondeur minimale de 1,5 po (38mm) est requise. DEU Bohren Sie Montagelöcher in die Montagefläche; Mindesttiefe von 38mm (1.5 Zoll) erforderlich.
1a-8 ENG ESP FRN DEU NEL ITL ČEŠ SLK POR TÜR Install using wood screws provided. Nivele e instale. Mettez à niveau et procédez au montage. Waagerecht ausrichten und anbringen. Installeer de schroeven waterpas. Livella e installa. Vyrovnejte a namontujte. Vyrovnajte a namontujte. Nivelar e instalar. Dengeleyin ve takın. 3/8" (10mm) D (2) ENG ESP FRN DEU NEL ITL ČEŠ SLK POR TÜR Maximum 80 in. • lb (9 N.M.). Máxima 80 in. • lb (9 N.M.). Maximum 80 in. • lb (9 N.M.). Maximum 80 in. • lb (9 N.M.).
1b WARNING ENG - When installing Peerless wall mounts directly to gypsum board (drywall), verify that the gypsum board (drywall) has a minimum depth of 3/8” (10mm). ADVERTENCIA ESP - Al instalar los soportes para pared de Peerless en yeso-cartón, verifique que el yeso-cartón (drywall) tenga una profundidad mínima de 3/8" (10mm).
1b-1 14-7/16" (367mm) 14-7/16" (367mm) ENG Using dimensions shown, draw outline for in-wall box. Make sure lines are level before removing drywall. ESP Utilizando las dimensiones indicadas, trace un bosquejo de la caja que va dentro de la pared. Cerciórese de que las líneas estén niveladas antes de quitar el yeso-cartón. FRN Tracez le contour du boîtier encastré à l’aide des dimensions indiquées. Assurez-vous que les lignes sont de niveau avant de retirer la cloison sèche.
1b-2 A 1/4" (6mm) E (4) F (4) B 1b-3 A 16 2019-07-09 #:120-9228-1
1b-4 C (2) 1b-5 1/4" (6mm) 2 1 2 3 C (2) E (2) F (2) 17 2019-07-09 #:120-9228-1
1c WARNING ENG - When installing Peerless wall mounts on a wood stud wall, verify that the wood studs are a minimum of 2" x 4" nominal size. ADVERTENCIA ESP - Cuando vaya a instalar soportes de pared de Peerless en paredes con montantes de madera, verifique que los montantes tengan un tamaño mínimo de 2" x 4".
1c-1 1c-2 A Thickness of drywall. Grosor del yeso-cartón. Épaisseur de la plaque de plâtre. Stärke der Trockenwand. Dikte van de gipsplaat. Spessore della parete in cartongesso. Tloušťka sádrokartonu. Hrúbka sadrokartónu. Espessura da parede de madeira coberta com painéis de gesso (drywall). TÜR Alçıpan duvar kalınlığı. ENG ESP FRN DEU NEL ITL ČEŠ SLK POR 1c-3 ENG ESP FRN DEU NEL ITL ČEŠ SLK POR TÜR Mark mounting holes. Marque los orificios de montaje. Marquez les trous de fixation.
1c-4 1c-5 1.5" (38mm) 5/32" (4mm) 5/32" (4mm) ENG Drill mounting holes into supporting surface (1.5" (38mm) minimum depth required). ESP Taladre los agujeros de montaje en la superficie de apoyo; se requiere una profundidad mínima de 1.5" (38mm). FRN Percez les trous de fixation dans la surface de support, une profondeur minimale de 1,5 po (38mm) est requise. DEU Bohren Sie Montagelöcher in die Montagefläche; Mindesttiefe von 38mm (1.5 Zoll) erforderlich.
1c-6 1c-7 A 3/8" (10mm) ENG ESP FRN DEU NEL ITL ČEŠ SLK POR TÜR ENG ESP FRN DEU NEL ITL ČEŠ SLK POR TÜR Install using wood screws provided. Nivele e instale. Mettez à niveau et procédez au montage. Waagerecht ausrichten und anbringen. Installeer de schroeven waterpas. Livella e installa. Vyrovnejte a namontujte. Vyrovnajte a namontujte. Nivelar e instalar. Dengeleyin ve takın. D (2) Maximum 80 in. • lb (9 N.M.). Máxima 80 in. • lb (9 N.M.). Maximum 80 in. • lb (9 N.M.). Maximum 80 in. • lb (9 N.M.).
1c-8 ENG ESP FRN DEU NEL ITL ČEŠ SLK POR Note: Drywall installed. Nota: Instalado en yeso-cartón. Remarque : Plaque de plâtre installée. Hinweis: Trockenwand bereits installiert. Let op: Gipsplaat geïnstalleerd Nota – Parete in cartongesso installata. Všimněte si: Nainstalovaný sádrokarton. Všimnite si: Nainštalovaný sadrokartón. Observação: Instalação na parede de madeira coberta com painéis de gesso (drywall). TÜR Not: Alçıpan duvar monte edildi.
2 ENG If additional tape is needed, make sure to use UL listed (ALKW) metal tape. ESP Si necesita más cinta adhesiva, asegúrese de utilizar cinta adhesiva metalizada (ALKW) aprobada por UL. FRN En cas de besoin de ruban adhésif supplémentaire, assurez-vous d’utiliser du ruban adhésif métallique homologué UL (ALKW). DEU Wenn zusätzliches Band erforderlich ist, muss UL-gelistetes Metallband (ALKW) verwendet werden.
3 ENG Access plate can be temporarily removed to install UL listed single receptacle electrical box. ESP La placa de acceso se puede quitar momentáneamente para instalar una caja eléctrica de un solo receptáculo clasificada por UL. FRN La plaque d’accès peut être temporairement retirée pour installer un coffret de branchement à prise unique homologué UL. DEU Die Zugangsplatte kann vorübergehend entfernt werden, um einen UL-gelisteten Schaltkasten mit einer Steckbuchse zu montieren.
4 ENG ESP FRN DEU NEL ITL ČEŠ SLK POR TÜR Remove. quite. retirez. entfernen. verwijderen. rimuovere. odstranit. odstrániť. remova. çıkartın. ENG ESP FRN DEU NEL ITL ČEŠ SLK POR TÜR Lay part on a soft surface. Coloque la pieza sobre una superficie suave. Posez la pièce sur une surface non dure. Teil auf eine weiche Oberfläche legen. Leg het onderdeel op een zachte ondergrond. Porre il pezzo su una superficie morbida. Položte součástku na měkký povrch. Položte súčiastku na mäkký povrch.
5 5-1 ENG These units are intended to be installed in accordance with the applicable requirements of the National Electric Code and Local Authorities having Jurisdiction. ESP These units are intended to be installed in accordance with the applicable requirements of the National Electric Code and Local Authorities having Jurisdiction. FRN These units are intended to be installed in accordance with the applicable requirements of the National Electric Code and Local Authorities having Jurisdiction.
6-1 ENG Replace ESP Remplace FRN Remettez en place DEU Ersetzen NEL Vervangen ITL Rimettere a posto ČEŠ Znova nasadit SLK Znova nasadiť POR Coloque novamente TÜR Değiştirin 6-2 1/4" (6mm) ENG Replace ESP Remplace FRN Remettez en place DEU Ersetzen NEL Vervangen ITL Rimettere a posto ČEŠ Znova nasadit SLK Znova nasadiť POR Coloque novamente TÜR Değiştirin 27 2019-07-09 #:120-9228-1
7 ENG ESP FRN DEU NEL ITL ČEŠ SLK POR TÜR Ground point Punto de conexión a tierra. Point de mise à la masse. Erdungsanschluss. Massapunt. Punto di messa a terra. Bod uzemnění. Bod uzemnenia. Ponto de aterramento. Zemin noktası.
LIMITED FIVE-YEAR WARRANTY Peerless Industries, Inc. (“Peerless-AV”) warrants to original end-users that each Peerless-AV® mounting product will be free from defects in material and workmanship, under normal use, for the applicable warranty period (from date of the original installation of the product). At its option, Peerless-AV will repair or replace, or refund the purchase price of, any product which fails to conform with this warranty.
BESCHRÄNKTEN FÜNFJÄHRIGEN GARANTIE Peerless Industries, Inc. („Peerless-AV”) übernimmt gegenüber den ursprünglichen Endnutzern die Gewährleistung, dass alle PeerlessAV®-Montageprodukte unter normalen Einsatzbedingungen für die zutreffende Garantiefrist (ab Datum der ursprünglichen Installation des Produkts) frei von Material- und Verarbeitungsfehlern sind. Peerless-AV repariert oder ersetzt nach eigenem Ermessen ein Produkt, das dieser Garantie nicht entspricht, oder erstattet den Kaufpreis dafür.
OMEZENÁ PĚTILETÁ ZÁRUKA Společnost Peerless Industries, Inc. (“Peerless-AV“) zaručuje prvním koncovým uživatelům, že každý montážní výrobek Peerless-AV® bude při běžném používání po příslušnou záruční dobu (ode dne první instalace výrobku) bez materiálních a výrobních vad. Podle rozhodnutí zákazníka společnost Peerless-AV opraví, vymění či vrátí kupní cenu u jakéhokoliv výrobku, u kterého dojde k porušení této záruky.
Peerless-AV 2300 White Oak Circle Aurora, IL 60502 Email: tech@peerlessmounts.com Ph: (800) 865-2112 Fax: (800) 359-6500 www.peerless-av.com Peerless-AV Europe Unit 3 Watford Interchange, Colonial Way, Watford, Herts, WD24 4WP, United Kingdom Customer Care 44 (0) 1923 200 100 www.peerless-av.com Peerless-AV de Mexico Ave de las Industrias 413 Parque Industrial Escobedo Escobedo N.L Mexico 66062 Servicio al Cliente 01-800-849-65-77 www.peerless-av.com © 2019, Peerless Industries, Inc.