Peerless® Partner® Indirect-Fired Water Heater PT-30 PT-40 PT-50 PT-60 PT-80 PT-120 Installation, Operation & Maintenance Manual
TABLE OF CONTENTS TABLE OF CONTENTS USING THIS MANUAL 1 A. INSTALLATION SEQUENCE . . . . . . . . . . . . . .1 B. SPECIAL ATTENTION BOXES . . . . . . . . . . . . .1 PRODUCT & SAFETY INFORMATION 2 1. PREINSTALLATION 3 A. CODES COMPLIANCE . . . . . . . . . . . . . . . . . . .3 B. CODES RESTRICTIONS . . . . . . . . . . . . . . . . . .3 C. OPERATING RESTRICTIONS . . . . . . . . . . . . . .3 D. LOCATING WATER HEATER . . . . . . . . . . . . . .3 E. PRODUCT SELECTION . . . . . . . . . . . . . . . . . .4 F.
USING THIS MANUAL USING THIS MANUAL A. INSTALLATION SEQUENCE Follow the installation instructions provided in this manual in the order shown. The order of these instructions has been set in order to provide the installer with a logical sequence of steps that will minimize potential interferences and maximize safety during boiler installation. DANGER Indicates a condition or hazard which will cause severe personal injury, death or major property damage. WARNING B.
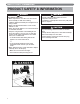
PRODUCT SAFETY & INFORMATION PRODUCT SAFETY & INFORMATION DANGER HOT WATER CAN SCALD! • Water temperatures over 125ºF can cause severe burns instantly or death from scalding. • Children, disabled and elderly are at highest risk of being scalded. • Never leave them unattended in or near shower, bathtub or sink. • Never allow small children to use a hot water faucet or draw their own bath.
PREINSTALLATION 1. PREINSTALLATION A. CODES COMPLIANCE Water heater installation must conform with the instructions in this manual and where applicable: • • C. OPERATING RESTRICTIONS 1. Maximum domestic hot water temperature is 194ºF for commercial applications and 140ºF for residential applications. local, state, provincial, and national codes, laws, regulations and ordinances. 2. Maximum boiler water temperature is 210ºF. in Canada - CAN / CGA B149.1 or B149.2 Installation Code. 3.
PREINSTALLATION E. PRODUCT SELECTION DANGER 1. The following guidelines apply to residential systems only. For commercial or institutional installations contact your local PB Heat, LLC representative. 2. Determine the quantity of domestic hot water required. Factors to consider: a. Estimate typical peak hour demand. Determine the general time of day (morning, noon, evening) when the most hot water is used. Use chart below to determine potential maximum usage. b. Estimate unusual peak draw demand.
PREINSTALLATION F. RECOMMENDED CLEARANCES 3. Recommended top or vertical clearance is 12" minimum. 1. Water heater should be installed to allow adequate clearance for servicing. 4. Refer to boiler manual for boiler clearances. 2. Zero clearance is permissible to any side of the Peerless® Partner® water heater, but information labels may be hidden. 5. See Figure 1.1 for recommended service clearances. Figure 1.
INSTALLATION - PIPING 2. INSTALLATION – PIPING A.
INSTALLATION - PIPING i. a suitable place for disposal F. or VACUUM BREAKER Installing a vacuum breaker Watts N36-M1 or equivalent on the domestic cold water inlet will prevent damage to the inner tank if a negative pressure is developed in the domestic supply line. See manufacturer’s instructions for application and installation of the vacuum breaker. ii. terminate within 12" of the floor C. AUTOMATIC AIR VENT 1. Remove plastic shipping cap from 1/2" NPT pipe fitting on top center of water heater.
INSTALLATION - PIPING NOTICE Do not apply heat to the cold water inlet when making sweat connections to water heater. Sweat tubing to adapter before fitting adapter to cold water inlet of heater. It is imperative that no heat be applied to the cold water inlet, as it contains a non metallic dip tube. 4. When the water supply pressure is higher than 70 psig, it is recommended to install a pressure reducing valve on cold water supply line to prevent water loss through T&P relief valve. 5.
INSTALLATION - PIPING DRAWINGS 3. INSTALLATION – PIPING DRAWINGS 12" min. Heat Trap Loop (Optional) 12" min. Heat Trap Loop (Optional) 13 1 1 5 H M 10 9 5 C 6 4 Cold Water Inlet 1 Figure 3.1: Peerless® Partner® Recommended Installation: Domestic Water Piping 12" min. Heat Trap Loop (Optional) Recirculating Loop 3 2 4 5 1 9 1 6 1 Cold Water Inlet 10 5 12" min. Heat Trap Loop (Optional) 11 Figure 3.
INSTALLATION - PIPING DRAWINGS Figure 3.3: Domestic Water Drain Tube Assembly: Commonwealth of Massachusetts Requirements 12" min. Heat Trap Loop (Optional) 12" min. Heat Trap Loop (Optional) 4 13 M 1 C 6 8 5 1 Cold Water Inlet H 5 10 9 11 Figure 3.4: Peerless® Partner® Domestic Water Piping: Commonwealth of Massachusetts Requirements 1. 4. 5. 6. 8. 9. 10 Shut-off valves T&P relief valve Unions Backflow preventer or pressure reducing valve (*) Vacuum breaker Drain valve 10.
INSTALLATION - PIPING DRAWINGS Figure 3.
INSTALLATION - PIPING DRAWINGS Figure 3.6: Peerless® Partner® Boiler Piping with Zone Valves Figure 3.
INSTALLATION - PIPING DRAWINGS Figure 3.8: Peerless® Partner® Boiler Piping with Plate Heat Exchanger for “Double Wall” Applications (Refer to the PureFire® Installation, Maintenance, and Operations Manual for alternate piping configurations). Figure 3.9: Peerless® Partner® Boiler Piping for Peerless® PUREFIRE® Condensing Boilers Note: Contact PB Heat for optional heat exchanger kit for "Double Wall" applications.
INSTALLATION - PIPING DRAWINGS T&P Relief Valve Cold Water Inlet Isolation Valve Circulator Recirculated Water Automatic Mixing Valve Hot Water Outlet Cold Water Inlet • Recommended for most applications. • Any one water heater tank thermostat may be utilized to control system temperature. • Install automatic mixing valve at either the hot water outlet of the water heater system or at each hot water fixture. • Each tank should be piped with a drain as shown in Figure 3.1. Figure 3.
INSTALLATION - PIPING DRAWINGS Figure 3.
INSTALLATION - WIRING 4. INSTALLATION – WIRING WARNING Electrical shock hazard can cause severe personal injury, death or substantial property damage. Disconnect power before installing and/or servicing. B. CIRCULATORS Priority relay must be sized for total amp draw of all circulators. C. ZONE VALVES A. WIRING REQUIREMENTS 1. All wiring must be a minimum of 18 gauge and installed in accordance with: a. U.S.A.
INSTALLATION – WIRING DRAWINGS 5. INSTALLATION – WIRING DRAWINGS Figure 5.1: Typical 4-Wire Zone Valve Zoning, With Domestic Priority Figure 5.
INSTALLATION – WIRING DRAWINGS 24 V.A.C. Figure 5.3: Typical 4-Wire Zone Valve Zoning, Without Domestic Priority 18 Figure 5.
INSTALLATION – WIRING DRAWINGS 2 Figure 5.5: Typical Circulator Zoning With Domestic Priority Figure 5.
INSTALLATION – WIRING DRAWINGS Figure 5.7: Circulator Zoning Without Domestic Priority, Series MI Figure 5.
INSTALLATION – WIRING DRAWINGS Note: Maximum of 4 total circulator zone when wiring 1 zone for priority. Figure 5.
WATER HEATER START-UP 6. WATER HEATER START-UP A. FILLING THE INNER (DOMESTIC WATER) TANK CAUTION Never use water heater unless inner and outer tanks are completely filled with water. Inner tank must be completely filled and pressurized before pressurizing outer tank. 1. Close domestic water drain valve. 6. If antifreeze is used in boiler water, check concentration.
WATER HEATER START-UP DANGER HOT WATER CAN SCALD! – Install an automatic mixing valve at water heater or at each hot water faucet, bath and shower outlet. Selection and installation must comply with valve manufacturer’s recommendation and instructions. D. ADJUSTING THE WATER HEATER THERMOSTAT Water heater thermostat is factory set to its lowest temperature.This may or may not be suitable for your needs. Turn thermostat knob clockwise to increase water temperature.
WATER HEATER MAINTENANCE 7. WATER HEATER MAINTENANCE A. MAINTENANCE SCHEDULE Annual service by qualified service technician should include the following: 1. Any procedure required by local codes. 2. Check air vent operation. 3. Verify system pressure. Air venting procedure may require adding water to bring system up to pressure, typically 12 psig. B. FILLING WATER HEATER See “Filling the Inner (Domestic Water) Tank and “Filling the Outer (Boiler Water) Tank” on in Section 6.A and 6.B. C.
WATER HEATER MAINTENANCE D. DRAINING INNER (DOMESTIC WATER) TANK (See Domestic Piping Fig. 3.1) 1. Disconnect snap set wiring connection at water heater. a. If outer (boiler water) tank pressure is greater than 15 psig, relieve boiler pressure and close isolation valves before proceeding. E. DRAINING OUTER (BOILER WATER) TANK 1. Disconnect snap set wiring connection at water. 2. Close boiler water isolation valves between boiler and water heater. 3. Connect hose to boiler water drain valve at water heater.
TROUBLESHOOTING 8. TROUBLESHOOTING Table 8.1: Troubleshooting Problem Cause Solution Refer to boiler installation instructions Boiler does not operate Check main service switch Check fused disconnect Circulator does not operate No hot water at faucet.
REPAIR PARTS 9. REPAIR PARTS Table 9.
REPAIR PARTS Figure 9.1: Peerless® Partner® Tank Components Figure 9.
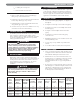
WATER HEATER DIMENSIONS & RATINGS C 10. WATER HEATER DIMENSIONS & RATINGS Figure 10.1: Figure 10.2: Top View Rear View Table 10.1 PEERLESS® PARTNER® DIMENSIONS & RATINGS Capacity (gallons) Water Heater Model DomesNumber tic Boiler PT-30 28 5 Boiler Piping Connections Head (NPT) Loss at Min. Heating Flow Surface (Ft. of Domes(sq. ft.) Water) tic Boiler Aux. 13 .75 1 ³⁄₄ ³⁄₄ Dimensions (inches) A 38 B 9 C 30 D 22 E 14 F 6 Thermostat Drywell Empty Length Weight (inches) (lbs.
PERFORMANCE RATINGS 11. PERFORMANCE RATINGS Table 11.
PERFORMANCE RATINGS Table 11.
NOTES 32
Peerless® Partner® Indirect-Fired Water Heater PT-30 PT-40 PT-50 PT-60 PT-80 PT-120 Installation, Operation & Maintenance Manual TO T H E I N S TA L L E R : This manual is the property of the owner and must be affixed near the water heater for future reference. TO T H E O W N E R : This water heater should be inspected annually by a Qualified Service Agency. PB HEAT, LLC 131 S. CHURCH STREET • BALLY, PA 19503 ©2011 PB Heat, LLC. All rights reserved. X8167 R0 (12/11-2M) Printed in U.S.A.