
Installation Guide


5 76
86626 Rev. B3
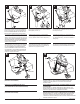
With pivot (1) facing toward faucet, pull pop-up
straight down into drain hole and secure gasket (2),
brass nut and washer (3). DO NOT TURN POP-UP
WHILE TIGHTENING BRASS NUT OR SEALANT
MAY NOT SEAL DRAIN. Remove excess sealant.
Remove pivot nut (1). Install horizontal rod (2) and
stopper (3) as removable (4) or non-removable (5).
Hand tighten pivot nut (1).
Attach horizontal rod (1) to strap (2) using clip
(3). Install lift rod (4), tighten screw (5). Connect
assembly to drain (6).
Con el pivote (1) de frente a la llave, hale el desagüe
automático directamente hacia abajo dentro del
drenaje y je el empaque (2), la tuerca de bronce y la
arandela (3). NO GIRE EL DRENAJE AUTOMÁTICO
MIENTRAS APRIETE LA TUERCA DE BRONCE O
EL SELLADOR PUEDA NO SELLAR EL DRENAJE.
Quite el exceso de sellador.
Quite la tuerca del pivote (1). Instale la barra
horizontal (2) y el tapón (3) como desmontable (4)
o jo (5). Apriete a mano la tuerca del pivote (1).
Una la barra horizontal (1) a la barra chata (2)
utilizando el gancho (3). Instale la barra de alzar
(4), apriete el tornillo (5). Conecte el ensamble al
desagüe (6).
Alors que le pivot (1) fait face au robinet, tirez le
renvoi directement vers le bas dans l’orice de l’évier,
puis xez le joint (2), l’écrou en laiton et la rondelle
(3). NE TOURNEZ PAS LE RENVOI PENDANT
QUE VOUS SERREZ L’ÉCROU EN LAITON CAR
LE COMPOSÉ À LA SILICONE POURRA NE PAS
ASSURER L’ÉTANCHÉITÉ DU RENVOI. Enlevez
l’excès de composé d’étanchéité.
Enlevez l’écrou du pivot (1). Installez la tige
horizontale (2) et la bonde (3) de manière que
la bonde soit amovible (4) ou non amovible (5).
Serrez l’écrou (1) du pivot à la main.
Fixez la tige horizontale (1) au feuillard (2) à l’aide
de l’agrafe (3). Installez la tige de manoeuvre (4) et
serrez la vis (5). Fixez l’ensemble au renvoi (6).
CONNECT TO WATER SUPPLIES
(HOOK-UPS NOT PROVIDED).
FLUSH SYSTEM/CHECK FOR LEAKS.
Remove aerator (1). Turn on hot and cold water supplies. Turn
handles to full open position for one minute. Check for leaks.
Replace aerator.
CONECTE A LOS SUMINISTROS DE AGUA.
(LAS CONEXIONES NO SON PROPORCIONADAS).
DEJE CORRER EL AGUA POR EL SISTEMA/EXAMINE POR SI HAY
FILTRACIONES.
Quite el aireador (1). Abralos suministros de agua caliente y fría.
Girelas manijas a la posición completamenteabierta por un minuto.
Examine si hay ltra¬ciones. Reemplace el aireador.
RACCORDEMENT À LA TUYAUTERIE D’ALIMENTATION
(RACCORDS NON FOURNIS)
RINÇAGE DEL’INSTALLATION ET VÉRIFICATION DE L’ÉTANCHÉITÉ.
Enlevez learateur (1). Tournez les manettes d’eau chaude et d’eau
froide pour les amener en position de plein débit et laissez l’eau
s’écouler une minute. Pendant que l’eau s’écoule, vériez l’étanchéité.
Remettez l’aérateur en place.
98
Cold
Fría
Eau Froides
Hot
Caliente
Eau Chaude
1
3
2
1
4 5
2
3
4
4
5
2
6
1
3
1