U.S.A./CANADA/AUSTRALIA Instructions for use EN Instrucciones de uso ES Notice dʼemploi FR Pliko P3 FINA0601I73 Pramette WARNING: AVOID SERIOUS INJURY FROM FALLING OR SLIDING OUT. ALWAYS USE COMPLETE 5 POINT SEAT BELT.
1 2 A OK B click 3 4 DX sx SX DX 6 Dx sx 5
OK A B click C 7 8 NO B A C 9 10 11 12
B A 2° 1° 13 14 15 16 A B 17 18
3 2 19 20 1 B A B A 21 23 22
2 3 1 24 25 A B Pra me tte Pramette 26 A A Pram Pram 27 ette ette 28
A A Pram Pram ette ette B Pramette 29 30 B B Pramette Pramette 31 32 B B Pramette Pramette 33 34
B B Pramette Pramette 36 35 B Pramette 37 38 A A Pram ette Pram ette B Pramette 39 40
A A Pram ette Pram ette 41 42 A B Pram ette Pramette 43 44 B B Pramette 45 Pramette 46
1 3 2 47 48 A 49 50 51 52 B
53 54 1 1 55 56 57 58 2
GM Ganciomatic System 59 60 GM Ganciomatic System A GM Ganciomatic System B 61 62 Pliko P3+Primo Viaggio 63 Accessory 45 Accessory 64
65 Accessory 67 Accessory 66 Accessory
Pliko P3 - Pramette 2 3 1 17 8 20 5 4 6 13 18 10 7 19 15 11 12 16 14 Pliko P 3 9 21
Pliko P3 - Pramette 22 25 24 23 1 2 3 4 5dx) 5sx) 6sx) 6dx) 7dx) 7sx) IT• EN• FR• DE• ES• PT• NL• DK• FI• CZ• SK• HU• SL• RU• TR• EL• SPST5332• ARPI0282• IRTR0015GR RSEP3N---NL• SPST5846D• SPST5846S• SAPI5339D• SAPI5339S• ASPI0043D• ASPI0043S• 8 MUCI5P14• 9 IRSHP3• 10 SPST5352• 11 SPST5497• 12 SOFF0186Z 13 SAPI5365• 14 SAPI6097• 15 SAPI6049• 16 SPST6049• 17dx)SPST5685KD• 17Sx)SPST5685KS• 18 IRTR0018• 19 SPST5777• 20 SAPI5363• 21 ITPAPR• 22 BCAPRA• 23 BCOPRA• 24 BSAPRA• 25 IRBELV0005N Ricambi disponi
EN•ENGLISH • IMPORTANT: read these instructions carefully and keep them for future reference. Failure to follow these instructions could put the childʼs safety at risk. • PEG PEREGO reserves the right to make any necessary changes or improvements to the products shown at any time without notice. CUSTOMER SERVICE If parts of the model are accidentally lost or damaged, use only original Peg Perego spare parts.
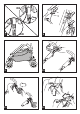
ADJUSTING THE FOOTBOARD 20• The footboard can be adjusted to three different positions. To lower the footboard, pull the two small levers downward while lowering. To lift the footboard, pull it up until it clicks into place. This is the third, highest position (see figure) for the baby carriage version of Pliko P3-Pramette. ADJUSTING THE BACKREST 21• The backrest can be reclined in four positions. To lower the backrest, raise the handle as you lower the backrest, blocking it in the desired position.
on the stroller version of Pramette (when the zip is open the elastic loops ensure that the rain canopy remains fastened to the stroller). 43• This rain canopy is also designed for use when the Primo Viaggio car seat is hooked onto the stroller, ensuring total protection. 44• The figure shows the rain canopy on the carriage version of Pramette. 45• The figure shows where to fasten the rain canopy button and elastic band on the Pramette carriage version.
ACCESSORY LINE 63• Diaper-Changing Bag: Satchel with pad for changing babyʼs diaper. Attaches to the stroller. 64• Sun Canopy: Sun canopy attaches to the stroller. 65• Rain Canopy: Rain canopy zips onto the hood. 66• Mosquito Netting: Mosquito netting zips onto the hood. 67• Travel Bag: Practical duffle bag for transporting the stroller by plane. CLEANING & MAINTENANCE Your product requires only minimal maintenance. Cleaning and maintenance operations must be performed only by adults.
ES•ESPAÑOL • IMPORTANTE: leer atentamente estas instrucciones y conservarlas para una futura utilización. Si no se siguen estas instrucciones, se podría arriesgar la seguridad del niño. • PEG PEREGO podrá modificar los modelos decritos en este prospecto, por razones técnicas o commerciales. SERVICIO DE ASISTENCIA Si por casualidad alguna parte del modelo se pierde o se rompe, usar sólo piezas de repuesto originales Peg Perego.
de enganchar el cinturón, fije la hebilla pequeña al respaldo introduciendo la lengüeta en la presilla como indica la figura; luego, cuando haya enganchado el cinturón al niño tiene que soltarla del respaldo para dejar que el niño tenga más movilidad. La hebilla pequeña tiene que quedar debajo de los hombros del niño. REGULACIÓN DEL REPOSAPIÉS 20• El reposapiés se puede regular en tres posiciones. Para bajar el reposapiés, tirar de las dos palanquitas laterales hacia abajo y al mismo tiempo bajarlo.
38• Fijar el cubrepies en el respaldo y abrochar a los lados como indica la figura. PLÁSTICO DE LLUVIA 39• Para montar el plástico de lluvia hay que unir la cremallera del mismo a la de la capota. 40• La figura muestra el plástico de lluvia ya montado en Pramette, en la versión silla de paseo. 41• La figura muestra dónde hay que enganchar el botón y la goma del plástico de lluvia en Pramette en la versión silla de paseo.
Ganciomatic si después se utiliza Pliko P3-Pramette en versión cochecito. PLIKO P3 PRAMETTE + PRIMO VIAGGIO • Enganchar Primo Viaggio en Pliko P3Pramette en versión silla de paseo.
SILLA DE PASEO ESTÉ ABIERTA CORRECTAMENTE Y BLOQUEADA EN LA POSICIÓN CORRECTA PARA SU UTILIZACIÓN. • ASEGURARSE DE QUE LA SILLA DE AUTO O EL COCHECITO ESTÉN ENGANCHADOS CORRECTAMENTE A LA SILLA DE PASEO. • NO USAR LA SILLA DE PASEO CERCA DE ESCALERAS O ESCALONES; PRESTAR ATENCIÓN CUANDO SE UTILIZA EN ESCALERAS O ESCALERAS MECÁNICAS. • NO UTILIZAR EL PRODUCTO SI PRESENTA PARTES DAÑADAS O SI FALTA ALGUNA PARTE. • NO USAR EN PRESENCIA DE LLAMAS O FUENTES DE CALOR.
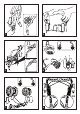
garantir un montage correct (voir figure). 7• Le clic lors du montage des roues permet de sʼassurer quʼelles sont montées correctement (voir figure). 8• Pour fixer le panier, enfilez les crochets avant A et les crochets arrières B et C sur les ergots prévus à cet effet. 9• Panier installé. 10• Le porte-biberon peut sʼinstaller indifféremment sur la poignée droite ou gauche de la poussette grâce aux deux attaches.
dans la poussette. Empêchez l'enfant de monter sur le marchepied arrière si la poussette est vide. POUSSETTE – LANDAU 26• Pliko P3 Pramette est une nouvelle poussette transformable en landau. Quelques gestes suffisent pour transformer la poussette en landau et vice-versa. • Grâce à sa fixation réversible, la capote peut être montée du côté des poignées en version poussette (A) et du côté opposé aux poignées en version landau (B).
lʼune des deux poignées puis lʼautre, jusquʼà entendre le déclic. 48• Saisissez la poignée centrale et tirez énergiquement pour fermer complètement la poussette. 49• Vérifiez que la poussette soit bien fermée et que le crochet de sécurité soit bien enclenché. La poussette fermée tient debout toute seule. 50• Il est possible de fermer Pliko P3 Pliko P3 Pramette aussi bien en version poussette quʼen version landau avec la capote et le tablier installés dessus.
pour prévenir la formation de rouille. • Nettoyer régulièrement les parties en plastique avec un chiffon humide, ne pas utiliser de solvants ou dʼautres produits du même type. • Brosser les parties en tissu pour les dépoussiérer. • Éliminer les dépôts de poussière et de sable des roues. • Protéger le produit contre les agents atmosphériques, lʼeau, la pluie ou la neige; lʼexposition continue et prolongée au soleil pourrait altérer les couleurs de nombreux matériaux.
Pliko P3 Pramette PEG PEREGO S.p.A. VIA DE GASPERI 50 20043 ARCORE MI ITALIA tel. 0039•039•60881 fax 0039•039•615869-616454 Servizio Post Vendita - After Sale: tel. 0039•039•6088213 fax: 0039•039•3309992 PEG PEREGO U.S.A. Inc. 3625 INDEPENDENCE DRIVE FORT WAYNE INDIANA 46808 phone 260•482•8191 fax 260•484•2940 Call us toll free 1•800•671•1701 PEG PEREGO CANADA Inc. 585 GRANITE COURT PICKERING ONTARIO CANADA L1W3K1 phone 905•839•3371 fax 905•839•9542 Call us toll free 1•800•661•5050 www.pegperego.