
Instruction Manual

- 11 -
CORRECTLY AND LOCKED IN POSITION
OF USE.
_ DO NOT DRIVE THIS PRODUCT
AROUND STAIRS OR STEPS; CARE
MUST BE TAKEN IF UNIT IS USED ON
STAIRS OR ESCALATORS.
_ DO NOT USE THE PRODUCT IF IT HAS
BROKEN OR MISSING PARTS.
_ DO NOT USE NEAR FIRE OR EXPOSED
FLAME.
NOTICE
THIS ARTICLE MEETS OR EXCEEDS
ALL REQUIREMENTS COVERED IN
ASTM F833 STANDARD AND LATEST
REVISIONS.
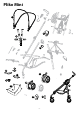
PRODUCT PARTS
Check the package contents and contact our
Customer Service for any claim.
_ The PLIKO MINI stroller is composed of:
2 swivel or locking front wheel sets, 2 rear
wheel sets, basket, cup holder, hood.
INSTRUCTIONS
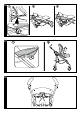
1• OPENING: to open the stroller, unhook the left
hand side lever (fig_a), hold the handles and
at the same time lift the stroller.
Check that the stroller has opened properly by
ensuring that the side hooks are well secured
(fig_b).
2• If the hooks are not secured properly, press
the seat downwards (fig_d) until they click
into place. Finally, press downwards on PUSH
with your foot (fig_e).
3• ASSEMBLING: to mount the front wheels,
firstly check that the washer is present, as
shown in the figure, then lower lever A and
slip wheel B on until it clicks into place.
4• To mount the rear wheels connected by the
brake cable, place them with the brake facing
externally (fig_a).
WARNING: ensure the hooks have clicked into
place, as in figure b.
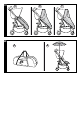
5• BASKET: to mount the basket, slip the loops
over the rear hooks 1 and 2 and the front hook
3 (fig_a).
CUP HOLDER: It can only be fitted to the right
hand side of the stroller, using the clip which
is already present on the chassis. To fit the cup
holder, push until it clicks into place (fig_b).
ADJUSTING THE HANDLES: the height of
the handles can be adjusted. Press the little
button behind the handles and pull upwards.
To lower the handles, do the opposite (Fig. c).
6• SWIVEL WHEELS: In order to make the wheels
swivel, the lever (arrow 1) must be lowered.
To secure the wheels, move the lever to the
opposite direction (arrow 2). The rear wheels
are fixed.
BRAKE: To set the brake on the stroller, lower
the lever on the rear wheel unit with your
foot. To release the brake, lift the lever (fig_b).
When stationary, always apply the brake.
7• HOOD: To fit the hood, click the fasteners
onto the appropriate points and button down
the hood on the rear of the stroller’s backrest
(fig_a).
The hood can be set to 2 positions (fig_b),
simply by pulling it backwards or forwards.
8• 5-POINT SAFETY HARNESS: to fasten, insert
the two buckles of the waist strap (with
attached shoulder straps, arrow a) into the leg
divider strap until they click into place (arrow
b). To unfasten, push the round button placed
in center of the buckle upwards (arrow_c) and
pull the waist strap outwards (arrow d).
9• To tighten the waist strap, pull on both sides
in the direction of the arrow (Fig. a). To loosen
it do the opposite. The waist strap can be
tightened as far as the safety lock (Fig. b).
10• It is possible to set the safety harness at 3
different heights, depending on how tall the
child is. As the child gets bigger, the harness
must be moved to a higher position.
11• To adjust the height of the safety harnesses,
release the two buckles on the rear of the
backrest.
Pull the shoulder straps towards you (arrow a)
until the buckles are released and insert them
in the backrest loops (arrow b). Remove the
shoulder straps from the sack (arrow c) and
insert them in the most appropriate buckle
(arrow d), then reattach the two buckles
behind the backrest (arrow e). The buckles are
securely attached when a click is heard (fig f).
12• LEG REST ADJUSTMENT: The leg rest can be
set in 2 different positions. To lower the leg
rest, pull the two side levers downwards and
at the same time lower the leg rest. To raise
the leg rest, push it upwards until it clicks into
position.
BACKREST ADJUSTMENT: The backrest can be
set in 3 positions: To lower the backrest, lift
the levers on both sides at the same time and
lower it, locking it in the position required. To
lift the backrest, push it upwards.