
Model Vehicle - Toy Car User Manual

• PEG PEREGO® thanks you for choosing this
product.For over 50 years, PEG PEREGO has been
taking children for an outing: first with its famous
baby carriages and strollers, later with its pedal and
battery operated toy vehicles.
• Read this instruction manual carefully to learn the
use of this vehicle and to teach your child safe and
enjoyable driving.Please keep this manual for use
as a reference in the future.
• Our toys conform with the safety requirements
provided by the Council of the EEC, of the T.Ü.V.; of
the I.I.S.G. Istituto Italiano Sicurezza Giocattoli, and
the U.S. Consumer Toy Safety Specification F963.
Peg Perego S.p.A. is an ISO 9001
certified company.
The fact that we are certified provides
a guarantee of our honesty for our
customers, and fosters trust in the
company’s way of working.
• Peg Perego reserves the right to modify or change
their product. Price, literature, manufacturing
processes or locations or any combination of these
above mentioned entities may change at any time
for any reason without notice with impunity.
Years 3-8
PEG PEREGO offers after-sales services, directly or
with a network of authorized service centers for
repairs or replacement parts. See the back cover of
this instruction manual for a list of service centers.
Peg Perego is at the consumer's service, meeting
every need in the best way possible.This is why our
customers' opinions are so important and valuable
to us.We would be very grateful if you would kindly
fill in the CUSTOMER SATISFACTION
QUESTIONNAIRE after using one of our products.
You will find the questionnaire on the Internet at
"www.pegperego.com/SSCo.html.en-UK".
Please note any observations or suggestions you
may have on the questionnaire.
ADULT ASSEMBLY REQUIRED.
USE CARE WHEN UNPACKING AS COMPONENTS TO
BE ASSEMBLED MAY POSE A SMALL PARTS/SHARP
EDGE HAZARD.
BATTERY ALREADY INSTALLED IN VEHICLE.
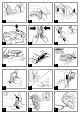
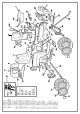
ASSEMBLY
1 • Position the double seat.To secure the double
seat, rotate the red lock 180° using a
screwdriver.
2 • Using a screwdriver and the spanner (supplied),
secure the double seat in the front (under the
rear mudquards).
3 • Position the roll-bar.Tighten the four screws to
fix the seat.
4 • Attach the two lights above the roll-bar.
5 • Assemble the two parts of the steering wheel.
6 • Insert the steering wheel on the steering wheel
column.
7 • Align steering wheel column holes with
steering wheel: nut fits into haxagon hole, bolt
into round hole.
8 • Loosen the safety screw that holds the hood
shut.
9 • To install the windscreen, slide the trigger in
the direction shown to release the hood. Move
the hood forward.
10 • Insert the windscreen.
11 • Tighten the four screws to fix it.
12 • Press the rearview mirrors in place.The
rearview mirrors can be swivelled in different
positions.
13 • Position the rear lights, pushing them till they
click.
14 • Attach the top part of the front bumper to the
body of the vehicle.
15 • Fix the bumper with the two screws provided.
16 • Open the hood.
17 • Plug the battery into the vehicle’s electrical
system.
ATTENTION: Always fasten the hood when
finished. The vehicle is ready for use.
ENGLISH
CUSTOMER SERVICE
ASSEMBLY INSTRUCTIONS
veicolo.
• 1ª VELOCITÁ (per principianti):
Con entrambe le mani sul volante premere il
pedale dell’acceleratore; il veicolo si mette in moto
ad una velocità ridotta di circa 4 Km/h.
• 2ª VELOCITÁ (per esperti):
Con entrambe le mani sul volante premere il
pedale dell’acceleratore; il veicolo si mette in moto
ad una velocità di circa 8 Km/h.
• RETROMARCIA:
Abbassare con una mano la leva del cambio.
Posizionare l’altra mano sul volante e premere con
il piede l’acceleratore. Il veicolo procede in
retromarcia ad una velocità di circa 4 Km/h.
• FRENO:
Per frenare alzare il piede dal pedale acceleratore,
il freno entrerà in funzione automaticamente.
Insegnate al vostro bambino un uso corretto del
veicolo per una guida sicura e divertente.
• Prima di partire assicurarsi che il percorso sia
sgombro da persone o cose.
• Guidare con le mani sul volante e guardare
sempre la strada.
• Frenare per tempo per evitare scontri.
• Inserire la 2ª velocità solo quando il bambino ha
imparato correttamente l’uso del volante, della 1ª
velocità e del freno.
• ATTENZIONE! in prima velocità, il veicolo é
dotato di effetto differenziale come le vere
automobili: su terreni lisci e con un solo
bambino, le due ruote possono avere velocità
diverse con possibilità di
slittamento/rallentamento delle stesse.
• Se il veicolo agisce in condizioni di
sovraccarico, come su sabbia soffice, fango o
terreni molto sconnessi, l’interruttore di
sovraccarico toglierà immediatamente
potenza. L’erogazione di potenza riprenderà
dopo alcuni secondi.
IL VEICOLO NON FUNZIONA?
• Verificare che non ci siano cavi scollegati sotto il
pulsante marcia.
• Controllare il funzionamento del pulsante marcia
ed eventualmente sostituirlo.
• Controllare che la batteria sia attaccata all’
impianto elettrico.
IL VEICOLO NON HA POTENZA?
• Caricare le batterie. Se dopo la ricarica il problema
persiste far controllare le batterie ed il
caricabatterie da un centro assistenza.
PROBLEMI?
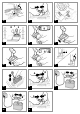
VEHICLE FEATURES AND INSTRUCTIONS FOR
USE
18 • A: electric accelerator/brake pedal. Lifting your
foot off the pedal, the brake applies
automatically.
B: gearshift lever.
19 • GEAR SHIFT LEVERS: 1: first speed. 2: second
speed. R: reverse.
20 • SECOND SPEED:When the red lock-out is
positioned as shown in the figure,the vehicle
will run in first speed and reverse only. The
turtle on the lock-out is in the up position. To
use the second gear, follow the instructions:
loose the screw on the red lock-out.
21 • Remove the red lock-out.
22 • Rotate it 180° until the hare is in the up
position. Insert the lock-out into the hole
provided.
23 • Tighten the screw. By pushing the gearshift
lever backward, the vehicle moves into second
gear.
REPLACING THE BATTERY
24 • Open the hood.Remove the battery clamp.
25 • Replace the battery. Reposition the battery
holder and close the hood.
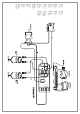
BATTERY RECHARGE
WARNING: BATTERY CHARGING AND EVERY OTHER
OPERATION ON THE ELECTRICAL SYSTEM MUST BE
CARRIED OUT BY ADULTS ONLY.
THE BATTERY CAN ALSO BE CHARGED WITHOUT
REMOVING IT FROM THE TOY.
26 • Unplug vehicle wiring terminal A from battery
terminal B, by pressing terminals on side and
pulling apart.
27 • Plug the battery charger terminal to a wall
outlet following the instructions enclosed.
Connect the plug B to the battery charger plug
C.
28 • Once the charge is completed unplug
recharger from wall outlet. Unplug recharger
cord terminal C from battery terminal B.
29 • Insert plug B into plug A, pressing all the way
until it clicks into place. Always remember to
close the hood and tighten the screw.
Before riding, charge your batteries for 18 hours to
initiate them. Failure to do this will result in
permanent battery damage.
CAUTION
Rechargeable batteries are only to be charged
under adult supervision.
Never allow children to handle batteries.
CHARGE BATTERY
• Charge the batteries no longer than 24 hours,
following the instructions enclosed with the
battery charger.
• Charge the battery, as the vehicle shows low
power, in this way you will avoid damage to the
battery.
• If you don’t use your vehicle for a long period of
time unplug the battery from the main wire
harness of the vehicle. Remember to charge the
battery at least every three months.
• Never charge the battery upside down.
• Do not forget batteries during charging! Check
them periodically.
• Never use a replacement recharger or batteries
unless they are approved by PEG PEREGO.
• Do not mix old and new batteries.
• Batteries are sealed and maintenance free.
• Battery polarity must be observed when
connecting battery to wiring.
WARNING
• BATTERIES CONTAIN TOXIC AND CORROSIVE
SUBSTANCES. DO NOT TAMPER WITH THEM.
• Batteries contain an acid-based electrolyte.
• Do not make direct contact between battery
terminals, as this can cause an explosion or fire.
• Charging produces explosive gases. Charge
batteries in a well ventilated area away from
sources of heat and flammable materials.
• Exhausted batteries are to be removed from the
vehicle.
• Do not place the batteries near clothing to avoid
damage.
IF A LEAK DEVELOPS
Shield your eyes.Avoid direct contact with the
electrolyte, protect your hands.
Place battery in a plastic bag and follow directions
listed below.
BATTERY MAINTENANCE AND SAFETY