Model #67403-1108D2 USE AND CARE GUIDE PULL-DOWN KITCHEN FAUCET Questions, problems, missing parts? Before returning to the store, call Pegasus Customer Service 8 a.m. - 6 p.m., EST, Monday - Friday 1-877-580-5682 WWW.HOMEDEPOT.COM/PEGASUS THANK YOU We appreciate the trust and confidence you have placed in Pegasus through the purchase of this kitchen faucet. We strive to continually create quality products designed to enhance your home.
Table of Contents Safety Information ....................................2 Warranty ...................................................2 Pre-Installation .........................................3 Planning Installation ..............................3 Tools Required .......................................3 Package Contents ..................................4 Installation ................................................5 Operation...................................................9 Care and Cleaning ........
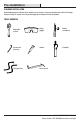
Pre-Installation PLANNING INSTALLATION Before beginning the installation of this product, ensure all parts are present. Compare parts with the Package Contents section. If any part is missing or damaged, do not attempt to install the product. TOOLS REQUIRED (2) Supply lines Phillips screwdriver Silicone Flashlight LI CO Safety goggles SI Hex wrench (Hex key) NE Adjustable wrench Basin wrench 3 WWW.HOMEDEPOT.COM/PEGASUS Please contact 1-877-580-5682 for further assistance.
Pre-Installation (continued) PACKAGE CONTENTS A B C E D F G J H I Part A Description Faucet assembly Quantity Part Description Quantity 1 F Base plate 1 B Plastic washer 1 G Bolt 2 C Metal washer 1 H Mounting nut 2 D Nut 1 I Quick connector 1 E Escutcheon 1 J Weights 1 4
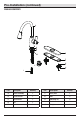
Installation 1 Preparing for installation 2 Installing the faucet assembly CAUTION: Always turn off the water supply before removing an existing faucet or replacing any part of a faucet. Open the faucet handle to relieve water pressure and ensure that the water is completely shut off. □ □ Shut off the water supply. Before installation, remove the quick connector (I) from the free end of the hose by unscrewing it in a counterclockwise direction. □ Unscrew the nut (D), and remove the washers (B & C).
Installation (continued) 3 Installing the escutcheon 4 Installing the faucet assembly NOTE: This step is for escutcheon installation (optional). If the escutcheon will not be used, install the faucet assembly as described in step 2. NOTE: This step is for escutcheon installation (optional). If the escutcheon will not be used, install the faucet assembly as described in step 2.
Installation (continued) 5 Securing the faucet assembly 6 □ Install the plastic washer (B), and metal washer (C) onto the threaded mounting shank. □ Thread the nut (D) onto the mounting shank using the basin wrench. Do not overtighten. □ Attaching the quick connector to the hose After inserting the hose through the hole in the sink surface, reattach the quick connector (I) by screwing it onto the threaded end of the hose (1) in a clockwise motion. Hand tighten only. I 1 B C D 7 WWW.HOMEDEPOT.
Installation (continued) the quick connector the waterline 8 Making 7 Attaching to the receiving block connections □ Push the quick connector (I) firmly upward and attach it to the receiving block (1). Pull down moderately to ensure the connection has been made. □ If it is necessary to remove the quick connector (I), squeeze the tabs on the hose and then pull down to disconnect. □ After connecting the hose, install the weights (J) at the lowest point of the hose.
Operation 1 Flushing and checking for leaks IMPORTANT: After installation is completed, turn on the hot and cold water supply. Check for leaks. □ Pull the hose assembly out of the spout and remove the spray head by unscrewing it from the hose in a counterclockwise direction. Be sure to hold the end of the hose down into the sink and turn the faucet on to the warm position where it mixes hot and cold water. □ Flush the water lines for one minute.
Service Parts *Specify Finish 2 1 3 4 5 6 7 18 8 19 9 20 21 13 14 10 15 11 16 17 12 Part Part Number Part 1 Spray head and Hose RP38201* 12 2 O-ring RP60071 13 Block RP70421 3 Inverter RP70380 14 O-ring RP60002 4 Cartridge RP20005 5 Bonnet RP70394 15 Quick connect assembly RP70429 6 Cap RP80028* 16 O-ring RP60024 7 Screw RP50015 17 Weights RP70223 8 Handle RP13271* 18 Escutcheon RP80276* 9 Set screw RP50002 19 Base plate RP80313 10 Plastic w
Questions, problems, missing parts? Before returning to the store, call Pegasus Customer Service 8 a.m. - 6 p.m., EST, Monday - Friday 1-877-580-5682 WWW.HOMEDEPOT.COM/PEGASUS Retain this manual for future use.
Modelo Núm.:67403-1108D2 GUÍA DE USO Y MANTENIMIENTO GRIFO EXTENSIBLE PARA COCINA ¿Problemas, preguntas o piezas faltantes? Antes de regresar a la tienda, llama al Servicio al Cliente de Pegasus de Lunes a Viernes de 8 a.m. a 6 p.m., Hora Estándar del Este 1-877-580-5682 WWW.HOMEDEPOT.COM/PEGASUS GRACIAS Agradecemos la confianza que has depositado en Pegasus al comprar este grifo para cocina. Nos esforzamos por crear continuamente productos de calidad diseñados para mejorar su hogar.
Tabla de Contenido Información de Seguridad ......................13 Garantía...................................................13 Pre-instalación .......................................14 Planificación de la Instalación .............14 Herramientas Necesarias ....................14 Contenido del Paquete.........................15 Instalación ..............................................16 Funcionamiento ......................................20 Cuidado y Limpieza ................................
Pre-instalación PLANIFICACIÓN DE LA INSTALACIÓN Antes de comenzar la instalación de este producto, asegúrate de que no falta ninguna pieza. Compara las piezas con la sección de Contenido del Paquete. Si falta alguna parte o se encuentra dañada, no intentes instalar el producto. HERRAMIENTAS NECESARIAS Gafas de seguridad Destornillador phillips Llave hexagonal Silicona Linterna SI LI CO NE Llave ajustable Líneas de suministro Llave para grifería 14 WWW.HOMEDEPOT.
Pre-instalación (continuación) CONTENIDO DEL PAQUETE A B C E D F G J H I Pieza A Descripción Ensamblaje del grifo Cantidad Pieza Descripción Cantidad 1 F Placa base 1 Perno 2 B Arandela plástica 1 G C Arandela metálica 1 H Tuerca de montaje 2 D Tuerca 1 I Conector rápido 1 E Placa protectora 1 J Pesos 1 15
Instalación prepararse para la 1 Cómo instalación instalar el ensamblaje 2 Cómo del grifo PRECAUCIÓN: Cierra siempre el suministro de agua antes de quitar un grifo existente o reemplazar cualquier pieza de un grifo. Abre la llave del grifo para liberar la presión de agua y asegúrate de que el suministro de agua esté completamente cerrado. □ □ Cierra el suministro de agua. Antes de instalar, desenrosca de izquierda a derecha el conector rápido (I) del extremo libre de la manguera, y quítalo.
Instalación (continuación) instalar la placa 3 Cómo protectora instalar el ensamblaje 4 Cómo del grifo NOTA: Este paso es para la instalación de la placa protectora (opcional). Si no usarás la placa protectora, instala el ensamblaje del grifo como se describe en el paso 2. □ Atornilla los pernos (G) en la placa protectora (E) y asegúrate de que la placa base (F) esté presionada sobre la placa protectora (E) antes de instalar esta última en los tres orificios del fregadero.
Instalación (continuación) fijar el ensamblaje del 5 Cómo 6 grifo □ Instala la arandela de plástico (B) y la arandela de metal (C) en el vástago de montaje roscado. □ Enrosca la tuerca (D) en el vástago de montaje con una llave para grifería. No aprietes demasiado.
Instalación (continuación) montar el conector 7 Cómo rápido al bloque receptor □ □ □ hacer las conexiones de 8 Cómo las tuberías de agua Presiona firmemente el conector rápido (I) hacia arriba y fíjalo en el bloque receptor (1). Hala hacia abajo ligeramente para asegurar que la conexión es segura. NOTA: El tubo de entrada del agua caliente se identifica con una etiqueta. Si no encuentras la etiqueta, el tubo de suministro del agua caliente es el más largo de los dos tubos de entrada.
Funcionamiento purgar las tuberías y 1 Cómo comprobar que no haya fugas IMPORTANTE: Luego de terminar la instalación, abre los suministros de agua caliente y fría. Revisa si hay filtraciones. □ Retira del caño el ensamblaje de la manguera y retira el cabezal del rociador desenroscándolo de la manguera en el sentido contrario a las manecillas del reloj.
Piezas de Repuesto *Especificar Acabado 2 1 3 4 5 6 7 18 8 19 9 20 21 13 14 10 15 11 16 17 12 Pieza Descripción Número de Pieza 1 Cabezal rociador y Manguera RP38201* 2 Aro tórico RP60071 3 Invertidor RP70380 4 Cartucho RP20005 5 Bonete Pieza 12 Descripción Tuerca Número de Pieza RP56053 13 Bloque RP70421 14 Aro tórico RP60002 15 Ensamblaje del conector rápido RP70429 RP70394 16 Aro tórico RP60024 6 Tapa RP80028* 17 Pesos RP70223 7 Tornillo RP50015 18
¿Problemas, preguntas o piezas faltantes? Antes de regresar a la tienda, llama a Servicio al Cliente de Pegasus de Lunes a Viernes de 8 a.m. a 6 p.m., Hora Estándar del Este 1-877-580-5682 WWW.HOMEDEPOT.COM/PEGASUS Conserva este manual para uso futuro.
Modèle n° 67403-1108D2 GUIDE D'UTILISATION ET D'ENTRETIEN ROBINET DE CUISINE RÉTRACTABLE Questions, problèmes, pièces manquantes? Avant de retourner au magasin, appelez le service à la clientèle de Pegasus de 8h à 18h, HNE, du lundi au vendredi 1-877-580-5682 WWW.HOMEDEPOT.COM/PEGASUS MERCI Nous vous remercions d'avoir fait confiance à Pegasus en achetant ce robinet de cuisine. Nous nous efforçons en permanence de créer des produits de qualité conçus pour perfectionner votre maison.
Table des matières Consignes de sécurité ............................24 Garantie...................................................24 Pré-installation .......................................25 ................25 Outils requis .........................................25 Contenu de l’emballage .......................26 Installation ..............................................27 Utilisation ................................................31 Entretien et nettoyage ............................
Pré-installation PLANIFICATION DE L’INSTALLATION Avant de commencer l’assemblage de ce produit, assurez-vous que toutes les pièces sont présentes. Comparez les pièces avec la liste du Contenu de l’emballage. Si une pièce est manquante ou endommagée, ne tentez pas d’assembler ce produit. OUTILS REQUIS Lunettes de protection Tournevis cruciforme Clé hexagonale Silicone Lampe de poche SI LI CO NE Clé à molette Conduites d'alimentation Clé pour lavabo 25 WWW.HOMEDEPOT.
Pré-installation (suite) CONTENU DE L'EMBALLAGE A B C E D F G J H I Pièce Description Quantité Pièce Description Quantité A Robinet 1 G Boulon 2 B Rondelle en plastique 1 H Écrou de montage 2 I Raccord à branchement rapide 1 J Pesées 1 C Rondelle en métal 1 D Écrou 1 E Rosace 1 F Plaque de base 1 26
Installation en vue de 1 Préparation l'installation de l'ensemble de 2 Installation robinetterie ATTENTION : Coupez l’alimentation en eau CAUTION: Always turntoujours off the water supply before avant d’enlever un robinet ou de any remplacer removing an existing faucetexistant or replacing part of a n’importe quelle partie du robinet. Ouvrez la poignée du faucet.
Installation (suite) 3 Installation de la rosace de l'ensemble de 4 Installation robinetterie REMARQUE : Cette étape est pour l'installation de la rosace (facultatif). Si vous n'utilisez pas la rosace, installez l'ensemble de robinetterie comme décrit dans l'étape 2. □ □ REMARQUE : Cette étape est pour l'installation de la rosace (facultatif). Si vous n'utilisez pas la rosace, installez l'ensemble de robinetterie comme décrit dans l'étape 2.
Installation (suite) solidement l'ensemble 5 Fixer 6 de robinetterie □ Installez la rondelle en plastique (B) et la rondelle en métal (C) sur la tige de montage filetée. □ Vissez l'écrou (D) sur la tige de montage à l'aide de la clé pour lavabo. Ne serrez pas trop.
Installation (suite) le raccord à des conduites 7 Attacher 8 Branchement branchement rapide au bloc d'alimentation en eau récepteur □ REMARQUE : Le tuyau d'entrée de l'eau chaude est indiqué par une étiquette. S'il n'y a pas d'étiquette, le tuyau d'entrée de l'eau chaude est le plus long des deux tuyaux d'entrée. Poussez fermement le raccord à branchement rapide (I) vers le haut et attachez-le au bloc récepteur (1). Tirez modérément vers le bas pour vous assurer que le branchement est bien fait.
Utilisation 1 Purge et recherche de fuites IMPORTANT : Une fois l'installation terminée, ouvrez l’alimentation en eau chaude et en eau froide. Vérifiez s’il y a des fuites. □ Retirez du bec l’assemblage du tuyau, puis retirez du tuyau la tête de vaporisation en la tournant dans le sens contraire des aiguilles d’une montre. Veillez à maintenir l'extrémité du tuyau flexible dans l'évier, puis mettez la poignée du robinet en position tiède où l'eau chaude et l'eau froide se mélangent.
Pièces de rechange *Spécifiez un fini 2 1 3 4 5 6 7 18 8 19 9 20 21 13 14 10 15 11 16 17 12 Pièce Description Numéro de pièce 1 Tête et tuyau de pulvérisation RP38201* 2 Joint torique RP60071 3 Inverseur RP70380 4 Cartouche RP20005 5 Chapeau Pièce 12 Description Écrou Numéro de pièce RP56053 13 Bloc RP70421 14 Joint torique RP60002 15 Raccord à branchement rapide RP70429 RP70394 16 Joint torique RP60024 6 Capuchon RP80028* 17 Pesées RP70223 7 Vis RP5001
Questions, problèmes, pièces manquantes? Avant de retourner au magasin, appelez le service à la clientèle de Pegasus de 8h à 18h, HNE, du lundi au vendredi 1-877-580-5682 WWW.HOMEDEPOT.COM/PEGASUS Conservez ce manuel pour référence future.