
User's Manual


Cisco and the Cisco logo are trademarks or registered trademarks of Cisco and/or its a liates in the U.S. and other countries. To view a list of Cisco trademarks, go to
this URL: www.cisco.com/go/trademarks. Third-party trademarks mentioned are the property of their respective owners. The use of the word partner does not imply a
partnership relationship between Cisco and any other company. (1110R)
© 2014 Cisco and/or its a liates. All rights reserved Last Updated: June 2014 Part Number: 78-100394-01A0
Printed in China
What’s in the carton?
Verify that the following items are in the shipping carton. If any items
are missing, contact your service provider:
• DLCi controller
• DLCi cradle
• Protective cover for the USB connector
• AC power adapter
• Right-angle USB connector
• Two Phillips screws
Installation instructions
The DLCi can be installed in one of two ways: desktop- or wall-
mounted.
Items needed
In addition to the items provided in the DLCi shipping carton, the
following additional materials are needed:
• One Phillips screwdriver
• One 3G USB dongle
• One Ethernet cable long enough to reach from the DLCi to a PC
or router
When mounting to a wall, the following additional materials are
needed:
• One pencil to trace the mounting holes to the wall
• Two #6 (M3.5) pan head screws
• One screwdriver
• One drill and drill bit
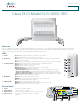
Wall mounting
Allow approximately 2 minutes to install the DLCi to a wall.
T16480
Mounting holes
1. Turn the cradle so the mounting holes are opposite from you,
and place the cradle against the wall where you intend to mount
it.
2. While holding the cradle in place, use a pencil to trace the
mounting holes onto the wall.
3. Drill two holes into the wall where the pencil traces indicate.
4. Install the mounting screws into the wall, leaving a gap of about
½-inch between the screw head and the wall.
5. Place the cradle into position by slipping the large end of both
mounting slots over the screw heads and sliding the cradle
down until the narrow end of the mounting slots contacts the
screw shafts.
6. Continue installing the DLCi by following the instructions for
Desktop mounting.
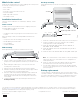
Desktop mounting
Allow approximately 3-5 minutes to install the DLCi to stand on a
desktop.
Controller
Cradle
3G Dongle
Phillips
Screws
Right-angle USB Connector
Protective Cover
T16482
1. Insert the controller into the cradle until you feel it lock into place.
2. Using a screwdriver, secure the controller to the cradle by
inserting the two screws and tightening.
3. Insert the right-angle USB connector into the yellow 3G port on
the bottom of the controller.
4. Insert a 3G dongle into the other end of the right-angle USB
connector.
5. Insert the protective cover over the 3G USB dongle until you feel
it lock into place.
6. Insert one end of an Ethernet cable into the yellow Internet port
and the other end of the cable into an Ethernet port on a router.
Note: The controller will be connected to a router except during
initial set up when it is connected to a PC for con guration of
network parameters.
7. Insert one end of the AC power adapter cable into the Power
port and the other end of the cable into a power outlet.
8. Turn the Power switch to the on position (|). All LEDs will ash
for one second; during this time, the STATUS LED will ash red,
yellow, and green.
Battery replacement
The DLCi battery is designed to last up to nine years under normal
operating conditions. Should the battery fail before that time, contact
your service provider for assistance. Do not attempt to replace the
battery on your own; doing so could damage the DLCi controller.
78-100394-01A0
6.
3. Insert the right-angle USB connector into the USB port on
4. Insert the protective cover over the USB Port until you feel it
the bottom of the controller.
lock into place.
5. Insert one end of an Ethernet cable into the yellow Internet port
and the other end of the cable into an Ethernet port on a router.
7.