
Digital Camera User Manual


10 C2946M-D (6/08)
Installation
LENS MOUNTING
The C10CH Series camera supports both manual and auto iris lenses, either fixed focal length or varifocal. It also supports both DC and video
drive lenses. It automatically senses an auto iris lens as soon as you plug in the connector. The camera has a standard CS mount that can accept
a C mount lens with a PCMA40 lens adapter.
After mounting a DC drive auto iris lens, but before using the camera, perform the DC drive auto iris automatic adjustment procedure (refer to
DC Iris Level on page 20). Also perform this procedure each time you change the lens.
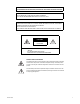
WIRING AN AUTO IRIS LENS
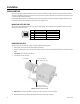
Auto iris lenses are controlled through the 4-pin drive connector (type D4-152N). Figure 2 identifies the pin connections for the auto iris lens
connector on the side of the camera.
Figure 2. DC Drive Auto Iris Lens Connector
MOUNTING THE LENS
To mount the lens onto the camera refer to Figure 3, and then complete the following steps:
1. Make sure the lens does not touch the camera imager when installed.
2. Use clean, compressed air or a clean, dry lens cloth to make sure there is no dust or other foreign matter between the lens and the camera
imager.
3. C mount lens: Screw the adapter onto the lens.
4. Screw the lens onto the lens mount.
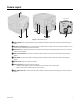
Figure 3. Mounting Lens to Camera
5. Auto iris lens: Connect the 4-pin connector from the lens to the connector on the side of the camera.
6. Perform the lens focusing procedure before using the lens (refer to Lens Focusing on page 25).
Pin DC Drive Video Drive
1 Control coil negative (–) +9 VDC (40 mA maximum)
2 Control coil positive (+) +9 VDC (40 mA maximum)
3 Drive coil positive (+) AI-Video
4 Drive coil negative (–) GND
LENS CONNECTOR
AUTO IRIS LENS CABLE
AND CONNECTOR (OPTIONAL)
C/CS MOUNT ADAPTER
(FOR C MOUNT LENS ONLY)
CS MOUNT LENS