® DD5L Series Dome Drive Installation/ Operation Manual C1471M (10/98) Pelco • 3500 Pelco Way, Clovis • CA 93612-5699 USA • www.pelco.
CONTENTS Section Page 1.0 GENERAL .................................................................................................. 3 1.1 IMPORTANT SAFEGUARDS AND WARNINGS ............................... 3 1.2 UNPACKING INSTRUCTIONS .......................................................... 4 2.0 DESCRIPTION .......................................................................................... 5 2.1 MODELS ............................................................................................
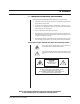
1.0 GENERAL 1.1 IMPORTANT SAFEGUARDS AND WARNINGS Observe the following WARNINGS before installing and using this product. 1. Installation and servicing should only be done by qualified service personnel and conform to all local codes. 2. Unless the unit is specifically marked as a NEMA Type 3, 3R, 3S, 4, 4X, 6, or 6P enclosure, it is designed for indoor use only and it must not be installed where exposed to rain and moisture. 3. Only use replacement parts Pelco recommends. 4.
1.2 UNPACKING INSTRUCTIONS This box contains one dome drive and one Installation/Operation manual (C1471M). Inspect all parts carefully. Save the shipping carton, boxes, and inserts. If an item appears damaged, replace it in its box and contact the factory at 1-800-289-9100 or 1-209-292-1981 for replacement. (International customers fax 1-209-348-1120 for authorization and instructions.) To return an item to the factory for repair, refer to Section 8.0, WARRANTY AND RETURN, for instructions.
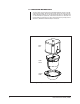
2.0 DESCRIPTION Spectra® Lite domes can do the following: • • • • 360° pan rotation preset positioning +2 to -92° tilt variable speed All Spectra® Lite models include a color CCD camera with a 12X zoom lens and capability to focus when going to a preset position. An integral receiver has a switch to select the type of control. The receiver supports Coaxitron® and RS-422 control types. The dome operates on 24 VAC. The dome drive is quickly installed and removed from the back box without tools. 2.
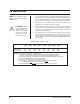
3.0 INSTALLATION NOTE: For Coaxitron® control, 1. Turn on power to the back box. The red LED should light to indicate power. If the LED does not light, correct the trouble before proceeding. (Refer to Section 6.0, TROUBLESHOOTING, in manual C1487M.) If the light operates, you may either leave power on or turn it off before continuing the installation. 2. Set the switches on the bottom of the dome drive. Refer to Table A for the settings for SW1, and Table B and Table C for SW2. 3.
Table B. Switch Settings for SW2 – P-Type Control NOTE: For Coaxitron® controls, all switches on SW2 MUST be OFF. For D-type control systems, refer to Table C.
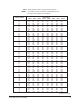
Table C. Switch Settings for SW2 – D-Type Control NOTE: For Coaxitron® controls, all switches on SW2 MUST be OFF. For P-type control systems, refer to Table B.
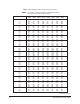
Table C. Switch Settings for SW2 – D-Type Control (Continued) NOTE: For Coaxitron® controls, all switches on SW2 MUST be OFF. For P-type control systems, refer to Table B.
Table C. Switch Settings for SW2 – D-Type Control (Continued) NOTE: For Coaxitron® controls, all switches on SW2 MUST be OFF. For P-type control systems, refer to Table B.
Table C. Switch Settings for SW2 – D-Type Control (Continued) NOTE: For Coaxitron® controls, all switches on SW2 MUST be OFF. For P-type control systems, refer to Table B.
Table C. Switch Settings for SW2 – D-Type Control (Continued) NOTE: For Coaxitron® controls, all switches on SW2 MUST be OFF. For P-type control systems, refer to Table B.
4.0 OPERATION The red LED in the back box interconnect door lights when power is turned on and the fan exhausts heat from inside the back box. If you have an outdoor pendant model with a heater, heater elements in the back box turn on at 70°F (21°C) and off at 85°F (29°C). The heater element in the lower dome turns on at 40°F (4°C) and off at 60°F (16°C). The interconnect door fan and heater fans in the outdoor back box operate continuously. 4.
4.3 ZOOM The Spectra® Lite dome can magnify an object up to 12 times (12X of optical zoom). Zoom Telephoto - Press and hold down the Zoom Tele button until you have the picture you want. Zoom Wide - Press the Zoom Wide button to increase the field of view. 4.4 PRESET FUNCTIONS NOTE: For AMERICAN DYNAM- ICS controllers with only 32 presets, set switch SW1-7 on the dome drive in the ON position.
4.6 PARK If the dome does not receive any commands for a specified period, it goes to preset 1 and parks. The dome will not park if the time specified is zero or preset 1 has not been programmed. The default is zero minutes. 4.
CM9500 1. Enter the number of the Spectra® Lite camera and press the CAM key. 2. Press the SELECT key twice. 3. Highlight CAM in the Setup menu and press the SELECT key. 4. Highlight PRESET in the Camera menu and press the SELECT key. 5. Enter 95 and press the F1 key. The main menu appears. CM9750 1. Turn the KEY SWITCH to the ON position. 2. Press the PROG key. PROGRAM appears on the LCD screen. 3. Press the PRES key. The PRESET prompt appears. 4. Enter 95 and press the ENTER key. The main menu appears. 5.
The following settings are not reset when the camera is reset: park time, auto flip disable, and limit stops. Turning off power to the dome does not reset the camera. Camera settings are retained in memory, and when power is restored, the settings are the same as when the camera was turned off. To reset the camera: 1. 2. 3. 4. On the main menu, move the joystick up or down to position the cursor (>) beside Camera. Press the Iris Open button to enter the Camera submenu.
4.7.5 Shutter Speed There are nine electronic shutter speeds: Auto 1/500 1/4,000 1/100 1/1,000 1/10,000 1/120 1/2,000 1/30,000 In the Auto setting the camera controls the shutter speed automatically. Increasing the shutter speed lowers the light sensitivity, but rapidly moving objects will be less blurred as the speed is increased. To change the electronic shutter speed settings: 1. 2. 3. 4. 5. 6. 7. 8. On the main menu, move the joystick up or down to position the cursor (>) beside Camera.
R-B WHITE BALANCE - Move the joystick up or down to a value. As you change the value, you can see the color change on your monitor. Press the Iris Open button to select the value, or press the Iris Close button if you do not want to change the setting. If Auto White Balance is on, it changes to off when you select a new value. M-G WHITE BALANCE - Move the joystick up or down to a value. As you change the value, you can see the color change on your monitor.
3. 4. Move the joystick up or down to cycle through the selections. Stop on the item you want to select. SELECT – Press the Iris Open button to select your choice. CANCEL – Press the Iris Close button if you do not want to change the setting. 4.7.10 Auto Flip The two auto flip modes are on (auto flip enabled) or off (feature disabled). To change the auto flip mode: 1. 2. 3. 4. 5. 6. On the main menu, move the joystick up or down to position the cursor (>) beside Other.
NOTE: On power-up, the auto scan tilt angle will be whatever angle the camera was at when the right scan limit was set. Scan Limit Stops Refer to the documentation for your control system for programming presets, then do the following: 1. 2. 3. 4. 5. Make sure limit stops are turned ON (refer to Section 4.7.11.1), then exit the menu. Push the joystick left until you reach the limit you want the camera to go to on the left. Program preset 92 (25).
5.0 TROUBLESHOOTING NOTE: The dome drive contains no user-serviceable parts. If there is a problem with the dome drive, return it to Pelco as a complete unit for servicing. For instructions on removing the back box assembly, refer to Section 6.1, BACK BOX ELECTRONIC ASSEMBLY REMOVAL, in manual C1487M. Symptom: Unit or fan does not operate Refer to Section 6.0, TROUBLESHOOTING, in manual C1487M. 6.0 MAINTENANCE 6.1 DOME CLEANING Do not scratch the dome.
7.0 SPECIFICATIONS MECHANICAL Pan Movement: 360° continuous pan rotation Vertical Tilt: Unobstructed +2° to -92° Manual Pan Speed: 0.5°-80°/sec manual operation, 150°/sec turbo Manual Tilt Speed: 0.
8.0 WARRANTY AND RETURN INFORMATION WARRANTY Pelco will repair or replace, without charge, any merchandise proved defective in material or workmanship for a period of one year after the date of shipment. Exceptions to this warranty are as noted below: • Five years on FT/FR8000 Series fiber optic products. • Three years on Genex® Series products (multiplexers, server, and keyboard).