
User's Manual


C665M-C (5/03) 9
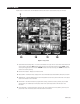
Figure 2. Camera Setup Menu
1 CAMERA NAME Box – To name a camera drag the cursor over the text in the CAMERA NAME box and type in the new
name. Up to 70 characters can be entered in the box.
2 SIGNAL TYPE – Set the NTSC/PAL signal to the correct camera setting for your location.
NOTE: The NTSC/PAL switch located on the back panel of the DVR must also be set for the correct signal. Refer to the
installation manual for more information.
3 CAMERA SELECTION Button – To setup a camera click on the camera selection button for that camera. The scene of the
selected camera appears in the viewing window of the Camera Setup Menu.
4 CAMERA ENABLE Button – Enable each camera connected to the camera inputs. This allows all enabled cameras to be
viewed and recorded. If a camera is not connected to an input disable the camera. Enabling or disabling cameras can
increase or decrease record rate.
HOW TO SET UP A CAMERA SITE
a. Click the CAMERA ENABLE button to enable a camera for setup. When the camera is enabled, the button should be a
light blue color. If the button color is dark blue, the camera is disabled.
b. Click the CAMERA SELECTION button (located above the CAMERA ENABLE button) the camera scene appears in the
Camera Viewing Window.
c. Drag the cursor over the text in the CAMERA NAME box and type in the new name.
1
2
3
4
CAMERA SETUP
Use this screen to enable or disable camera inputs, input camera name, and set signal type (NTSC/PAL).
All cameras are enabled the first time the DX7000 DVR is started. Disable any camera input that is not being used. Disabled
cameras can increase record rate.