
Operation Manual

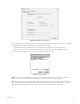
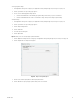

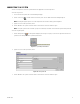
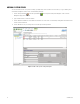
Table Of Contents
- Digital Sentry® DS ControlPoint
- Contents
- List of Illustrations
- Description
- Installing the Software
- DS ControlPoint Overview
- Operation
- Live
- Full Screen
- Quick Review
- Manual Record
- Snapshot
- Camera Groups
- Printing Images from Video Panes
- Entering a Motion Mask for Sarix Cameras
- Video Pane Borders
- Removing Video from a Window
- Manage OSD Settings
- Image Adjustments
- Enable On-Screen Pan/Tilt/Zoom
- Enable Digital Zoom
- PTZ Controls
- Alarm Page
- Pause Notification
- Search
- PTZ Cameras
- Appendixes

14 C3674M-L (6/15)
Figure 6. Sync Settings Dialog Box
Using Auto Sync: The Auto Sync function allows the CP or XML file to be enabled at the following settings:
• On Start Up of ControlPoint
• Hourly
• Daily
• Weekly
• Monthly
Using Auto Sync
1. Determine the location of the file (Ex. C:\ControlPoint Files\CPSettings.cp.
2. Configure your auto sync setting.
3. Click OK.
4. Export the CP file.
5. In order to disable the auto sync setting, delete the .cp or .xml file.
To import systems:
1. Click the Application Settings tab in the Setup page. The Application Settings dialog box appears (refer to Figure 6 on page 14).
2. Click the Sync button. The Sync Settings section appears.
3. Click the Import Systems button. An Import Complete dialog box appears showing the number of systems that are imported and the number
of existing systems that are ignored (refer to Figure 7).
4. Click the OK button to close the dialog box.
Figure 7. Import Complete Dialog Box