
Operation Manual
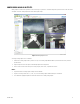
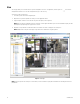

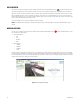
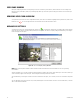
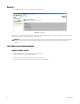
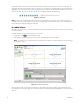
Table Of Contents
- Digital Sentry® DS ControlPoint
- Contents
- List of Illustrations
- Description
- Installing the Software
- DS ControlPoint Overview
- Operation
- Live
- Full Screen
- Quick Review
- Manual Record
- Snapshot
- Camera Groups
- Printing Images from Video Panes
- Entering a Motion Mask for Sarix Cameras
- Video Pane Borders
- Removing Video from a Window
- Manage OSD Settings
- Image Adjustments
- Enable On-Screen Pan/Tilt/Zoom
- Enable Digital Zoom
- PTZ Controls
- Alarm Page
- Pause Notification
- Search
- PTZ Cameras
- Appendixes

34 C3674M-L (6/15)
QUICK REVIEW
To view video recently recorded from the cameras displayed in the video panes, click the Quick Review icon and select the amount of video
you want to view from the list. You can quickly view video recorded in several increments ranging from the last minute to the last 90 minutes.
When you select the increment, recorded video for the entire time range is played back starting from the beginning of the increment. The status
bar in the bottom-right corner of the screen indicates the progress of the video. You can control playback of the recorded video using the nine
buttons at the bottom of the screen; to view the function of a button, place your mouse pointer over the button. Also, click the status bar or drag
the slider left or right to quickly move through the video.
To return to viewing live video, click the Live tab at the top of the window.
NOTE: For information about exporting recorded video, authenticating video, or filtering samples, refer to Live and Playback Video Search on
page 38.
MANUAL RECORD
You can create a customized recording resolution and time frame by clicking the Manual Record icon . Use the following options to create
your customized recording solution:
• Recording Resolution
– Off
– Low
– Medium
– High
• Recording Time
– 1 Minute
– 5 Minutes
– 30 Minutes
– 1 Hour
Selecting a low recording frame rate allows you to save recording space. Recording at a higher resolution allows you to increase the quality of
the video recording. An example of a customized recording resolution might be in a college classroom. When the class begins, the recorder might
be set to a high frame rate and a certain recording time. When the class ends, the frame rate and recording time would be set back to the original
settings. This would result in saving space on your hard drive.
Figure 30. Customizing Recording