
Operation Manual
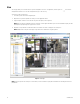

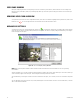
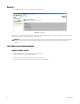
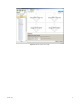
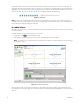
Table Of Contents
- Digital Sentry® DS ControlPoint
- Contents
- List of Illustrations
- Description
- Installing the Software
- DS ControlPoint Overview
- Operation
- Live
- Full Screen
- Quick Review
- Manual Record
- Snapshot
- Camera Groups
- Printing Images from Video Panes
- Entering a Motion Mask for Sarix Cameras
- Video Pane Borders
- Removing Video from a Window
- Manage OSD Settings
- Image Adjustments
- Enable On-Screen Pan/Tilt/Zoom
- Enable Digital Zoom
- PTZ Controls
- Alarm Page
- Pause Notification
- Search
- PTZ Cameras
- Appendixes

C3674M-L (6/15) 35
SNAPSHOT
To export a current still image from a selected live or playback video:
1. Click the Snapshot icon
. The Snapshot Preview dialog box appears.
2. Select a file type from drop down list: PNG (default), BMP, GIF, JPEG, and TIFF.
3. Select a file name for the snapshot.
4. Click the Save Path button to select a location to save the snapshot.
5. Select “Keep Open after Save?” if you want the Snapshot Preview screen to remain open.
6. Select “Add note?” if you want to add a note to the snapshot.
7. Click the Save button to save the snapshot to the desired location.
NOTE: When you click the Refresh button, the snapshot will show the latest scene in the live or playback video.
CAMERA GROUPS
Any combination of cameras in a video pane configuration can be saved as a camera group. To save and view cameras as a camera group:
1. Drop the cameras into the video panes and click the Create Group icon . The Create Group tab allows you to save a combination of
cameras in the video panes.
2. On the Create Group tab (refer to Figure 31), type a name for the group in the Group Name text box, and click the Save button. The camera
group now appears in the Groups section of the navigation pane under Local Groups.
3. To view the camera group, right-click on the camera group name in the tree and select View Live from the menu. Alternatively, you can click
and drag the group name into the video panes.
NOTES:
• Camera groups configured directly through DSAdmin also appear in the Groups section of the navigation pane. They can be found in the
System Groups portion of the tree.
• Camera properties and the ability to pause and unpause notifications are also accessible when you right-click on a camera in the camera
tree.
Figure 31. Create Group Tab
PRINTING IMAGES FROM VIDEO PANES
To print camera images displayed in the video panes, click the Print icon . On the Print tab, you can select options to include the OSD text
(Text Overlay) and to fit the images to the paper (Best Fit). You can also preview the print job. To print the images, click the Print button.
ENTERING A MOTION MASK FOR SARIX CAMERAS
Motion masking is available for Sarix cameras.
1. Right-click in the image.
2. Select the Configure Motion Settings option. The Configure Motion Settings page appears.
3. Click and drag in the image to select the area to be masked.
4. Click the Save button, then the Close button.
NOTE: The system requires 15 minutes to recognize the motion masking setting.