
Operation Manual
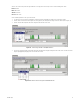

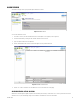

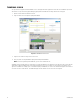

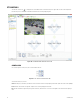
Table Of Contents
- Digital Sentry® DS ControlPoint
- Contents
- List of Illustrations
- Description
- Installing the Software
- DS ControlPoint Overview
- Operation
- Live
- Full Screen
- Quick Review
- Manual Record
- Snapshot
- Camera Groups
- Printing Images from Video Panes
- Entering a Motion Mask for Sarix Cameras
- Video Pane Borders
- Removing Video from a Window
- Manage OSD Settings
- Image Adjustments
- Enable On-Screen Pan/Tilt/Zoom
- Enable Digital Zoom
- PTZ Controls
- Alarm Page
- Pause Notification
- Search
- PTZ Cameras
- Appendixes

48 C3674M-L (6/15)
4. Click the Browse button to select the name and location for the export file, and then click the Next button.
5. Select the streams to export. In this tab, you can select Select All or Clear All, and then click the Next button.
6. Use the status bar slider to select the beginning of the search result that you want to export, and then click the Next button.
7. Use the status bar slider to select the end of the search result that you want to export, and then click the Next button.
The export begins and the status bar shows the progress of the export. Once the export is completed, the search option screen will reappear.
NOTE: When connected to a DX product, the AVI export format does not function.
EXPORTING TO A CD/DVD
NOTE: Before exporting to a CD/DVD, make sure you install the Microsoft
®
Windows
®
Feature Pack for Storage 1.0, which includes Image
Mastering API version 2.0 (IMAPI2). To install the feature pack, go to TechTip.
To export video included from a search result to a CD/DVD, complete the following steps:
1. Click the Export icon (refer to Figure 46).
2. On the Export tab, select Video and click the Next button.
3. Select the export format and click the Next button. You can select AVI (Indeo), AVI (Video1), EXE (self-extracting executable), H264, MJPEG,
MPEG1, MPEG2, MPEG4, or XPA.
Figure 46. Export Formats
4. Select “Write to CD/DVD,” and click the Next button.
5. Click the Browse button to select the name and location for the export file, and then click the Next button.
6. Select the streams to export. In this tab, you can select Select All or Clear All, and then click the Next button.
7. Use the status bar slider to select the beginning of the search result that you want to export, and then click the Next button.
8. Use the status bar slider to select the end of the search result that you want to export, and then click the Next button.
NOTE: If there is no CD or DVD in the disc drive, a message will appear asking if you would like to retry writing to the CD/DVD.
The export begins and the status bar shows the progress of the export. Once the export is completed, the search option screen will reappear.
EXPORT A SINGLE IMAGE
1. Click the Export icon.
2. Select Image and click the Next button.
3. Use the status bar slider to display the image.
4. Select Include Video Text Overlay and Best Fit, if desired.
5. Click the OK button to display the Save As window.
6. Type a file name, select the location where you want to save the file, and click the Save button.