
Operation Manual
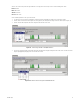


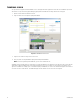

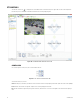
Table Of Contents
- Digital Sentry® DS ControlPoint
- Contents
- List of Illustrations
- Description
- Installing the Software
- DS ControlPoint Overview
- Operation
- Live
- Full Screen
- Quick Review
- Manual Record
- Snapshot
- Camera Groups
- Printing Images from Video Panes
- Entering a Motion Mask for Sarix Cameras
- Video Pane Borders
- Removing Video from a Window
- Manage OSD Settings
- Image Adjustments
- Enable On-Screen Pan/Tilt/Zoom
- Enable Digital Zoom
- PTZ Controls
- Alarm Page
- Pause Notification
- Search
- PTZ Cameras
- Appendixes

C3674M-L (6/15) 49
PTZ Cameras
DS ControlPoint provides features for pan/tilt/zoom (PTZ) cameras that allow you to control and configure PTZ-enabled cameras (by way of
presets) through the viewing area.
NOTE: To control PTZ functions on Digital Sentry systems when connected through DS ControlPoint, you must be assigned the Configuration
Manager permission. This permission must be assigned using DSAdmin. For more information, refer to the Integral Digital Sentry Operation/
Configuration manual.
To view video or data from a PTZ camera in a video pane:
1. From the Live page, click the Layout icon and select the configuration from the menu. To close the configuration menu, press the
<Esc> key.
2. Select the Systems section of the navigation pane, and expand the tree until you see the appropriate PTZ-enabled camera.
3. Drag the camera to a video pane. The PTZ icons appear with the displayed video.
Figure 47. Live Page with PTZ-Enabled Video
4. If necessary, repeat these steps until video or data from all desired PTZ-enabled cameras are displayed in the video panes.
ENABLE AND DISABLE PTZ
The Enable PTZ feature allows you to use your mouse to control the pan, tilt, and zoom functionality of a PTZ camera. To enable PTZ, perform
the following steps:
1. Click the Enable PTZ icon . The icon turns red.
2. Position the mouse pointer on the video, and then click and hold the left mouse button until the pointer changes to an arrow. Move the
mouse to pan and tilt the camera, which changes the view as the camera moves.
3. To zoom the camera, move the mouse pointer until it changes to a spyglass. Then click and hold the mouse button to zoom in (+ spyglass)
and out (– spyglass).
4. To disable PTZ, click the red PTZ icon .