
Operation Manual

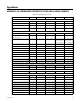
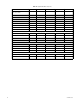
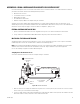
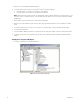
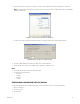
Table Of Contents
- Digital Sentry® DS ControlPoint
- Contents
- List of Illustrations
- Description
- Installing the Software
- DS ControlPoint Overview
- Operation
- Live
- Full Screen
- Quick Review
- Manual Record
- Snapshot
- Camera Groups
- Printing Images from Video Panes
- Entering a Motion Mask for Sarix Cameras
- Video Pane Borders
- Removing Video from a Window
- Manage OSD Settings
- Image Adjustments
- Enable On-Screen Pan/Tilt/Zoom
- Enable Digital Zoom
- PTZ Controls
- Alarm Page
- Pause Notification
- Search
- PTZ Cameras
- Appendixes
C3674M-L (6/15) 59
APPENDIX C: USING A KBD5000 KEYBOARD WITH DS CONTROLPOINT
Pelco’s KBD5000 keyboard can be used to control certain functions of the DS ControlPoint software. The KBD5000 is configured with three
control modules that are installed in receptacles on the keyboard base. Refer to the KBD5000 Operation manual for detailed information.
NOTES:
• You must install DS ControlPoint version 7.0.41 or later.
• Windows virtually assigns a COM port so no Windows configuration is required.
• If required, contact Pelco Product Support (1-800-289-9100) to download the latest version of DS ControlPoint.
The following three modules are included with the KBD5000 base:
• A variable speed, vector-solving joystick with keys for lens, iris, and focus control. The barrel-type joystick provides precise pan and tilt
control of fixed speed and variable speed positioning systems. Twisting the joystick zooms the lens in and out.
• A jog dial and shuttle ring for playback and menu navigation. The jog/shuttle contains four illuminated function keys. The color of each key
corresponds to the color of its icon displayed on the monitors linked to the user interface. This intuitive color-coded design lets users
navigate the on-screen menus without looking down to read keyboard text labels.
• A keypad for camera and monitor control. Keys can be used to select cameras and monitors and the number of cameras to view.
INSTALLING THE KBD5000
1. Attach the USB Type B-to-Type A cable from the USB connector on the rear of the KBD5000 to the USB connector on the computer.
2. Connect the power supply cord to the rear of the keyboard, and tighten the connector barrel.
3. Connect the other end of the power cord to a power supply. When power is applied, lights on the module illuminate.
CONTROLLING DS CONTROLPOINT WITH THE KBD5000
DS ControlPoint automatically detects the KBD5000 on startup. To use the KBD5000 to control DS ControlPoint functionality:
1. Open DS ControlPoint by clicking the DS ControlPoint icon on your desktop or by locating the software in the Start menu.
2. Connect to a system in the Setup page.
3. Click the Live tab.
NOTE: If your sites are not autoconnect, you will need to use your mouse to connect to your sites.