
Installation Manual
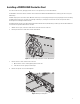
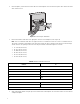

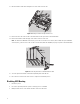

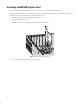
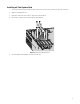

Table Of Contents
- Digital Sentry Hardware
- Contents
- Important Notices
- Package Contents
- Product Overview: Front
- Product Overview: Rear
- Placing on a Desktop
- Product Serial Number Label Placement
- Installing a DSSRV-RAID Controller Card
- Installing the SCSI Card
- Installing an ENC5400 Capture Card
- Mounting in a Rack
- Installing the Hard Drive Array
- Connecting an ENC5516
- Connecting an Uninterruptible Power Supply
- Connecting to the Network
- Connecting the Power Supply
- Connecting the Power Supply
- Shutting Down the Unit
- Enabling SNMP Services
- Enabling Serial Ports in the BIOS
- Digital Sentry Port Assignments
- Troubleshooting
- Technical Specifications

13
8. Insert and tighten the two screws on the top of each backplane.
9. Unscrew and remove the metal filler bracket for the PCIe x 16 slot.
Figure 4: Removing the PCIe x 16 Filler Bracket
10. Replace the RAID card’s high-profile bracket with the supplied low-profile bracket.
11. Align the card with the PCIe x 16 slot. Gently press down on the card so that it is properly seated in the PCIe x 16 slot. Insert and
tighten the metal bracket screw to secure the card.
Figure 5: Removing the PCIe x 16 Filler Bracket