
Installation Manual
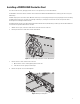
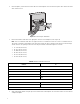

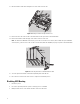
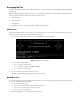


Table Of Contents
- Digital Sentry Hardware
- Contents
- Important Notices
- Package Contents
- Product Overview: Front
- Product Overview: Rear
- Placing on a Desktop
- Product Serial Number Label Placement
- Installing a DSSRV-RAID Controller Card
- Installing the SCSI Card
- Installing an ENC5400 Capture Card
- Mounting in a Rack
- Installing the Hard Drive Array
- Connecting an ENC5516
- Connecting an Uninterruptible Power Supply
- Connecting to the Network
- Connecting the Power Supply
- Connecting the Power Supply
- Shutting Down the Unit
- Enabling SNMP Services
- Enabling Serial Ports in the BIOS
- Digital Sentry Port Assignments
- Troubleshooting
- Technical Specifications

15
Re-Imaging the Unit
A USB key containing the software image is shipped with the unit. You must re-image the unit after installing an optional DSSRV-RAID
controller card.
NOTE: If burning the ISO image to a DVD, you must use a dual-layer DVD. DS-SRV2-RD models have the RAID card installed. Use the
USB key packaged with the DS-SRV2 system to perform an image recovery.
1. Shut down the unit.
2. Insert the USB key.
3. Turn on the unit.
4. Depending on the system configuration, perform a RAID or Non-RAID recovery.
RAID Recovery
A warning dialog appears before the recovery process. If you have not backed up your video data, you might want to exit the recovery
dialog and back up your data before continuing with the recovery process.
1. Press any key to continue with the factory restore. The RAID Operations dialog box appears.
Figure 8: RAID Operations Dialog Box
2. Select one of the following options:
• Press 1 to convert to a RAID 5 array.
• Press 2 to convert to a single-drive (JBOD) configuration.
• Press 3 to exit the recovery console.
3. Press y to confirm your selection. Press Enter to continue.
The RAID 5 configuration will take approximately one hour to complete.
Non-RAID Recovery
If recovering a unit that does not have a RAID controller installed, or you selected a single-drive configuration during the RAID recovery
process, the non-RAID recovery dialog appears.
1. Select one of the following options:
• Press 1 to restore the OS partition only, leaving video data intact.
• Press 2 to erase all system drives, including video data.
• Press 3 to exit the recovery console.
2. After selecting Option 1 or 2, type y, and then click the Enter key.