
Installation Manual
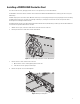


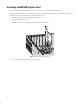

Table Of Contents
- Digital Sentry Hardware
- Contents
- Important Notices
- Package Contents
- Product Overview: Front
- Product Overview: Rear
- Placing on a Desktop
- Product Serial Number Label Placement
- Installing a DSSRV-RAID Controller Card
- Installing the SCSI Card
- Installing an ENC5400 Capture Card
- Mounting in a Rack
- Installing the Hard Drive Array
- Connecting an ENC5516
- Connecting an Uninterruptible Power Supply
- Connecting to the Network
- Connecting the Power Supply
- Connecting the Power Supply
- Shutting Down the Unit
- Enabling SNMP Services
- Enabling Serial Ports in the BIOS
- Digital Sentry Port Assignments
- Troubleshooting
- Technical Specifications

16
Installing the SCSI Card
Disconnect the power source before opening the chassis and installing or removing any expansion cards or other hardware.
1. Unscrew and remove the bracket for the PCIe x 16 slot. Set the screw aside.
2. Replace the high-profile bracket connected to the card with the low-profile bracket (supplied).
3. Align the card with the PCIe x 16 slot and gently press down on the card until it is firmly seated in the slot.
Figure 1: Installing the SCSI Card
4. Insert and tighten the screw to secure the card.