
Installation Manual
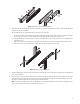
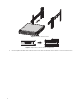
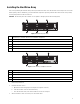
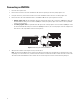

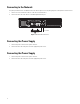
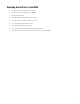
Table Of Contents
- Digital Sentry Hardware
- Contents
- Important Notices
- Package Contents
- Product Overview: Front
- Product Overview: Rear
- Placing on a Desktop
- Product Serial Number Label Placement
- Installing a DSSRV-RAID Controller Card
- Installing the SCSI Card
- Installing an ENC5400 Capture Card
- Mounting in a Rack
- Installing the Hard Drive Array
- Connecting an ENC5516
- Connecting an Uninterruptible Power Supply
- Connecting to the Network
- Connecting the Power Supply
- Connecting the Power Supply
- Shutting Down the Unit
- Enabling SNMP Services
- Enabling Serial Ports in the BIOS
- Digital Sentry Port Assignments
- Troubleshooting
- Technical Specifications
28
Enabling SNMP Services
The Windows SNMP service is turned off by default. You must enable the SNMP service to issue SNMP requests or receive traps from
the unit.
The Digital Sentry MIB files are located on the Digital Sentry recorder at C:\Program Files (x86)\Pelco\Health Monitor\MIB
• DigitalSENTRY-Base-MIB.MIB
• Integral-Tech-SMI.MIB
Consult the documentation for your SNMP manager for information about loading MIB files.
1. Click Start. Type “Turn Windows Features On or Off” in the Search Programs and Files field, and then click Enter.
2. Select the Simple Network Management Protocol (SNMP) and WMI SNMP Provider check boxes, and then click OK.
3. Click Start and type services.msc in the Search Programs and Files field, and then click Enter.
4. Right-click SNMP Service and select Properties.
5. Click the Security tab within the “Accepted community names” frame, and then click Add.
6. Ensure the “Community rights:” menu states READ ONLY. In the “Community Name:” field, type “Public”, and then click Add.
7. Click Apply.
8. Go to the Traps tab. Under “Trap destinations:” click Add, and type the IP address of your SNMP manager. Click Add.
9. Click OK to save and close the SNMP Service Properties dialog.