
Installation Manual
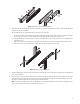
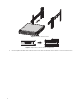
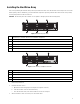
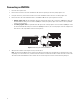

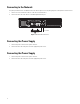
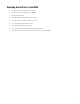
Table Of Contents
- Digital Sentry Hardware
- Contents
- Important Notices
- Package Contents
- Product Overview: Front
- Product Overview: Rear
- Placing on a Desktop
- Product Serial Number Label Placement
- Installing a DSSRV-RAID Controller Card
- Installing the SCSI Card
- Installing an ENC5400 Capture Card
- Mounting in a Rack
- Installing the Hard Drive Array
- Connecting an ENC5516
- Connecting an Uninterruptible Power Supply
- Connecting to the Network
- Connecting the Power Supply
- Connecting the Power Supply
- Shutting Down the Unit
- Enabling SNMP Services
- Enabling Serial Ports in the BIOS
- Digital Sentry Port Assignments
- Troubleshooting
- Technical Specifications
29
Enabling Serial Ports in the BIOS
1. Turn the unit on. If the unit is already on, restart it.
2. Press the Delete key repeatedly to access the BIOS.
3. Go to the Advanced menu.
4. Select NCT6776F Super IO Configuration. Press Enter.
5. Select the serial port you want to enable. Press Enter.
6. Select Serial Port from the menu. Press Enter.
7. Select Enabled from the menu. Press Enter.
8. Press Esc, and repeat the steps above to enable other serial ports.
9. Press F4, select Yes, and then press Enter to save your changes and exit the BIOS.