
Operation Manual
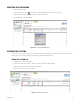
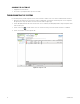
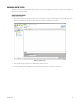
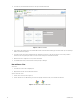
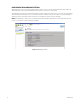
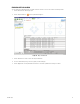

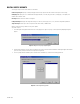
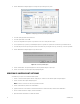
Table Of Contents
- Digital Sentry® DS ControlPoint
- Contents
- List of Illustrations
- Description
- Installing the Software
- DS ControlPoint Overview
- Operation
- Live
- Full Screen
- Quick Review
- Manual Record
- Snapshot
- Camera Groups
- Printing Images from Video Panes
- Entering a Motion Mask for Sarix Cameras
- Video Pane Borders
- Removing Video from a Window
- Manage OSD Settings
- Image Adjustments
- Enable On-Screen Pan/Tilt/Zoom
- Enable Digital Zoom
- PTZ Controls
- Alarm Page
- Pause Notification
- Search
- PTZ Cameras
- Appendixes

30 C3674M-L (6/15)
4. Click the Next button. A dialog box appears to configure the report settings for the system.
Figure 26. Configuring System Report Settings Dialog Box
5. Select the report type(s) from the drop-down list.
6. Select the report format: PDF or HTML.
7. Select “Use configuration for all systems” if you want to reserve these settings for future reports.
8. Select “Separate file per system” if you want multiple reports to be generated as separate files instead of being consolidated into one.
9. Select the time period for the report using the From and To calendars or by selecting the Last 7 Days, Last 14 Days, or Last 30 days button.
10. Click the Next button. A dialog box appears to generate the report.
Figure 27. Create Report Dialog Box
11. Click the Finalize button. The report will appear in the directory location that you set up in step 2.
12. Click the Close button to close the Digital Sentry Reporting dialog box.
UPDATING DS CONTROLPOINT SOFTWARE
To determine if you require a DS ControlPoint software update:
1. Click the “Check for Software Update” tab in the Setup page. A “Confirm check for Software Update” dialog box appears.
2. Click the Yes button. A DS Update dialog box appears.
NOTE: You must be connected to the Internet to perform this function.
3. Click the ControlPoint box, and then click the Next button.
4. Type the location in the Save Path box or click the Browse button for a download location, and then click the Next button.
5. Once the software download is complete, click the Finish button.
6. Open and install the downloaded DS ControlPoint software.