
User's Manual


84 C1697M-B (11/08)
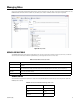
Figure 91. Adding a Role
3. Enter the role name, and then click OK to confirm the addition.
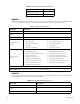
4. Assign a priority (1–25) to the role. Priority 1 has the highest priority when more than one user is trying to access a device. Priority 25 has
the lowest priority. The default priority setting is 1.
5. Enter a brief role description. (For example, “Day shift operator (from 8 a.m. to 5 p.m.) can view live video on all cameras, run searches and
scripts, and play back video.”)
6. Assign permissions to the role.
ASSIGNING PERMISSIONS
Giving a permission to a role is granting that role the right to access specific DVR5100 devices, services, and features. A new role does not have
a permissions set. When you create a new role, you must assign the new role a set of permissions to access system features, services, and
devices. You can also exclude specific devices from the permissions set.
ASSIGNING PERMISSIONS TO SYSTEM FEATURES
1. Select the role you want to edit. Information about that role appears in the right pane of the Roles screen.
2. Click the System tab (if it is not already visible).
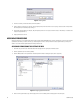
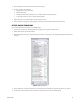
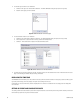
3. Click the Modify button on the System tab. The Select System Permissions dialog box opens (refer to Figure 92).
Figure 92. Assigning System Permissions
4. Click one of the system features you want to assign to this role. The related system services appear in the center pane.