
User's Manual


C1696M-B (11/08) 43
6. After you have modified the camera settings, press the red function button . The Camera Settings menu disappears and the video
pane returns to live view mode (green border).
NOTE: Selecting EXIT will not clear the Camera Settings menu.
ADJUSTING THE AUDIO VOLUME
To adjust the audio level (for cameras that support audio):
1. Select a video pane.
2. Hold down the Control key and press the right arrow key to raise the audio level, or press the left arrow key to lower the audio level.
[Or, hold down Enter/Shift and turn the Jog (inner dial)
to the right to raise the audio level, or turn it to the left to lower the
audio level].
ADJUSTING THE IRIS
To adjust the iris:
1. In live view mode, use the arrow keys [or the Joystick ] to select a video pane that is displaying video from a camera requiring an iris
adjustment. The selected pane is highlighted by a green border.
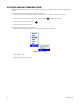
2. Press the “M” key [or Menu ]. The Main menu appears.
3. Click Cameras [or Navigate to Cameras and press Enter/Shift ]. The Cameras menu appears.
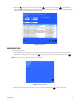
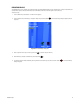
4. On the Cameras menu, click Iris. The Iris dialog box appears (refer to Figure 45).
[Or, navigate to Iris and press Menu
or the red function button ].
Figure 45. Iris Dialog Box
5. In the Iris list, click Auto Iris Off; the default setting is Auto Iris On.
[Or, navigate to the Iris box and turn the Jog (inner dial) to set the Iris mode to Auto Iris Off.]
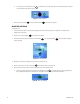
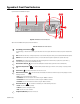
6. Navigate to the Iris Plus (+) or Minus (-) signs and perform one of the following actions:
• To open the iris, turn the Shuttle (outer ring)
clockwise. As an alternative, press and hold the Plus button to open the iris until
it reaches its limit (refer to Figure 46).
Figure 46. Open Iris Control