
User Guide

38 C1695M-B (11/08)
DATE AND TIME SETUP
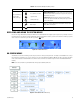
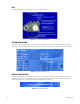
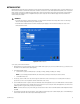
You can select a choice of on-screen time and date formats, and the operating time zone for the DVR5100 (refer to Figure 36). Before you record
any video, you must set the system time, date, and time zone. You may also choose to use an external time server to synchronize the DVR5100's
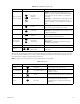
time with an NTP server. Refer to Table P on page 69 for more information and default settings.
Figure 36. Date and Time Screen
To set up time and date formats:
1. Select the Date & Time tab from the System screen.
2. Select AM/PM or 24-hour Time from the “Time format” list.
3. Select mm/dd/yyyy or dd/mm/yyyy from the “Date format” list.
To set up the time and date:
1. Select the closest time zone to your location first, and then select the closest city. If your location observes a form of daylight saving time,
the system will automatically change the time on the associated dates.
2. Highlight the hours, minutes, and seconds in the Time box and type the time. Or, use the Time box up and down arrows to change the
highlighted hours, minutes, and seconds.
3. Click in the Date box and type the appropriate date. Or, use the Date up and down arrows to change the highlighted day, month, and year.
WARNING: You must restart the DVR5100 before changes you make to date and time are recognized by the operating system. It may take
several minutes for the system to save all of the changes and restart.