O P E R AT I O N / P R O G R A M M I N G ® ES30C/ES31C Series Esprit® with IOP C309M-J (9/04)
C309M-J (9/04)
CONTENTS Section Page IMPORTANT SAFETY INSTRUCTIONS ............................................................................................................................................................................... 5 OPERATION ......................................................................................................................................................................................................................... 6 POWER-UP DISPLAY .................................
WHITE BALANCE ...................................................................................................................................................................................................... 40 WIPER MODE ........................................................................................................................................................................................................... 41 ZONE BLANK ...................................................................
IMPORTANT SAFETY INSTRUCTIONS 1. Read these instructions. 2. Keep these instructions. 3. Heed all warnings. 4. Follow all instructions. 5. Do not block any ventilation openings. Install in accordance with the manufacturer’s instructions. 6. Do not install near any heat sources such as radiators, heat registers, stoves, or other apparatus (including amplifiers) that produce heat. 7. Only use attachments/accessories specified by the manufacturer. 8.
OPERATION POWER-UP DISPLAY When the system is powered up, the selected protocol, revision number, and other information is displayed on the monitor. For example, the screen might show the following information: ESPRIT 16X IOP 1.0h CONFIGURE DONE The information displayed depends on the selected protocol (C, D, or P) and the menu selection for powerup mode. (Refer to the Power-Up Mode in the Programming section).
OPERATING NOTES ENVIRONMENTAL RANGE The operating temperature ranges from a minimum of -50°F (-45°C) to a maximum of 122°F (50°C) for sustained system operation or 140°F (60°C) absolute maximum. The entire unit can de-ice and be operational in two hours from a temperature of -13°F (-25°C). The thermostatically controlled heater consumes 10 watts and cycles on at 70°F (21°C) and off at 85°F (29°C), while the window defroster runs continuously and consumes 2.5 watts.
PATTERNS The Esprit system can do either one full pattern (1.5, 3, or 6 minutes long) or two half patterns (.75, 1.5, or 3 minutes long). This pattern can consist of any standard pan and tilt or lens command. Presets, flip, digital zoom, proportional pan, and turbo are not allowed in a pattern. Zones can be enabled while running a pattern. Refer to the documentation for your control system to program and run patterns.
PROGRAMMING - ES30C16/ES31C16 1. Access main menu (preset 95). 2. Make main menu selections. Joystick: Move up or down to position cursor or to toggle between selections. Iris Open: Enter. Camera Menu Iris Close: Cancel. MAIN MENU * Exit PRESETS The following presets are reserved for special functions.
PROGRAMMING - ES30C22/ES31C22 1. Access main menu (preset 95). 2. Make main menu selections. Joystick: Move up or down to position cursor or to toggle between selections. Iris Open: Enter. Camera Menu Iris Close: Cancel. MAIN MENU * Exit PRESETS The following presets are reserved for special functions.
PROGRAMMING - ES30CBW18/ES31CBW18 1. Access main menu (preset 95). 2. Make main menu selections. Joystick: Move up or down to position cursor or to toggle between selections. Iris Open: Enter. Camera Menu Iris Close: Cancel. MAIN MENU * Exit PRESETS The following presets are reserved for special functions.
PROGRAMMING ACCESSING MAIN MENU (PRESET 95) You can call up the main menu on your monitor by programming (setting or creating) preset 95 (28 if in 32-preset mode). Programming preset 95 for Pelco’s controllers varies according to the type of controller you are using. Instructions for programming preset 95 are given below for various Pelco controllers. CM6700 1. Enter the number of the camera and press the CAM key. 2. Enter 95 and hold the PRESET key for two seconds. 3.
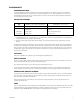
AUTO FOCUS MODE MAIN MENU Exit Camera Menu Backlight comp Zoom limit Reset camera Next Exit Next Menu Off x- - LowLight limit Shutter speed Auto focus mode Prev Exit Auto Auto There are two auto focus modes: Auto – If auto focus is in the auto mode, pressing the Focus Far or Focus Near button will place the focus in the manual mode.
AUTO IRIS MAIN MENU Exit Auto Iris Menu Camera Menu Backlight comp Zoom limit Reset camera Next Exit Off x- - Auto-iris mode Auto-iris level Auto-iris peak Exit Auto The following are the settings for auto iris: Mode Level Peak To change the settings for auto iris: 1. 2. 3. 4. 5. 6. Program preset 95 (28). The main menu appears. Position the cursor (>) beside Camera.
AUTO IR LEVEL (MODELS ES30CBW18/ES31CBW18 ONLY) MAIN MENU Exit Camera Menu Backlight comp Zoom limit Reset camera Next Exit IR Filter Menu Next Menu Off x- - LowLight limit Shutter speed Auto focus mode Prev Exit Auto Auto Auto IR filter mode Auto IR Level Exit Auto Dusk The auto IR level is the light level at which the infrared filter switches IN or OUT.
AUTO SHARPNESS MAIN MENU Exit Camera Menu Backlight comp Zoom limit Reset camera Next Exit Sharpness Menu Next Menu Off x- - LowLight limit Shutter speed Auto focus mode Prev Exit Auto Auto Auto Auto Sharpness Sharpness Exit On 13 The following settings are available for auto sharpness: On – Automatically sets the sharpness of the camera.
AZ/EL Other Menu MAIN MENU Exit Proportional pan Park time minutes Scan Speed deg/s Pattern Length Spd Profile Exit Az/El/Direction On 0 25 1.5 min Set Azimuth Zero Az/El Az/El Line Direction Direction Line Zoom Zoom Line Disp Duration Exit Az/El programs the horizontal display position of the Azimuth1/Elevation2 label. NOTE: Az/El display is not available while you are programming or running a pattern.
AZ/EL LINE Other Menu MAIN MENU Exit Proportional pan Park time minutes Scan Speed deg/s Pattern Length Spd Profile Exit Az/El/Direction On 0 25 1.5 min Set Azimuth Zero Az/El Az/El Line Direction Direction Line Zoom Zoom Line Disp Duration Exit Az/El Line controls the vertical display position of the Azimuth/Elevation label. The label may be displayed on lines 3 through 10.
AZIMUTH ZERO MAIN MENU Exit Other Menu Proportional pan Park time minutes Scan Speed deg/s Pattern Length Spd Profile Exit Az/El/Direction On 0 25 1.5 min Set Azimuth Zero Az/El Az/El Line Direction Direction Line Zoom Zoom Line Disp Duration Exit Azimuth is the pan angle from 0° to 359°. Azimuth zero is the programmed 0° point that is normally set to magnetic north.
BACKLIGHT COMPENSATION MAIN MENU Camera Menu Exit Backlight comp Zoom limit Reset camera Next Exit Off x- - There are two backlight compensation modes: On – The system uses the center 10 percent of the picture to adjust the iris. If there is a bright light source outside of this area, it will wash out to white. The camera will adjust the iris so that the object in the sensitive area is properly exposed.
DIRECTION Other Menu MAIN MENU Exit Proportional pan Park time minutes Scan Speed deg/s Pattern Length Spd Profile Exit Az/El/Direction On 0 25 1.5 min Set Azimuth Zero Az/El Az/El Line Direction Direction Line Zoom Zoom Line Disp Duration Exit Direction programs the horizontal display position of the Direction label (N, NW, NE, …).
DIRECTION LINE Other Menu MAIN MENU Exit Proportional pan Park time minutes Scan Speed deg/s Pattern Length Spd Profile Exit Az/El/Direction On 0 25 1.5 min Set Azimuth Zero Az/El Az/El Line Direction Direction Line Zoom Zoom Line Disp Duration Exit Direction Line controls the vertical display position of the Direction label. The label may be displayed on lines 3 through 10.
DISPLAY DURATION Other Menu MAIN MENU Exit Proportional pan Park time minutes Scan Speed deg/s Pattern Length Spd Profile Exit Az/El/Direction On 0 25 1.5 min Set Azimuth Zero Az/El Az/El Line Direction Direction Line Zoom Zoom Line Disp Duration Exit Display Duration programs the duration the Az/El, Direction, and Zoom labels are displayed on the monitor.
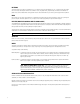
GAIN/AGC MAIN MENU Exit Gain/AGC Menu Camera Menu Backlight comp Zoom limit Reset camera Next Exit Off x- - Gain Limit Exit 27 GAIN LIMIT The gain limit sets the maximum level for the automatic gain control. Increasing the level will increase the signal level and increase the noise level of the picture. To change the gain: 24 1. Program preset 95 (28). The main menu appears. 2.
IR FILTER MODE (MODELS ES30CBW18/ES31CBW18 ONLY) MAIN MENU Exit Camera Menu Backlight comp Zoom limit Reset camera Next Exit IR Filter Menu Next Menu Off x- - LowLight limit Shutter speed Auto focus mode Prev Exit Auto Auto Auto IR filter mode Auto IR Level Exit Auto Dusk There are two settings for the IR filter mode: Auto – IR filter switches in and out automatically.
LIMIT STOPS Limit Stop Menu MAIN MENU Exit Limit Stops Set Man Limits Clear Man Limits Set Scan Limits Clear Scan Limits Exit Off NOTE: Limit stops are inactive while setting items in the program menu (e.g. azimuth zero, scan limits, manual pan limits). TURNING LIMIT STOPS ON OR OFF To change the limit stop mode: 1. Program preset 95 (28). The main menu appears. 2. Position the cursor (>) beside Limit Stop. 3.
LIMIT STOPS MENU The manual pan limit stops can be set at the controller using the Limit Stops menu: 1. Program preset 95 (28). The main menu appears. 2. Position the cursor (>) beside Limit Stop. 3. Press the Iris Open button to enter the Limit Stop menu. 4. Move the cursor to Set Man Limits and press the Iris Open button. PRESS IRIS OPEN TO SET LEFT LIMIT appears. 5. Move the pan and tilt to the desired left limit position and press the Iris Open button to set the left manual limit.
Scan Limit Stops When scan limit stops are set, the pan and tilt reverses direction during random, frame, or auto scanning when a limit stop is reached. The manual scan limit stops can be set in one of two ways: At the controller by programming presets 92 and 93 or At the controller by programming the Limit Stops menu PRESETS Refer to the documentation for your control system for programming presets, and then do the following: 1. 2. 3. 4. 5. Make sure limit stops are turned ON, then exit the menu.
LINE SYNCHRONIZATION MAIN MENU Exit Line Sync Menu Line Sync Line Sync Phase Exit On 0 If cameras are out of phase with each other, they may produce what appears to be vertical roll when switching between cameras. There are two settings for line synchronization: On – Adjust the synchronization of the power line voltage so that it is in phase with other cameras. Off – The system synchronizes to an internal clock.
LOWLIGHT LIMIT (MODELS ES30C22/ES31C22 AND ES30CBW18/ES31CBW18 ONLY) MAIN MENU Exit Camera Menu Backlight comp Zoom limit Reset camera Next Exit Next Menu Off x- - LowLight limit Shutter speed Auto focus mode Prev Exit Auto Auto This setting determines the maximum length of time the shutter will remain open automatically in low light conditions.
PARK TIME MINUTES Other Menu MAIN MENU Exit Proportional pan On Park time minutes 0 Scan Speed deg/s 25 Pattern Length 1.5 min Spd Profile 90 MPH wind Exit This feature causes the system to park at preset 1 after a programmed number of minutes of control inactivity. The time can be set from 1 minute to 720 minutes (12 hours), or it can be set to zero, which disables this feature. NOTE: Preset 1 must be programmed for the dome to park.
PATTERN LENGTH Other Menu MAIN MENU Proportional pan On Park time minutes 0 Scan Speed deg/s 25 Pattern Length 1.5 min Spd Profile 90 MPH wind Exit Exit The Esprit can do the following: One full pattern - 1.5, 3, or 6 minutes long or Two half patterns - .75, 1.5, or 3 minutes long This pattern can consist of any standard pan, tilt, or lens command. Presets, flip, and turbo are not allowed in a pattern.
POWER-UP MODE MAIN MENU Exit Power-Up Menu Power Up Default Exit This feature lets the dome resume a desired condition following power-up. The menu includes the following choices. • Default – On power-up, the system goes through a configuration cycle and stops at zero reference, showing “Configuration Done,” address, and mode settings on the screen. • Park – The system moves to preset 1 when the power-up sequence finishes.
PROPORTIONAL PAN Other Menu MAIN MENU Exit Proportional pan On Park time minutes 0 Scan Speed deg/s 25 Pattern Length 1.5 min Spd Profile 50 MPH wind Exit There are two proportional pan modes: On – Enables the proportional pan mode. The amount of zoom controls the pan and tilt. At telephoto zoom settings, the pan and tilt speeds will be slower for a given amount of joystick deflection than at wide zoom settings.
RESET CAMERA MAIN MENU Exit Camera Menu Backlight comp Zoom limit Reset camera Next Exit Off x- - Resetting the camera returns the settings to their defaults.
SCAN SPEED Other Menu MAIN MENU Exit Proportional pan On Park time minutes 0 Scan Speed deg/s 25 Pattern Length 1.5 min Spd Profile 50 MPH wind Exit The scan speed is adjustable from 1-40 degrees per second. This occurs in three scan modes: auto, random, and frame scan. To change the scan speed: 36 1. Program preset 95 (28). The main menu appears. 2. Position the cursor (>) beside Other. 3.
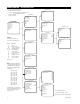
SHARPNESS MAIN MENU Exit Camera Menu Backlight comp Zoom limit Reset camera Next Exit Sharpness Menu Next Menu Off x- - LowLight limit Shutter speed Auto focus mode Prev Exit Auto Auto Auto Auto Sharpness Sharpness Exit On 13 Use the Sharpness setting to manually set the sharpness of the camera. To manually set the sharpness of the camera: 1. Program preset 95 (28). The main menu appears.
SHUTTER SPEED MAIN MENU Exit Camera Menu Backlight comp Zoom limit Reset camera Next Exit Next Menu Off x- - LowLight limit Shutter speed Auto focus mode Prev Exit Auto Auto There are several electronic shutter speed settings: Auto 1/2 1/4 1/8 1/15 1/30 1/60 1/120 1/180 1/250 1/500 1/1000 1/2000 1/4000 1/10,000 1/30,000 In the Auto setting the camera controls the shutter speed automatically.
SPEED PROFILE Other Menu MAIN MENU Exit Proportional pan On Park time minutes 0 Scan Speed deg/s 25 Pattern Length 1.5 min Spd Profile 50 MPH wind Exit This feature allows the operator to set the wind speed conditions for the location of the Esprit system. You can set two wind speed profiles of 50 mph or 90 mph in which the system will remain operational. In both settings, the pan speed will be a maximum of 40 degrees per second.
WHITE BALANCE The settings for white balance are as follows: Auto white bal R Gain B Gain To change the white balance settings: MAIN MENU Exit 40 Camera Menu Backlight comp Zoom limit Reset camera Next Exit White Balance Menu Next Menu Off x- - LowLight limit Shutter speed Auto focus mode Prev Exit 1. Program preset 95 (28). The main menu appears. 2.
WIPER MODE Wiper Menu MAIN MENU Wiper Mode Momentary Wiper Dwell 2 Wiper Time 60 Exit Exit There are three wiper settings: Wiper Mode Wiper Dwell Wiper Time To change the wiper settings: 1. Program preset 95 (28). The main menu appears. 2. Position the cursor (>) beside Wiper. 3. Press the Iris Open button to enter the Wiper menu. 4. Move the joystick up or down to position the cursor next to one of the wiper settings. 5.
ZONE BLANK Exit Zone Blank Menu Other Menu MAIN MENU Proportional pan On Park time minutes 0 Scan Speed deg/s 25 Pattern Length 1.5 min Spd Profile 90 MPH wind Exit Video Blank Zone 1 Off 2 Off 3 Off 4 Off 5 Off 6 Off 7 Off 8 Off Exit The Esprit system features onscreen programmable zone blanking. This feature lets you define any zone as blanked for video (viewing/ recording).
ZOOM Exit Az/El/Direction Other Menu MAIN MENU Proportional pan Park time minutes Scan Speed deg/s Pattern Length Spd Profile Exit On 0 25 1.5 min Set Azimuth Zero Az/El Az/El Line Direction Direction Line Zoom Zoom Line Disp Duration Exit Zoom programs the horizontal display position of the Zoom label. The following settings are available for the Zoom label: Off – Label is not displayed.
ZOOM LIMIT MAIN MENU Exit Camera Menu Backlight comp Zoom limit Reset camera Next Exit Off x- - ES30C16/ES31C16 - 16X optical zoom and 10X electronic zoom, can be set for 16X, 32X, 64X, 128X, or 160X. ES30C22/ES31C22 - 22X optical zoom and 10X electronic zoom, can be set for 22X, 32X, 88X, 176X, or 220X. ES30CBW18/ES31CBW18 - 23X optical zoom and 10X electronic zoom, can be set for 23X, 32X, 92X, 184X or 230X.
ZOOM LINE Exit Az/El/Direction Other Menu MAIN MENU Proportional pan Park time minutes Scan Speed deg/s Pattern Length Spd Profile Exit On 0 25 1.5 min Set Azimuth Zero Az/El Az/El Line Direction Direction Line Zoom Zoom Line Disp Duration Exit Zoom Line controls the vertical display position of the Zoom label. The label may be displayed on lines 3 through 10.
SPECIFICATIONS ELECTRICAL Input Voltage: Power Requirements: Heater and Defroster: Defogger: Electrical Connections: Aux 2: MECHANICAL Construction System: EWM Wall Mount: EPA Pedestal Adapter: Finish System: EWM Wall Mount: EPA Pedestal Adapter: Viewing Window: Window Viewing Area: CAMERAS Scanning System ES30C16/ES31C16 and ES30C22/ES31C22: ES30CBW18/ES31CBW18: Image Sensor: Effective Pixels ES30C16/ES31C16 NTSC: ES30C16/ES31C16 PAL: ES30C22/ES31C22 NTSC: ES30C22/ES31C22 PAL: ES30CBW18/ES31CBW18 NTSC: E
Sensitivity ES30C16/ES31C16: ES30C22/ES31C22: ES30CBW18/ES31CBW18: Synchronization System: White Balance: Shutter Speed: Iris Control: Gain Control ES30C16/ES31C16: ES30C22/ES31C22: ES30CBW18/ES31CBW18: Video Output: Signal to Noise Ratio ES30C16/ES31C16: ES30C22/ES31C22: ES30CBW18/ES31CBW18: Construction: Finish: Viewing Window: Operating Temperature: Operating Environment: Weight Unit Standard w/IOP: With Wiper and IOP: Ratings: 0.05 lux at 1/2-second shutter speed (NTSC) 0.05 lux at 1/1.
REGULATORY NOTICES This equipment has been tested and found to comply with the limits of a Class A digital device, pursuant to part 15 of the FCC rules. These limits are designed to provide reasonable protection against harmful interference when the equipment is operated in a commercial environment. This equipment generates, uses, and can radiate radio frequency energy and, if not installed and used in accordance with the instruction manual, may cause harmful interference to radio communications.
® Worldwide Headquarters 3500 Pelco Way Clovis, California 93612 USA USA & Canada Tel: 800/289-9100 Fax: 800/289-9150 International Tel: 1-559/292-1981 Fax: 1-559/348-1120 www.pelco.