
User's Manual


C1680M (1/06) 25
Mounting the Transmitter into a DF5/DF8 In-Ceiling Dome
The following procedure provides instructions to mount the FT8301A transmitter into an existing DF5/
DF8 in-ceiling dome installation.
To mount the transmitter into a DF5/DF8 in-ceiling dome, do the following:
1. Mount the DF5/DF8 bracket to the transmitter (refer to the Mounting the DF5/DF8 Bracket to
the Transmitter section).
2. Disconnect power to the DF5/DF8 dome.
3. Feed fiber optic cable through the conduit fitting of the dome into the back box.
WARNING: When routing the fiber optic cable, be careful not to bend the fiber at a
sharp angle. Doing so breaks the fiber.
4. Feed the power cable for the transmitter through the conduit fitting of the dome into the back
box.
5. Remove the lower dome from the back box.
6. Disconnect the power wires and video cable from the connectors on the camera.
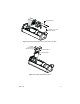
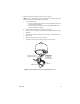
7. Using a 7/16-inch wrench, remove the tilt bracket and attached camera from the back box. To
do so, loosen the nut on the stud of the tilt bracket, and, while holding the camera securely,
remove the nut and associated flat washer and lock washer from the stud (refer to Figure 16).
NOTE: In Figure 16, the pan bracket is removed from the back box for illustration purposes only.
You do not need to remove the pan bracket from the back box.
Figure 16. Removing Tilt Bracket from DF5/DF8 In-Ceiling Dome
1/4-INCH SPLIT
LOCK WASHER
3/16-INCH
FLAT WASHER
1/4-20 HEX NUT
TILT BRACKET
PAN BRACKET
(REMOVED FROM
BACK BOX FOR
ILLUSTRATION
PURPOSES ONLY)
STUD