® HS4000 High-Security Enclosure Installation/Operation Manual C497M-D (1/96) Pelco • 3500 Pelco Way • Clovis, CA 93612-5699 • USA • www.pelco.
TABLE OF CONTENTS Section Page 1.0 WARNINGS ..................................................................................................................................... 1 2.0 SCOPE ............................................................................................................................................ 2 2.1 DESCRIPTION ...................................................................................................................... 2 3.0 INSTALLATION ..................
INSTALLATION/OPERATION MANUAL HS4000 HIGH-SECURITY ENCLOSURE 1.0 WARNINGS Prior to installation and use of this product, the following WARNINGS should be observed. 1. Installation and servicing should only be done by Qualified Service Personnel and conform to all Local codes. 2. Unless the unit is specifically marked as a NEMA Type 3, 3R, 3S, 4, 4X, 6, or 6P enclosure, it is designed for indoor use only and it must not be installed where exposed to rain and moisture. 3.
2.0 SCOPE The information contained within this manual covers the HS4000 High Security Camera Enclosure. 2.1 DESCRIPTION The HS4000 is a high-security camera enclosure designed for use with 2/3-inch cameras and will accommodate fixed focal length lenses or motorized zoom lenses with or without auto-iris operation. This enclosure has a removable rear cap for easy access to the slide-out platform on which the camera is mounted.
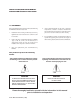
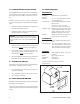
3.0 INSTALLATION 3.1 CAMERA/LENS INSTALLATION The following hardware is supplied with the enclosure and can be used to mount the enclosure or the camera/ lens: 1. Remove the four (4) “tampruf” screws from the rear cap with the tool provided. 2. Remove the rear cap from the enclosure. Loosen the bolt on the camera sled assembly and remove it from the rail. 3. Place the camera/lens on the sled assembly. Quantity 2 4 4 2 Item 1/4-20 x .
4.0 TAMPER SWITCH INSTALLATION 6.0 SPECIFICATIONS The HS4000 High-Security enclosures come standard from the factory with a tamper switch(es) mounted on the secured access door. Refer to Section 4.1 for wiring. MECHANICAL Camera Mounting: Multiple holes on camera sled Viewing Window: 1/2" (1.27 cm) thick impact and abrasion resistant Lexan Camera Size: Accommodates camera/lens combinations up to: 6.00" W x 4.75" H x 15.00" L (15.24 cm x 12.07 cm x 38.
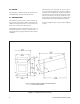
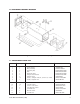
.0 EXPLODED ASSEMBLY DIAGRAM Figure 3. HS4000 Exploded Assembly Diagram 7.1 MECHANICAL PARTS LIST Item Quantity Description Part Number 1 2 3 4 5 6 7 8 9 1 1 2 1 1 2 2 10 1 Lexan window Body assembly Front/rear plate Sled Knockouts plate Tamper switch bracket Tamper switch Screws, “tampruf” #10, SS, 1/4-20 x 1/2" round Socket, “tampruf” #10 AH80001001 HS40001100WA HS40004003COMP EH40144001COMP HS40004015COMP HS30004113COMP SWI1DM401 ZH1/4-20X.
.0 WARRANTY AND RETURN INFORMATION WARRANTY RETURNS Pelco will repair or replace, without charge, any merchandise proved defective in material or workmanship for a period of one year after the date of shipment. Exceptions to this warranty are as noted below: In order to expedite parts returned to the factory for repair or credit, please call the factory at (800) 289-9100 or (559) 292-1981 to obtain an authorization number (CA number if returned for credit, and RA number if returned for repair).