
DVR - Video Recorder User Manual
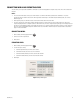


Table Of Contents
- DX4700/DX4800 Series Hybrid Video Recorder
- Contents
- List of Illustrations
- List of Tables
- Description
- Product Overview
- Operation
- Unit Startup
- Logging On and Logging Off
- Unit Shutdown
- About Basic System Defaults
- Quick Start to Working With the Unit
- Instant Recording and Playback
- PTZ in Live View
- Copying and Exporting Video
- Acknowledging an Alarm or Motion Event
- Displaying Video on the Main and Spot Monitors
- System Log List
- System Information
- Playback
- Search Video
- Formatting Media and Exporting Video
- Capturing a Video Scene
- Configuration
- Appendixes
- Appendix A: Overview of DX4700/DX4800 Setup Window and Operating Information
- Appendix B: Supported Media Devices
- Appendix C: Supported PTZ Protocols
- Appendix D: Supported IP Camera Resolutions
- Appendix E: Resolutions and Frame Rates (250 GB HDD)
- Appendix F: Troubleshooting
- Appendix G: Hardware and Software Upgrade Policy
- Appendix H: Recovering the Administrator Password
- Appendix I: Working with PTZ Devices Using the KBD300A Keyboard
- Appendix J: Factory Defaults
- Appendix K: Time Zone Conversion Chart

C4655M (2/11) 31
FORMATTING MEDIA AND EXPORTING VIDEO
The unit allows you to export data to CD/DVD or USB media. You can view and playback the exported video on the unit or at the remote client
computer.
NOTES:
• The erase and format features allow you to format media for use with the HVR. Although media can be formatted on a PC, Pelco
recommends that you format the media on the HVR to guarantee functionality. For information about formatting media, refer to Erase
Media on page 69.
• When exporting video, the start time must be set at least two minutes before the current time.
• The unit’s recorded video, time stamp is affected by different time zones. When video recorded on a HVR located in one time zone is
exported and played back on a computer located in a different time zone, the video’s original recording time adjusts and displays based on
the time zone of the playback computer. To play back exported video so its original recording time displays correctly, you must change the
time zone setting of the playback computer to match the time zone of the HVR on which the video was recorded. Refer to Date/Time on
page 61 for more information.
FORMATTING MEDIA
1. On the toolbar, click the Copy/Export button .
2. Connect or insert the export media.
3. Click Format.
EXPORTING VIDEO
1. On the toolbar, click the Copy/Export button .
2. To enter the export settings:
a. Click the Target Device box, and then select a device.
b. Click the Channel box, and select one or more channels.
c. Click the Start Date/Time box, and then select the date and time.
d. Click the End Date/Time box, and then select the date and time.
3. Click Export.
Figure 25. Export Dialog Box