
DVR - Video Recorder User Manual
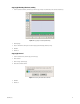


Table Of Contents
- DX4700/DX4800 Series Hybrid Video Recorder
- Contents
- List of Illustrations
- List of Tables
- Description
- Product Overview
- Operation
- Unit Startup
- Logging On and Logging Off
- Unit Shutdown
- About Basic System Defaults
- Quick Start to Working With the Unit
- Instant Recording and Playback
- PTZ in Live View
- Copying and Exporting Video
- Acknowledging an Alarm or Motion Event
- Displaying Video on the Main and Spot Monitors
- System Log List
- System Information
- Playback
- Search Video
- Formatting Media and Exporting Video
- Capturing a Video Scene
- Configuration
- Appendixes
- Appendix A: Overview of DX4700/DX4800 Setup Window and Operating Information
- Appendix B: Supported Media Devices
- Appendix C: Supported PTZ Protocols
- Appendix D: Supported IP Camera Resolutions
- Appendix E: Resolutions and Frame Rates (250 GB HDD)
- Appendix F: Troubleshooting
- Appendix G: Hardware and Software Upgrade Policy
- Appendix H: Recovering the Administrator Password
- Appendix I: Working with PTZ Devices Using the KBD300A Keyboard
- Appendix J: Factory Defaults
- Appendix K: Time Zone Conversion Chart

C4655M (2/11) 41
Copying By Weekday, Weekend, and Day
1. From the Schedule submenu, click the day you want to copy. (In Figure 31, Wednesday is the selected schedule day.)
Figure 31. Copying a Schedule by Week Day
2. Click Day Copy.
3. Right- or left-click the settings box to select a copying period: Weekday, Weekend, or Day.
4. Click OK.
5. Click Close.
Copying By Channel
1. From the Schedule menu, click the day you want to copy.
2. Click a channel.
3. Click “Ch Copy” (channel copy).
4. Click each destination channel.
Figure 32. Selecting the Destination Channels
5. Click OK.
6. Click Close.