
DVR - Video Recorder User Manual
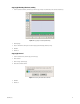


Table Of Contents
- DX4700/DX4800 Series Hybrid Video Recorder
- Contents
- List of Illustrations
- List of Tables
- Description
- Product Overview
- Operation
- Unit Startup
- Logging On and Logging Off
- Unit Shutdown
- About Basic System Defaults
- Quick Start to Working With the Unit
- Instant Recording and Playback
- PTZ in Live View
- Copying and Exporting Video
- Acknowledging an Alarm or Motion Event
- Displaying Video on the Main and Spot Monitors
- System Log List
- System Information
- Playback
- Search Video
- Formatting Media and Exporting Video
- Capturing a Video Scene
- Configuration
- Appendixes
- Appendix A: Overview of DX4700/DX4800 Setup Window and Operating Information
- Appendix B: Supported Media Devices
- Appendix C: Supported PTZ Protocols
- Appendix D: Supported IP Camera Resolutions
- Appendix E: Resolutions and Frame Rates (250 GB HDD)
- Appendix F: Troubleshooting
- Appendix G: Hardware and Software Upgrade Policy
- Appendix H: Recovering the Administrator Password
- Appendix I: Working with PTZ Devices Using the KBD300A Keyboard
- Appendix J: Factory Defaults
- Appendix K: Time Zone Conversion Chart

44 C4655M (2/11)
4. Edit the holiday recording schedule settings for the desired channel.
Figure 37. Editing a Holiday Recording Schedule
5. Click Close.
6. Click OK.
Deleting a Holiday Schedule
1. From the Schedule submenu, click the Holiday button.
2. Click List.
3. Select a holiday recording schedule, and then click Delete.
4. Click Close.
NORMAL RECORDING
NOTE: IP cameras only record in the normal recording mode.
The unit allows you to configure the following settings:
• Ch: Lists the input channels (CH 01 to CH 16) for configuration.
• Resolution: Sets the resolution for the channel. The default resolution is 352 x 240.
• Quality: Sets the picture quality of recorded video: LOWEST, LOW, STANDARD, HIGH, and HIGHEST.
• Frame Rate: Sets the frame rate.
For information about the resolution, quality, and frame rate, refer to Appendix E: Resolutions and Frame Rates (250 GB HDD) on page 75.
To configure the normal recording mode:
1. From the Camera menu, click the Normal Record submenu.
2. Click the Ch 1 Resolution box, and enter a setting.
3. Configure the remaining settings for Ch 1.
4. Repeat the previous steps (as necessary) to configure additional channels.
5. Click Close.
6. Click OK.