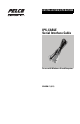
INSTALLATION/OPERATION IPS-CABLE Serial Interface Cable For use with Windows®-Based Computers C2458M-F (4/11)
C2458M-F (4/11)
Contents Description . . . . . . . . . . . . . . . . . . . . . . . . . . . . . . . . . . . . . . . . . . . . . . . . . . . . . . . . . . . . . . . . . . . . . . . . . . . Parts List. . . . . . . . . . . . . . . . . . . . . . . . . . . . . . . . . . . . . . . . . . . . . . . . . . . . . . . . . . . . . . . . . . . . . . . . User Supplied Parts List . . . . . . . . . . . . . . . . . . . . . . . . . . . . . . . . . . . . . . . . . . . . . . . . . . . . . . . . . . . .
List of Illustrations 1 2 3 4 5 6 7 4 IPS-CABLE Installation with 9-Pin Serial Connection . . . . . . . . . . . . . . . . . . . . . . . . . . . . . . . . . . . . . 7 IPS-CABLE Installation with USB Connection . . . . . . . . . . . . . . . . . . . . . . . . . . . . . . . . . . . . . . . . . . . 8 Downloader II Application Window. . . . . . . . . . . . . . . . . . . . . . . . . . . . . . . . . . . . . . . . . . . . . . . . . . . 9 PTZ Control Window . . . . . . . . . . . . . . . . . . . . . . . . . . . . .
Description The IPS-CABLE provides the serial interface between an IPS-RDPE-2 remote data port or Spectra® dome system and a Microsoft® Windows®-based computer. The interface cable transmits data for local viewing, configuration, and pan/tilt/zoom (PTZ) control of Spectra™ III, Spectra IV, Esprit®, and ExSite® Series systems. The cable can also upload revised operating software and language files to Spectra III, Spectra IV, and ExSite Series systems.
Installation To interface with a Spectra dome drive or IPS-RDPE-2 remote data port using a Windows-based computer, you must install the control/upload utility before you install the IPS-CABLE. The control/upload utility is compatible with the following operating systems: Windows 95 Windows 98 Windows ME Windows 2000 Windows XP Windows NT® with service pack 6 INSTALLING THE CONTROL/UPLOAD UTILITY 1. Insert the Resource disc into the CD drive. The main menu appears.
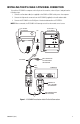
INSTALLING THE IPS-CABLE: 9-PIN SERIAL CONNECTION To install the IPS-CABLE to computers with a 9-pin serial connection, refer to Figure 1 and perform the following steps: 1. Connect a null modem cable (not supplied) to the COM1 or COM2 serial port on the computer. 2. Connect the 9-pin male connector from the IPS-CABLE (supplied) to the null modem cable. 3. Connect the IPS-CABLE to the RJ-45 port of the desired dome drive or IPS-RDPE-2.
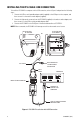
INSTALLING THE IPS-CABLE: USB CONNECTION To install the IPS-CABLE to computers with a USB connection, refer to Figure 2 and perform the following steps: 1. Connect the USB-to-serial portable adapter cable (supplied) to the USB port on the computer, and then connect it to the male-to-male adapter (supplied). 2. Connect the 9-pin male connector from the IPS-CABLE (supplied) to the male-to-male adapter, and then connect it to the USB-to-serial portable adapter cable. 3.
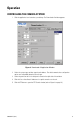
Operation CONTROLLING THE CAMERA SYSTEM 1. Click the application icon located on your desktop. The Downloader II window appears. Figure 3. Downloader II Application Window 2. Select the system type, and then type the unit address. The valid communication configuration options are configurable based on the unit type. 3. Select the port from the list of valid ports located on the right side of the window. 4. Click the Fast or Auto Baud + Id buttons for a quick connection to the unit. 5.
PTZ CONTROL MENU The PTZ Control window contains the following buttons (refer to Figure 4): Directional buttons/sliders: • The directional buttons (Up, Down, Left, Right, and Stop), located in the middle of the window, control the pan and tilt function. • Alternatively, you can control the pan and tilt function using the sliders, which are located to the right and beneath the directional buttons. Open/Close: Sends a command to the camera to open or close the Iris.
UPLOADING THE SOFTWARE (SPECTRA III, SPECTRA IV, AND EXSITE SYSTEMS ONLY) The following system software must be installed to upload software using the IPS-RDPE-2 remote data port: • Spectra III and Spectra IV dome drives: Require version 1.2 or later. • ExSite explosionproof system: Requires version 1.13 or later. • Esprit system: Software cannot be uploaded to an Esprit system. To upload software: 1. Click the application icon located on your desktop. 2. Insert the Resource disc into the CD drive. 3.
4. Select the file you want to download from the list. Figure 6.
Once selected, the file is downloaded to the unit and status information appears in the Download window. Figure 7. Download Window 5. Wait until the Configure Done message appears before disconnecting the IPS-CABLE. WARNING: To prevent damage to the system, never cycle power or attempt control of the system during the upload process. The upload process is not complete until the system reboots and the Configure Done message appears.
REVISION HISTORY Manual # C2458M C2458M-A C2458M-B C2458M-C C2458M-D C2458M-E C2458M-F Date 7/02 4/03 1/04 8/04 7/05 10/06 4/11 Comments Original version. Added IPS-RDPE-2 and Esprit information. Revised per ECO 93-9497 for software revision. Added COM2 port to PC section per ECO 04-9702. Added ExSite system information. Made references to Spectra more generic by removing series numbers. Added RoHS label.
PRODUCT WARRANTY AND RETURN INFORMATION WARRANTY Pelco will repair or replace, without charge, any merchandise proved defective in material or workmanship for a period of one year after the date of shipment.
www.pelco.