
User's Manual

This document describes how to replace a failed system or CPU fan in a NSM5200 Series network system manager (NSM) or a DAS5200 Series
direct attached storage (DAS).
MODELS
NSM5200-FAN System fan replacement for the NSM5200
NSM5200-FANB Rear chassis fan replacement for the NSM5200
DAS5200-FAN System fan replacement for the DAS5200
REPLACING A SYSTEM FAN
The NSM5200 and the DAS5200 each have four system fans that are located in the middle of the unit. These fans are hot-swappable and can be replaced
without turning the unit off and without pulling the unit completely out of the rack. A red indicator light shows the failed fan.
NOTE: When the unit is pulled out to replace a system fan, make sure that all cables connected to the unit are long enough to avoid being disconnected.
1. To release the unit from the rack, turn the two captive thumbscrews on the rack counterclockwise to loosen them.
2. Gently slide the unit toward you until it stops.
3. Remove the two screws from the appropriate system fan cover; set the screws aside.
4. Open the system fan cover.
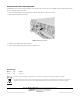
5. Pinch the latches on either side of the failed fan, and pull the fan out of the slot.
Figure 1. Replacing a System Fan
6. Gently slide the replacement fan into the empty slot. Make sure that the latches on the new fan are engaged and the fan is seated properly.
7. Close the system fan cover and replace the screws.
8. Slide the NSM5200 back into the rack.
9. Turn the captive thumbscrews clockwise to tighten them.
INSTALLATION
Endura
®
NSM5200/DAS5200 Series
Fan Replacement
C4612M (10/09)